安装
安装gcc g++的依赖库
1
2
apt-get install build-essential apt-get install libtool
安装pcre依赖库
1
2
sudo apt-get update sudo apt-get install libpcre3 libpcre3-dev
安装zlib依赖库
1 apt-get install zlib1g-dev
安装ssl依赖库
安装nginx
1
2
3
4
5
6
7
8
9
10
11
12
./configure --prefix=/usr/local/nginx make # 注意:这里可能会报错,提示“pcre.h No such file or directory”,具体详见:http://stackoverflow.com/questions/22555561/error-building-fatal-error-pcre-h-no-such-file-or-directory # 需要安装 libpcre3-dev,命令为:sudo apt-get install libpcre3-dev sudo make install # 启动nginx: sudo /usr/local/nginx/sbin/nginx -c /usr/local/nginx/conf/nginx.conf # 注意:-c 指定配置文件的路径,不加的话,nginx会自动加载默认路径的配置文件,可以通过 -h查看帮助命令。 # 查看nginx进程: ps -ef|grep nginx # 重启 sudo ./sbin/nginx -s reload
配置
在conf目录下新建一个ihasy.conf文件
1
2
3
4
5
6
7
8
9
10
11
12
13
14
15
16
17
18
19
20
21
22
23
24
25
26
27
28
29
30
31
32
33
upstream ihasy { server 127.0.0.1:9001; #Tornado } ## Start www.ihasy.com ## server { listen 80; server_name www.ihasy.com ihasy.com; #root html; #index index.html index.htm index.py index; ## send request back to Tornado ## location / { proxy_pass http://ihasy; #Proxy Settings proxy_redirect off; proxy_set_header Host $host; proxy_set_header X-Real-IP $remote_addr; proxy_set_header X-Forwarded-For $proxy_add_x_forwarded_for; proxy_next_upstream error timeout invalid_header http_500 http_502 http_503 http_504; proxy_max_temp_file_size 0; proxy_connect_timeout 90; proxy_send_timeout 90; proxy_read_timeout 90; proxy_buffer_size 4k; proxy_buffers 4 32k; proxy_busy_buffers_size 64k; proxy_temp_file_write_size 64k; } } ## End www.ihasy.com ##
在nginx.conf中添加include ihasy.conf,保存,重启nginx,即可实现反向代理。
nginx.conf中默认配置
1
2
3
4
5
6
7
8
9
10
11
12
13
14
15
16
17
18
19
20
21
22
23
24
25
26
27
28
29
30
31
32
33
34
35
36
37
38
39
40
41
42
43
44
45
46
47
48
49
50
51
52
53
54
55
56
57
58
59
60
61
62
63
64
65
66
67
68
69
70
71
72
73
74
75
76
77
78
79
80
81
82
83
84
85
86
87
88
89
90
91
92
93
94
95
96
97
98
99
100
101
102
103
104
105
106
107
108
109
110
111
112
113
114
user root; worker_processes 1; #error_log logs/error.log; #error_log logs/error.log notice; #error_log logs/error.log info; #pid logs/nginx.pid; events { worker_connections 1024; } http { include mime.types; default_type application/octet-stream; #log_format main '$remote_addr - $remote_user [$time_local] "$request" ' # '$status $body_bytes_sent "$http_referer" ' # '"$http_user_agent" "$http_x_forwarded_for"'; #access_log logs/access.log main; sendfile on; #tcp_nopush on; #keepalive_timeout 0; keepalive_timeout 65; #gzip on; server { listen 80; server_name localhost; #charset koi8-r; #access_log logs/host.access.log main; location / { root html; index index.html index.htm; } #error_page 404 /404.html; # redirect server error pages to the static page /50x.html # error_page 500 502 503 504 /50x.html; location = /50x.html { root html; } # proxy the PHP scripts to Apache listening on 127.0.0.1:80 # #location ~ \.php$ { # proxy_pass http://127.0.0.1; #} # pass the PHP scripts to FastCGI server listening on 127.0.0.1:9000 # #location ~ \.php$ { # root html; # fastcgi_pass 127.0.0.1:9000; # fastcgi_index index.php; # fastcgi_param SCRIPT_FILENAME /scripts$fastcgi_script_name; # include fastcgi_params; #} # deny access to .htaccess files, if Apache's document root # concurs with nginx's one # #location ~ /\.ht { # deny all; #} } # another virtual host using mix of IP-, name-, and port-based configuration # #server { # listen 8000; # listen somename:8080; # server_name somename alias another.alias; # location / { # root html; # index index.html index.htm; # } #} # HTTPS server # #server { # listen 443 ssl; # server_name localhost; # ssl_certificate cert.pem; # ssl_certificate_key cert.key; # ssl_session_cache shared:SSL:1m; # ssl_session_timeout 5m; # ssl_ciphers HIGH:!aNULL:!MD5; # ssl_prefer_server_ciphers on; # location / { # root html; # index index.html index.htm; # } #} }
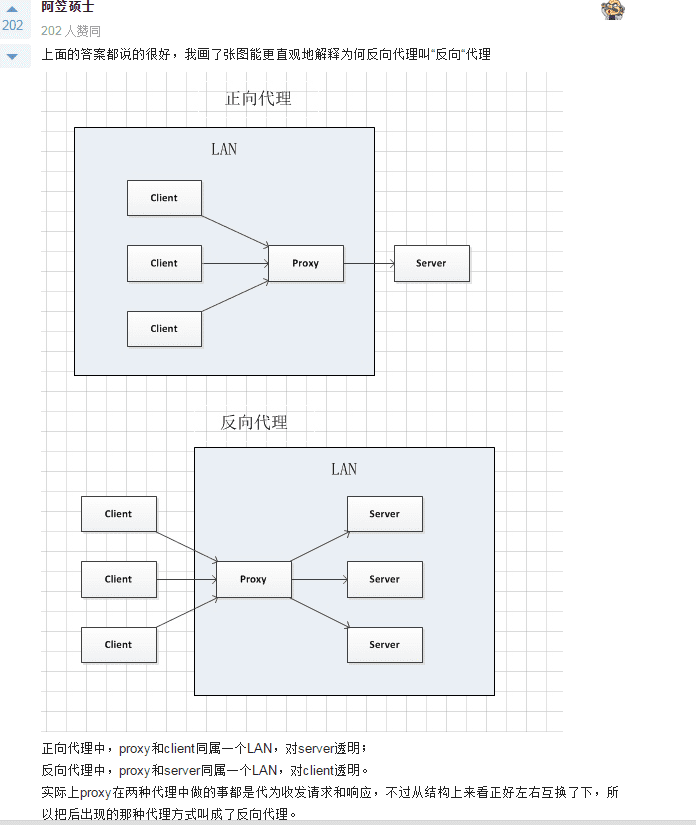
概述 正向代理和反向代理 正向代理:是一个位于客户端和原始服务器(origin server)之间的服务器,为了从原始服务器取得内容,客户端向代理发送一个请求并指定目标(原始服务器),然后代理向原始服务器转交请求并将获得的内容返回给客户端。客户端必须要进行一些特别的设置才能使用正向代理。
正向代理的用途:
访问原来无法访问的资源,如google
可以做缓存,加速访问资源
对客户端访问授权,上网进行认证
代理可以记录用户访问记录(上网行为管理),对外隐藏用户信息
反向代理(Reverse Proxy)实际运行方式是指以代理服务器来接受internet上的连接请求,然后将请求转发给内部网络上的服务器,并将从服务器上得到的结果返回给internet上请求连接的客户端,此时代理服务器对外就表现为一个服务器。
反向代理的作用:
保证内网的安全,可以使用反向代理提供WAF功能,阻止web攻击
负载均衡,通过反向代理服务器来优化网站的负载
事件驱动 Nginx之所以能同时处理大量的请求,原因在于它采用了十分巧妙的事件驱动机制。
作为一个Web服务器,要同时处理多个请求,不可避免地要面对这么一个问题,如何同时处理像磁盘和网络等等的I/O请求,即如何实现I/O复用。为了解决该问题,操作系统在很久之前就开始提供诸如“select”、“poll”等系统调用。Apache HTTP的多处理模块(MPM,multi-processing module)就会用到这些系统调用。但是,select/poll为了识别出哪些文件或者socket已经准备就绪,必须将所有已注册的文件描述符(fd)一个个地检查一遍。如果注册列表越长,那么每次的扫描所需的时间也越长。而Nginx的I/O复用机制使用的是“epoll”这个基于事件驱动的系统调用。因为epoll会在系统内核管理和监听这些文件描述符(fd),并自动把就绪的加入到Ready队列当中。所以,程序只需在需要时往Ready队列中取出一个进行处理即可,而不用切换到内核态,然后一个个地检查,然后又切换回用户态。这样,无论需要注册监听的I/O有多少,都不会影响程序的运行效率。为了避免select/poll带来的线性增长的负担,Apache HTTP必须将这些IO分散到各个进程/线程中处理,这样势必会造成占用内存的增长。但是,Nginx可以通过利用“epoll”,保证可以使用一个进程/线程完成所有请求的处理,这样可以大大减少内存的占用,从而使应对上万并发请求成为可能。
配置 location 语法规则: location [=||*|^~] /uri/ { … }
= 开头表示精确匹配
^~ 开头表示uri以某个常规字符串开头,理解为匹配 url路径即可。nginx不对url做编码,因此请求为/static/20%/aa,可以被规则^~ /static/ /aa匹配到(注意是空格)。一旦匹配成功,那么 Nginx 就停止去寻找其他的 Location 块进行匹配了(其他可能没有这个特性)
~ 开头表示区分大小写的正则匹配
~* 开头表示不区分大小写的正则匹配
!和!*分别为区分大小写不匹配及不区分大小写不匹配 的正则
/ 通用匹配,任何请求都会匹配到。
多个location配置的情况下匹配顺序为:首先匹配 =,其次匹配^~, 其次是按文件中顺序的正则匹配,最后是交给 / 通用匹配。当有匹配成功时候,停止匹配,按当前匹配规则处理请求。
1
2
3
4
5
6
7
8
9
10
11
12
13
14
15
16
17
18
19
20
21
22
23
24
location = / { #规则A } location = /login { #规则B } location ^~ /static/ { #规则C } location ~ \.(gif|jpg|png|js|css)$ { #规则D } location ~* \.png$ { #规则E } location !~ \.xhtml$ { #规则F } location !~* \.xhtml$ { #规则G } location / { #规则H }
那么产生的效果如下:
1
2
3
4
5
6
7
8
9
10
11
12
13
14
15
16
17
18
19
20
21
22
#直接匹配网站根,通过域名访问网站首页比较频繁,使用这个会加速处理,官网如是说。 #这里是直接转发给后端应用服务器了,也可以是一个静态首页 # 第一个必选规则 location = / { proxy_pass http://tomcat:8080/index } # 第二个必选规则是处理静态文件请求,这是nginx作为http服务器的强项 # 有两种配置模式,目录匹配或后缀匹配,任选其一或搭配使用 location ^~ /static/ { root /webroot/static/; } location ~* \.(gif|jpg|jpeg|png|css|js|ico)$ { root /webroot/res/; } #第三个规则就是通用规则,用来转发动态请求到后端应用服务器 #非静态文件请求就默认是动态请求,自己根据实际把握 #毕竟目前的一些框架的流行,带.php,.jsp后缀的情况很少了 location / { proxy_pass http://tomcat:8080/ }
handler filter upstream 基本配置 负载均衡配置:
1
2
3
4
5
6
7
8
9
10
upstream linuxidc { server 10.0.6.108:7080; server 10.0.0.85:8980; } location / { root html; index index.html index.htm; proxy_pass http://linuxidc; }
weight(权重) 1 2 3 4 upstream linuxidc { server 10.0.0.77 weight=5; server 10.0.0.88 weight=10; }
ip_hash(访问ip) 每一个请求按訪问ip的hash结果分配。这样每一个訪客固定訪问一个后端服务器,能够解决session的问题。
1 2 3 4 5 upstream favresin { ip_hash; server 10.0.0.10:8080; server 10.0.0.11:8080; }
url_hash(第三方) 按访问url的hash结果来分配请求,使每一个url定向到同一个后端服务器。后端服务器为缓存时比較有效。注意:在upstream中加入hash语句。server语句中不能写入weight等其他的參数,hash_method是使用的hash算法。
1 2 3 4 5 6 upstream resinserver { server 10.0.0.10:7777; server 10.0.0.11:8888; hash $request_uri; hash_method crc32; }
fair(第三方) 按后端服务器的响应时间来分配请求。响应时间短的优先分配,与weight分配策略相似。
1 2 3 4 5 upstream favresin { server 10.0.0.10:8080; server 10.0.0.11:8080; fair; }
其他 upstream还能够为每一个设备设置状态值,这些状态值的含义分别例如以下:
down 表示单前的server临时不參与负载.
weight 默觉得1.weight越大,负载的权重就越大。
max_fails :同意请求失败的次数默觉得1.当超过最大次数时,返回proxy_next_upstream 模块定义的错误.
fail_timeout : max_fails次失败后。暂停的时间。
backup: 其他全部的非backup机器down或者忙的时候,请求backup机器。所以这台机器压力会最轻。
1 2 3 4 5 6 7 upstream bakend{ #定义负载均衡设备的Ip及设备状态 ip_hash; server 10.0.0.11:9090 down; server 10.0.0.11:8080 weight=2; server 10.0.0.11:6060; server 10.0.0.11:7070 backup; }
虚拟主机配置 概述 通常情况下,为了使每个服务器可以供更多用户使用,可以将一个服务器分为很多虚拟的子服务器,每个子服务器是相互独立的.这些服务器是根据虚拟化技术分出来的,这样,一台服务器可以虚拟成很多台子服务器,叫做虚拟主机.nginx下,一个server标签就是一个虚拟主机。
配置方法:
基于域名的虚拟主机,通过域名来区分虚拟主机——应用:外部网站
基于端口的虚拟主机,通过端口来区分虚拟主机——应用:公司内部网站,外部网站的管理后台
基于ip的虚拟主机,几乎不用。
基于域名 1 2 3 4 5 6 7 8 9 10 11 12 server { listen 80; server_name www.yong.com; index index.html; root /data/www; } server { listen 80; server_name bbs.yong.com; index index.html; root /data/bbs; }
基于端口 1 2 3 4 5 6 7 8 9 10 server { listen 8000; server_name www.yong.com; root /data/www; } server { listen 8001; server_name www.yong.com; root /data/bbs; }
基于ip地址 1 2 3 4 5 6 7 8 9 10 server { listen 192.168.20.20:80; server_name www.yong.com; root /data/www; } server { listen 192.168.20.21:80; server_name www.yong.com; root /data/bbs; }
正向代理 nginx实现代理上网,有三个关键点必须注意,其余的配置跟普通的nginx一样\
增加dns解析resolver
增加无server_name名的server
proxy_pass指令
电脑配置配置文件中的地址和端口为代理地址和端口
1 2 3 4 5 6 7 8 9 10 11 12 13 14 15 16 17 18 user www; worker_processes 1; error_log /var/log/nginx/error.log debug; events { use epoll; worker_connections 1024; } http { resolver 8.8.8.8; server { listen 8088; location / { proxy_pass http://$http_host$request_uri; } } }
反向代理 反向代理,外部机器通过网关访问网关后面服务器上的内容,网关起到了反向代理的功能,我们平时通过浏览器访问远程的web服务器大都是这样实现的。
nginx反向代理的指令不需要新增额外的模块,默认自带proxy_pass指令,只需要修改配置文件就可以实现反向代理。配置前的准备工作:后端run apache服务的ip和端口,确保可以通过http://ip:port能访问到自己的网站 .
添加配置文件:
1 2 3 4 5 6 7 8 9 10 11 12 13 14 15 16 17 18 19 20 21 22 23 24 25 26 27 28 29 30 31 32 33 upstream apachephp { server ip:8080; #Apache } server { listen 80; server_name www.quancha.cn; access_log logs/quancha.access.log main; error_log logs/quancha.error.log; root html; index index.html index.htm index.php; ## send request back to apache ## location / { proxy_pass http://apachephp; #Proxy Settings proxy_redirect off; proxy_set_header Host $host; proxy_set_header X-Real-IP $remote_addr; proxy_set_header X-Forwarded-For $proxy_add_x_forwarded_for; proxy_next_upstream error timeout invalid_header http_500 http_502 http_503 http_504; proxy_max_temp_file_size 0; proxy_connect_timeout 90; proxy_send_timeout 90; proxy_read_timeout 90; proxy_buffer_size 4k; proxy_buffers 4 32k; proxy_busy_buffers_size 64k; proxy_temp_file_write_size 64k; } }
部署SpringBoot Nginx配置:
1
2
3
4
5
6
location / { proxy_pass http://localhost:8080; proxy_set_header X-Forwarded-For $proxy_add_x_forwarded_for; proxy_set_header X-Forwarded-Proto $scheme; proxy_set_header X-Forwarded-Port $server_port; }
SpringBoot的配置文件中配置:
1
2
3
4
5
6
7
server: tomcat: remote-ip-header: x_forwarded_for protocol-header: x-forwarded-proto port-header: X-Forwarded-Port use-forward-headers: true address: 127.0 .0 .1
其他 映射本地文件夹 配置如下:
1
2
3
4
location /hearing { autoindex on; root /home/hearing/Downloads/; }
通过nginx -s reload重新载入配置,可以在localhost:80/hearing/访问到/home/hearing/Downloads/hearing/下的文件。