OpenGL ES 版本要求 - 如果应用需要特定版本的 OpenGL ES,则必须通过将以下设置添加到 Manifest 中来声明该要求,如下所示。
1
2
3
4
5
6
<!-- Tell the system this app requires OpenGL ES 2.0. --> <uses-featureandroid:glEsVersion="0x00020000"android:required="true" /> <!-- Tell the system this app requires OpenGL ES 3.0. --> <uses-featureandroid:glEsVersion="0x00030000"android:required="true" /> <!-- Tell the system this app requires OpenGL ES 3.1. --> <uses-featureandroid:glEsVersion="0x00030001"android:required="true" />
init { // Create an OpenGL ES 2.0 context setEGLContextClientVersion(2) renderer = MyGLRenderer() setRenderer(renderer) // 该设置可防止系统在调用 requestRender() 之前重新绘制 GLSurfaceView 帧,更为高效。 // Render the view only when there is a change in the drawing data renderMode = GLSurfaceView.RENDERMODE_WHEN_DIRTY } }
classMyGLRenderer : GLSurfaceView.Renderer {
overridefunonSurfaceCreated(unused: GL10, config: EGLConfig) { // Set the background frame color GLES20.glClearColor(0.0f, 0.0f, 0.0f, 1.0f) }
overridefunonDrawFrame(unused: GL10) { // Redraw background color GLES20.glClear(GLES20.GL_COLOR_BUFFER_BIT) }
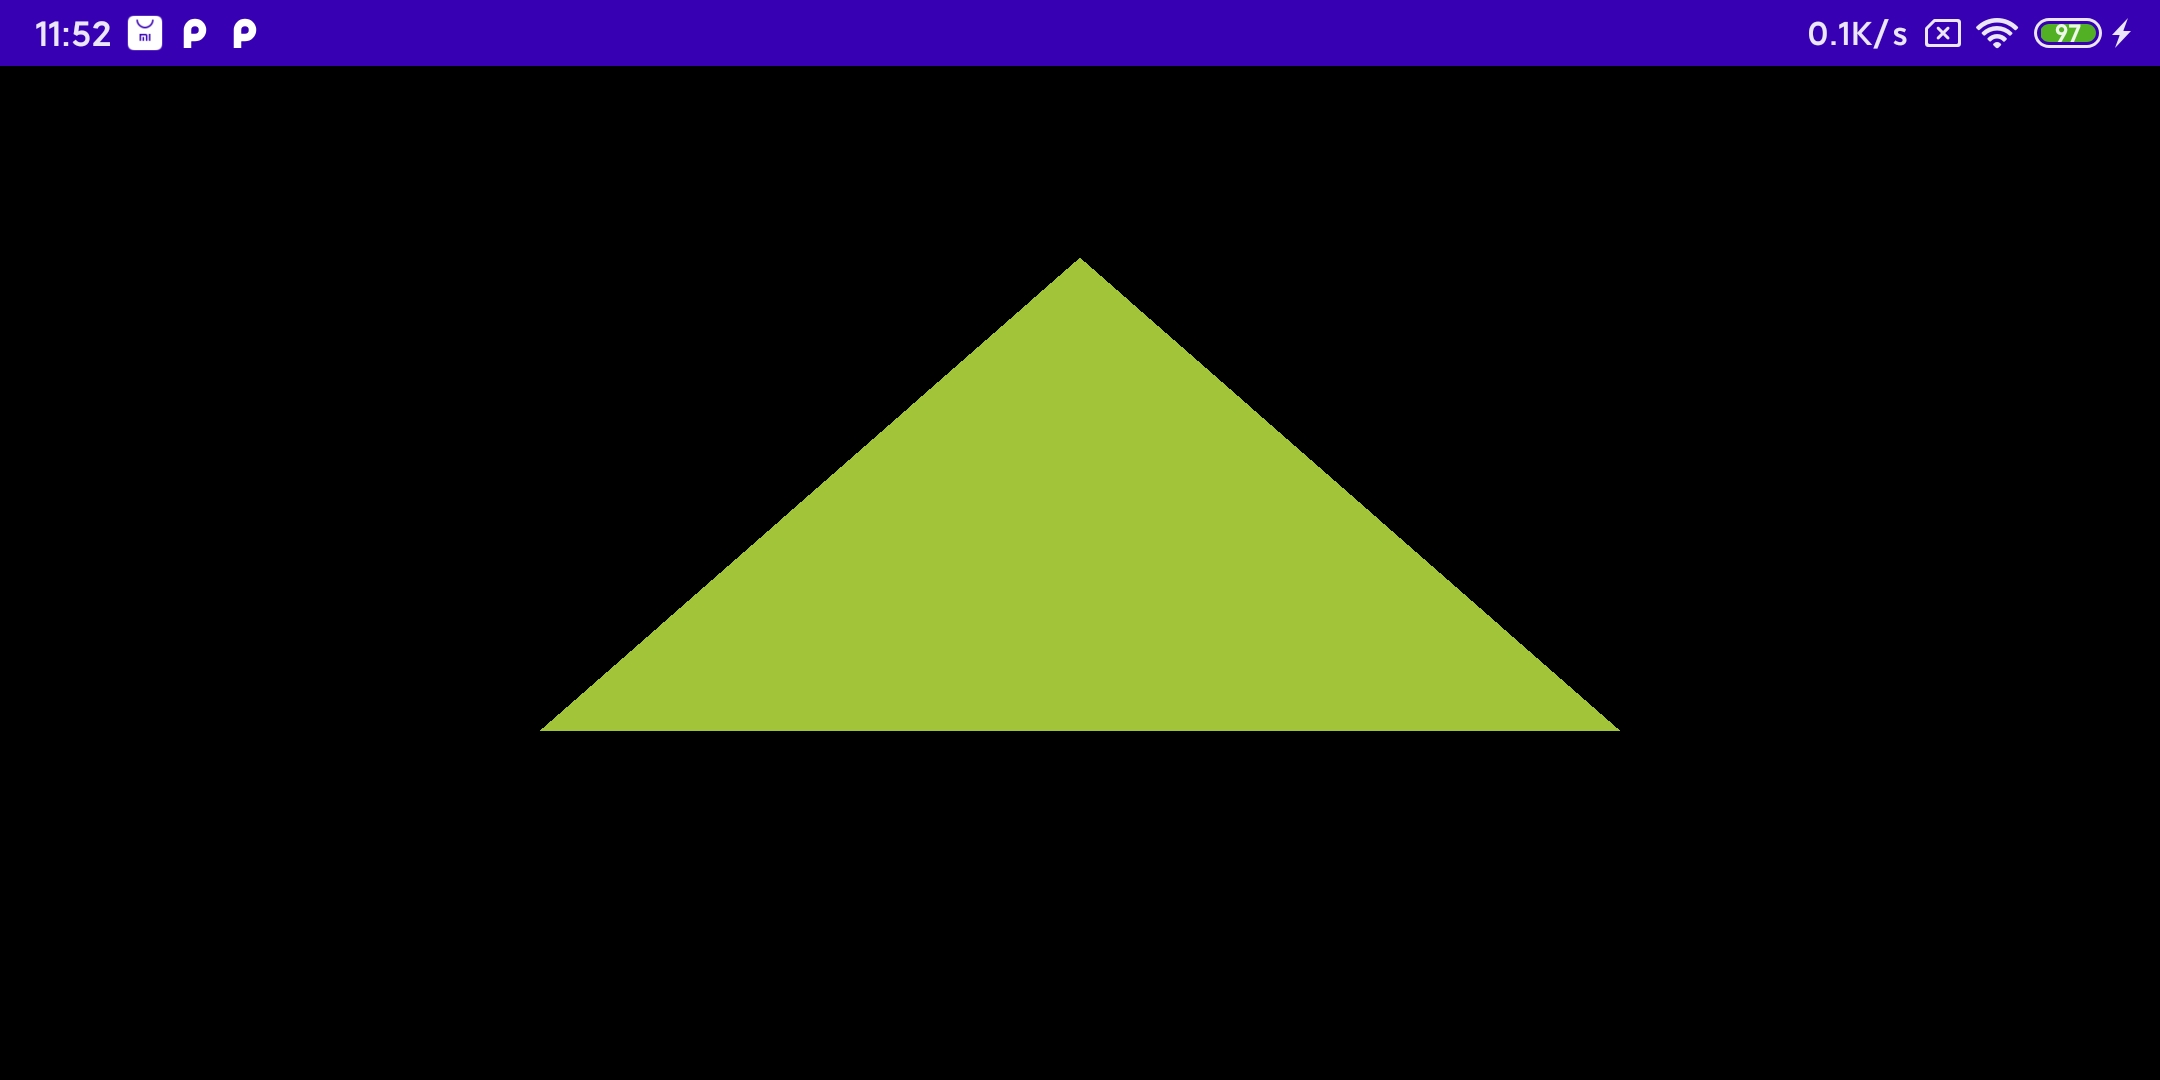
// number of coordinates per vertex in this array constval COORDS_PER_VERTEX = 3 var triangleCoords = floatArrayOf( // in counterclockwise order: 0.0f, 0.622008459f, 0.0f, // top -0.5f, -0.311004243f, 0.0f, // bottom left 0.5f, -0.311004243f, 0.0f// bottom right )
classTriangle{
// Set color with red, green, blue and alpha (opacity) values val color = floatArrayOf(0.63671875f, 0.76953125f, 0.22265625f, 1.0f)
// (number of coordinate values * 4 bytes per float) privatevar vertexBuffer: FloatBuffer = ByteBuffer.allocateDirect(triangleCoords.size * 4).run { // use the device hardware's native byte order order(ByteOrder.nativeOrder())
// create a floating point buffer from the ByteBuffer asFloatBuffer().apply { // add the coordinates to the FloatBuffer put(triangleCoords) // set the buffer to read the first coordinate position(0) } } }
定义方形
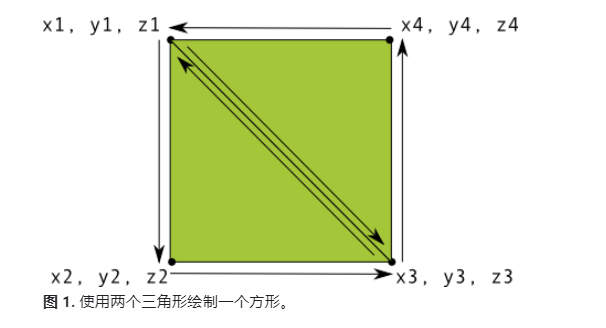
有多种方式可以定义方形,但在 OpenGL ES 中绘制此类形状的典型方式是使用两个绘制在一起的三角形:
// number of coordinates per vertex in this array constval COORDS_PER_VERTEX = 3 var squareCoords = floatArrayOf( -0.5f, 0.5f, 0.0f, // top left -0.5f, -0.5f, 0.0f, // bottom left 0.5f, -0.5f, 0.0f, // bottom right 0.5f, 0.5f, 0.0f// top right )
classSquare2{
privateval drawOrder = shortArrayOf(0, 1, 2, 0, 2, 3) // order to draw vertices
着色程序包含 OpenGL 着色语言 (GLSL) 代码,必须先对其进行编译,然后才能在 OpenGL ES 环境中使用。要编译此代码,可以在渲染程序类中创建一个实用程序方法:
1
2
3
4
5
6
7
8
9
10
11
funloadShader(type: Int, shaderCode: String): Int {
// create a vertex shader type (GLES20.GL_VERTEX_SHADER) // or a fragment shader type (GLES20.GL_FRAGMENT_SHADER) return GLES20.glCreateShader(type).also { shader ->
// add the source code to the shader and compile it GLES20.glShaderSource(shader, shaderCode) GLES20.glCompileShader(shader) } }
要绘制形状,必须编译着色程序代码,将它们添加到 OpenGL ES 程序对象中,然后关联该程序。该操作需要在绘制对象的构造函数中完成,因此只需执行一次。
init { val vertexShader: Int = loadShader(GLES20.GL_VERTEX_SHADER, vertexShaderCode) val fragmentShader: Int = loadShader(GLES20.GL_FRAGMENT_SHADER, fragmentShaderCode)
// create empty OpenGL ES Program mProgram = GLES20.glCreateProgram().also {
// add the vertex shader to program GLES20.glAttachShader(it, vertexShader)
// add the fragment shader to program GLES20.glAttachShader(it, fragmentShader)
// creates OpenGL ES program executables GLES20.glLinkProgram(it) } } }
此时可以添加绘制形状的实际调用,使用 OpenGL ES 绘制形状时需要指定多个参数,以告知渲染管道要绘制的形状以及如何进行绘制。由于绘制选项因形状而异,因此最好使形状类包含自身的绘制逻辑。
创建用于绘制形状的 draw() 方法,此代码将位置和颜色值设置为形状的顶点着色程序和 Fragment 着色程序,然后执行绘制功能。
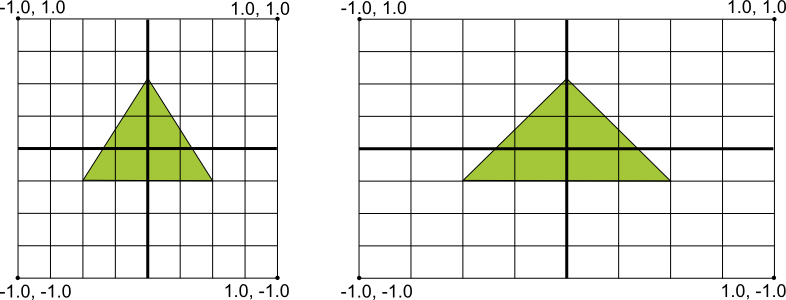
val ratio: Float = width.toFloat() / height.toFloat()
// this projection matrix is applied to object coordinates // in the onDrawFrame() method Matrix.frustumM(projectionMatrix, 0, -ratio, ratio, -1f, 1f, 3f, 7f) }
classTriangle{ privateval vertexShaderCode = // This matrix member variable provides a hook to manipulate // the coordinates of the objects that use this vertex shader "uniform mat4 uMVPMatrix;" + "attribute vec4 vPosition;" + "void main() {" + // the matrix must be included as a modifier of gl_Position // Note that the uMVPMatrix factor *must be first* in order // for the matrix multiplication product to be correct. " gl_Position = uMVPMatrix * vPosition;" + "}"
// Use to access and set the view transformation privatevar vPMatrixHandle: Int = 0 }
overridefunonDrawFrame(gl: GL10) { val scratch = FloatArray(16)
// ...
// Create a rotation transformation for the triangle val time = SystemClock.uptimeMillis() % 4000L val angle = 0.090f * time.toInt() Matrix.setRotateM(rotationMatrix, 0, angle, 0f, 0f, -1.0f)
// Combine the rotation matrix with the projection and camera view // Note that the vPMatrix factor *must be first* in order // for the matrix multiplication product to be correct. Matrix.multiplyMM(scratch, 0, vPMatrix, 0, rotationMatrix, 0)
classMyGLSurfaceView(context: Context) : GLSurfaceView(context) { init { // Render the view only when there is a change in the drawing data. // To allow the triangle to rotate automatically, this line is commented out: //renderMode = GLSurfaceView.RENDERMODE_WHEN_DIRTY } }
overridefunonTouchEvent(e: MotionEvent): Boolean { // MotionEvent reports input details from the touch screen // and other input controls. In this case, you are only // interested in events where the touch position changed.
val x: Float = e.x val y: Float = e.y
when (e.action) { MotionEvent.ACTION_MOVE -> {
var dx: Float = x - previousX var dy: Float = y - previousY
// reverse direction of rotation above the mid-line if (y > height / 2) { dx *= -1 }
// reverse direction of rotation to left of the mid-line if (x < width / 2) { dy *= -1 }
overridefunonDrawFrame(gl: GL10) { // ... val scratch = FloatArray(16)
// Create a rotation for the triangle // long time = SystemClock.uptimeMillis() % 4000L; // float angle = 0.090f * ((int) time); Matrix.setRotateM(rotationMatrix, 0, angle, 0f, 0f, -1.0f)
// Combine the rotation matrix with the projection and camera view // Note that the mvpMatrix factor *must be first* in order // for the matrix multiplication product to be correct. Matrix.multiplyMM(scratch, 0, mvpMatrix, 0, rotationMatrix, 0)