Activity
生命周期
看一下以下操作:
1 | // 程序启动 |
各个生命周期的作用:
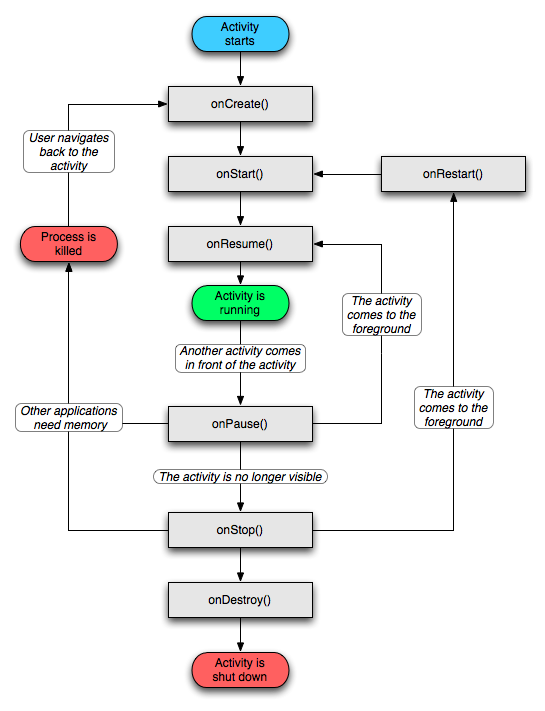
- onCreate: Activity
已创建状态,在 Activity 的整个生命周期中只发生一次,用来进行 Activity 的一些初始化工作。 - onStart: 为 Activity 可见做准备工作,此时还不在前台。
- onResume: Activity 进入前台,对用户可见了。
- onPause: 将要离开 Activity, 此时 Activity 依旧可见。可以做一些轻量级数据存储任务,因为在跳转 Activity 时只有当一个 Activity 执行完了 onPause 方法后另一个 Activity 才会启动。
- onStop: 此时 Activity 已经不可见了,但是 Activity 对象还在内存中,在此可以做一些资源回收操作。
- onDestroy: Activity 被销毁。
关于 onRestoreInstanceState 和 onSaveInstanceState 方法:
- onSaveInstanceState 在 onStop 后被调用;
- onRestoreInstanceState 在 onStart 后被调用;
在 Activity 中有一个属性 — View mDecor, 在 PhoneWindow 中有一个属性 — DecorView mDecor,在 handleResumeActivity 方法中,会把 PhoneWindow 中的 mDecor 赋值给 Activity.mDecor。
启动方式
standard
standard 是 Activity 默认的启动模式。在 standard 模式下,每启动一个 Activity 都会创建一个新的实例进入任务栈栈顶。
singleTop
singleTop 模式与 standard 类似,不同的是当启动的 Activity 已经位于栈顶时,则直接使用它不创建新的实例,此时栈顶的 Activity 实例会调 onNewIntent 方法。如果启动的 Activity 没有位于栈顶时,则创建一个新的实例位于栈顶。
singleTask
当 Activity 的启动模式指定为 singleTask,每次启动该 Activity 时,系统首先会检查栈中是否存在该 Activity 的实例,如果发现已经存在则直接使用该实例,此时栈顶的 Activity 实例会调 onNewIntent 方法,并将当前 Activity 之上的所有 Activity 出栈,如果没有发现则创建一个新的实例。
singleInstance
在程序开发过程中,如果需要 Activity 在整个系统中都只有一个实例,这时就需要用到 singleInstance 模式。指定为 singleInstance 模式的 Activity 会启动一个新的任务栈来管理这个 Activity。
singleInstance模式加载Activity时,无论从哪个任务栈中启动该Activity,只会创建一个Activity实例,并且会使用一个全新的任务栈来装载该Activity实例。采用这种模式启动Activity会分为一下两种情况:
- 如果要启动的Activity不存在,系统会创建一个新的任务栈,在创建该Activity的实例,并把该Activity加入栈顶.
- 如果要启动的Activity已经存在,无论位于哪个应用程序或者哪个任务栈中,系统都会把该Activity所在的任务栈转到前台,从而使该Activity显示出来。
taskAffinity
概述
每个Activity都有taskAffinity属性,这个属性指出了它希望进入的Task。如果一个Activity没有显式的指明该Activity的taskAffinity,那么它的这个属性就等于Application指明的taskAffinity,如果Application也没有指明,那么该taskAffinity的值就等于包名。而Task也有自己的affinity属性,它的值等于它的根Activity的taskAffinity的值。
allowTaskReparenting
如果该Activity的allowTaskReparenting设置为true,它进入后台,当一个和它有相同affinity的Task进入前台时,它会重新宿主,进入到该前台的task中。
| Application | Activity | taskAffinity | allowTaskReparenting |
|---|---|---|---|
| application1 | Activity1 | com.winuxxan.affinity | true |
| application2 | Activity2 | com.winuxxan.affinity | false |
创建两个工程:application1和application2,分别含有Activity1和Activity2,它们的taskAffinity相同,Activity1的allowTaskReparenting为true。
首先,我们启动application1,加载Activity1,然后按Home键,使该task(假设为task1)进入后台。然后启动application2,默认加载Activity2。本来应该是显示Activity2,但是我们却看到了Activity1。实际上Activity2也被加载了,只是Activity1重新宿主,所以看到了Activity1。
FLAG_ACTIVITY_NEW_TASK
如果加载某个Activity的intent,Flag被设置成FLAG_ACTIVITY_NEW_TASK时,它会首先检查是否存在与自己taskAffinity相同的Task,如果存在,那么它会直接宿主到该Task中,如果不存在则重新创建Task。
写一个应用,包含两个Activity:Activity1的taskAffinity为com.hearing.task,Activity2为入口,且点击Activity2会以FLAG_ACTIVITY_NEW_TASK启动Activity1。再写一个应用MyActivity,它包含一个Activity(MyActivity),其taskAffinity为com.hearing.task。
首先启动MyActivity,然后Home回桌面,然后打开Activity2,点击Activity2,进入Activity1。然后按返回键。进入Activity的顺序为Activity2->Activity1,而返回时顺序为Activity1->MyActivity。这就说明了一个问题,Activity1在启动时,重新宿主到了MyActivity所在的Task中去了。
launchMode
- 当一个应用程序加载一个singleTask模式的Activity时,首先该Activity会检查是否存在与它的taskAffinity相同的Task。如果存在,那么检查是否实例化,如果已经实例化,那么销毁在该Activity以上的Activity并调用onNewIntent。如果没有实例化,那么该Activity实例化并入栈。如果不存在,那么就重新创建Task,并入栈。
- 当一个应用程序加载一个singleInstance模式的Activity时,如果该Activity没有被实例化,那么就重新创建一个Task,并入栈,如果已经被实例化,那么就调用该Activity的onNewIntent.singleInstance的Activity所在的Task不允许存在其他Activity,任何从该Activity加载的其它Activity(假设为Activity2)都会被放入其它的Task中,如果存在与Activity2相同affinity的Task,则在该Task内创建Activity2。如果不存在,则重新生成新的Task并入栈。
启动方式的问题
MainActivity是SingleTask或者SingleInstance模式,启动TestActivity,TestActivity马上跳转到MainActivity,这种情况下,MainActivity的onResume会回调两次。日志如下:
1 | com.hearing.activitytest.MainActivity@2c5d2eb onCreate |
适当延时500ms再跳转回MainActivity可以解决这个问题(可能由于业务场景不同,会带来新的问题)。
在stackoverflow上也有人发现过类似的问题。
BroadcastReceiver
分类
- 普通广播(Normal Broadcast)
- 系统广播(System Broadcast)
- 有序广播(Ordered Broadcast)
- 粘性广播(Sticky Broadcast)(已弃用)
- App应用内广播(Local Broadcast)
使用步骤
BroadcastReceiver
- 继承BroadcastReceivre基类
- 复写抽象方法onReceive()方法
注册
静态注册
- 常驻:不受任何组件声明周期影响
- 耗电,占内存
1 | <receiver |
动态注册
- 非常驻,灵活
- 手动释放
1 |
|
Service
概述
生命周期:
startService()
- 作用:启动Service服务
- 手动调用startService()后,自动调用内部方法:onCreate()、onStartCommand()
- 如果一个service被startService多次启动,onCreate()只会调用一次
- onStartCommand()调用次数=startService()次数
stopService()
- 作用:关闭Service服务
- 手动调用stopService()后,自动调用内部方法:onDestory()
- 如果一个service被启动且被绑定,如果没有在绑定的前提下stopService()是无法停止服务的。
bindService()
- 作用:绑定Service服务
- 手动调用bindService()后,自动调用内部方法:onCreate()、onBind()
unbindService()
- 作用:解绑Service服务
- 手动调用unbindService()后,自动调用内部方法:onCreate()、onBind()、onDestory()
接口函数:
- onStartCommand():当其他组件调用startService()方法请求启动Service时,该方法被回调。一旦Service启动,它会在后台独立运行。当Service执行完以后,需调用stopSelf() 或 stopService()方法停止Service。(若您只希望bind Service,则无需调用这些方法)
- onBind():当其他组件调用bindService()方法请求绑定Service时,该方法被回调。该方法返回一个IBinder接口,该接口是Service与绑定的组件进行交互的桥梁。若Service未绑定其他组件,该方法应返回null。
- onCreate():当Service第一次创建时,回调该方法。该方法只被回调一次,并在onStartCommand() 或 onBind()方法被回调之前执行。若Service处于运行状态,该方法不会回调。
- onDestroy():当Service被销毁时回调,在该方法中应清除一些占用的资源,如停止线程、接触绑定注册的监听器或broadcast receiver 等。该方法是Service中的最后一个回调。
启动方式:
- Started:其他组件调用startService()方法启动一个Service。一旦启动,Service将一直运行在后台(run in the background indefinitely)即便启动Service的组件已被destroy。通常,一个被start的Service会在后台执行单独的操作,也并不给启动它的组件返回结果。比如说,一个start的Service执行在后台下载或上传一个文件的操作,完成之后,Service应自己停止。
- Bound:其他组件调用bindService()方法绑定一个Service。通过绑定方式启动的Service是一个client-server结构,该Service可以与绑定它的组件进行交互。一个bound service仅在有组件与其绑定时才会运行(A bound service runs only as long as another application component is bound to it),多个组件可与一个service绑定,service不再与任何组件绑定时,该service会被destroy。
注意:
- Service运行在主线程中(A service runs in the main thread of its hosting process),Service并不是一个新的线程,也不是新的进程。也就是说,若您需要在Service中执行较为耗时的操作(如播放音乐、执行网络请求等),需要在Service中创建一个新的线程。这可以防止ANR的发生,同时主线程可以执行正常的UI操作。
- 如果某个组件通过调用startService()启动了Service(系统会回调onStartCommand()方法),那么直到在Service中手动调用stopSelf()方法、或在其他组件中手动调用stopService()方法,该Service才会停止。
- 如果某个组件通过调用bindService()绑定了Service(系统不会回调onStartCommand()方法),只要该组件与Service处于绑定状态,Service就会一直运行,当Service不再与组件绑定时,该Service将被destroy。
- 当系统内存低时,系统将强制停止Service的运行;若Service绑定了正在与用户交互的activity,那么该Service将不大可能被系统kill( less likely to be killed)。如果创建的是前台Service,那么该Service几乎不会被kill(almost never be killed)。否则,当创建了一个长时间在后台运行的Service后,系统会降低该Service在后台任务栈中的级别——这意味着它容易被kill(lower its position in the list of background tasks over time and the service will become highly susceptible to killing),所以在开发Service时,需要使Service变得容易被restart,因为一旦Service被kill,再restart它需要其资源可用时才行
注册
1 | <service android:name="com.example.servicetest.MyService"/> |
继承IntentService类
- 默认在子线程中处理回传到onStartCommand()方法中的Intent;
- 在重写的onHandleIntent()方法中处理按时间排序的Intent队列,所以不用担心多线程带来的问题。
- 当所有请求处理完成后,自动停止service,无需手动调用stopSelf()方法;
- 默认实现了onBind()方法,并返回null;
- 默认实现了onStartCommand()方法,并将回传的Intent以序列的形式发送给onHandleIntent(),只需重写该方法并处理Intent即可。
示例:
1 | class MyService : IntentService("MyService") { |
如果启动的 Service 存在则不会再次创,而会回调 onStartCommand 方法:
1 | public int onStartCommand( Intent intent, int flags, int startId) { |
继承Service类
如果需要在Service中执行多线程而不是处理一个请求队列,那么需要继承Service类,分别处理每个Intent。
1 | public class MyService extends Service { |
onStartCommand()返回一个整形变量,该变量必须是下列常量之一:
- START_NOT_STICKY:若执行完onStartCommand()方法后,系统就kill了service,不要再重新创建service,除非系统回传了一个pending intent。这避免了在不必要的时候运行service,您的应用也可以restart任何未完成的操作。
- START_STICKY:若系统在onStartCommand()执行并返回后kill了service,那么service会被recreate并回调onStartCommand()。dangerous不要重新传递最后一个Intent(do not redeliver the last intent)。相反,系统回调onStartCommand()时回传一个空的Intent,除非有 pending intents传递,否则Intent将为null。该模式适合做一些类似播放音乐的操作。
- START_REDELIVER_INTENT:若系统在onStartCommand()执行并返回后kill了service,那么service会被recreate并回调onStartCommand()并将最后一个Intent回传至该方法。任何 pending intents都会被轮流传递。该模式适合做一些类似下载文件的操作。
启动服务
startService(intent)方法将立即返回,并回调onStartCommand()(请不要手动调用该方法),若该Service未处于运行状态,系统将首先回调onCreate(),接着再回调onStartCommand()。若您希望Service可以返回结果,那么需要通过调用getBroadcast 返回的PendingIntent启动Service(将PendingIntent包装为Intent),service可使用broadcast 传递结果。
多个启动Service的请求可能导致onStartCommand()多次调用,但只需调用stopSelf() 、 stopService()这两个方法之一,就可停止该服务。
绑定Service
- 通过其他组件调用bindService()方法可以绑定一个Service以保持长连接(long-standing connection),这时一般不允许其他组件调用startService()启动Service。
- 当其他组件需要与Service交互或者需要跨进程通信时,可以创建一个bound Service。
- 为创建一个bound Service,必须重写onBind()回调,该方法返回一个IBinder接口。该接口时组件与Service通信的桥梁。组件调用bindService()与Service绑定,该组件可获取IBinder接口,一旦获取该接口,就可以调用Service中的方法。一旦没有组件与Service绑定,系统将destroy它,您不必手动停止它。
- 为创建一个bound Service,必须定义一个接口 ,该接口指定组件与Service如何通信。定义的接口在组件与Service之间,且必须实现IBinder接口。这正是onBind()的返回值。一旦组件接收了IBinder,组件与Service便可以开始通信。
- 多个组件可同时与Service绑定,当组件与Service交互结束后,可调用unbindService()方法解绑。bound Service比start Service要复杂,故我将在后续单独翻译。
1 | public class MainActivity extends Activity implements OnClickListener { |
运行前台Service
- 前台Service用于动态通知消息,如天气预报。该Service不易被kill。前台Service必须提供status bar,只有前台Service被destroy后,status bar才能消失。
- 举例来说,一个播放音乐的Service必须是前台Service,只有这样用户才能确知其运行状态。为前台Service提供的status bar可以显示当前音乐的播放状态,并可以启动播放音乐的Activity。
- 调用startForeground()可以启动前台Service。该方法接收两个参数,参数一是一个int型变量,用户指定该通知的唯一性标识,而参数而是一个Notification用于配置status bar
ContentProvider
概述
ContentProvider 需要实现的接口:
1 | public Uri insert(Uri uri, ContentValues values) |
参数含义:
- projection: 返回内容(conlumn名),null 表示返回所有
- selection: 设置条件
- selectionArgs: selection 参数条件的内容
- sortOrder: ASC(升序),DESC(降序),默认升序
例如:
1 | Cursor cursor = contentResolver.query(uri, new String[]{"name"}, "name=?", new String[]{"hearing"}, "id DESC"); |
可以通过 ContentResolver 类与 ContentProvider 统一进行交互;可以通过 ContentObserver 类监听 ContentProvider 中指定 Uri 的数据变化。
1 | class MyObserver extends ContentObserver { |
Uri
Uri 的四个组成部分:content://contacts/people/5
- schema:已由Android固定设置为content://
- authority:ContentProvider权限,在AndroidMenifest中设置权限
- path:要操作的数据库表
- id:查询的关键字(可选字段)
Uri匹配模式:Uri的匹配表示要查询的数据,对于单个数据查询,可直接使用Uri定位具体的资源位置,但当范围查询时就需要结合通配符的使用,Uri提供以下两种通配符:
*:匹配由任意长度的任何有效字符组成的字符串#:匹配由任意长度的数字字符组成的字符串
示例:
1 | content://com.example.app.provider/table2/* //多数据查询 |
ContentUris
核心方法有两个:
- withAppendedId():向Uri追加一个id
- parseId():从Uri中获取id
1 | Uri uri = Uri.parse("content://com.hearing.provider/user") |
UriMatcher
UriMatcher的作用:
- 在 ContentProvider 中注册Uri
- 根据 Uri 匹配 ContentProvider 中对应的数据表
使用步骤:
- 初始化UriMatcher对象
- 在ContentProvider 中注册URI(addURI())
- 根据URI 匹配 URI_CODE,从而匹配ContentProvider中相应的资源(match())
1 | // 步骤1:初始化UriMatcher对象 |
权限
概述
指定其他应用访问提供程序的数据所必须具备权限的属性。
grantUriPermssions
android:grantUriPermssions:表示是否可以通过临时权限访问数据,默认为false,在开发中可以只对限定的内容提供临时权限,如对照片的内容 URI 设置临时权限。
1 | android:grantUriPermissions="false" |
- true:系统会向整个系统授予临时权限,并替代其他设置的权限。
- false:需添加
<grant-uri-permission>并表明可以授权临时权限所对应的URI- path:表示绝对路径Uri
- pathPattern:表示限定完整的路径但可以使用./*通配符匹配
- pathPrefix:限定路径的初始部分后面可以变化,只要初始部分符合即可授权
permission
- android:permission:统一提供程序范围读取/写入权限
- android:readPermission:提供程序范围读取权限,优先于permission权限
- android:writePermission:提供程序范围写入权限,优先于permission权限
1 | android:readPermission="com.hearing.provider.permission.READ_PERMISSION" |
使用
- 创建两个程序A和B,在程序A中使用ContentProvider保存数据,在程序B中进行查询,在开始A程序中不设置任何权限,B程序进行访问数据会报错;
- 修改A程序清单文件添加android:exported=”true”,再次访问数据访问成功;
- 在A程序的清单文件中,为Provider添加两个读写权限,添加完权限后再次在B程序中获取数据,还是会报错,也很正常因为已经对数据的访问设置了门槛,所以在B程序中声明读写权限即可。
1 | <!-- A程序 --> |
实例:IPC
进程一
创建数据库类:
1 | public class DBHelper extends SQLiteOpenHelper { |
自定义ContentProvider:
1 | public class MyProvider extends ContentProvider { |
注册ContentProvider:
1 | <provider |
进程二
声明权限:
1 | <uses-permission android:name="com.hearing.provider.PROVIDER"/> |
访问ContentProvider:
1 | public class MainActivity extends AppCompatActivity { |
FileProvider
概述
对于面向Android 7.0及以上的应用,Android禁止在应用外部公开file://url。如果一项包含文件URI的intent离开应用,则应用会抛出FileUriExposedException异常。
解决方案:要在应用间共享文件,应发送一项content://URI,并授予URI临时访问权限。进行此授权的最简单方式是使用FileProvider类。FileProvider是ContentProvider的一个特殊的子类,它让应用间共享文件变得更加容易,其通过创建一个Content URI来代替File URI。
注册FileProvider
由于FileProvider中已经包含了为file生成Content URI的基本代码了,所以开发者不必再去定义一个FileProvider的子类。你可以在XML文件中指定一个FileProvider:在manifest中使用<provider>标签来指定。
1 | <manifest> |
- name的值一般都固定为android.support.v4.content.FileProvider。如果开发者继承了FileProvider,则可以写上其绝对路径。
- authorities字段的值用来表明使用的使用者,在FileProvider的函数getUriForFile需要传入该参数。
- exported 的值为false,表示该FileProvider只能本应用使用,不是public的。
- grantUriPermissions 的值为true,表示允许赋予临时权限。
xml配置
只有事先指定了目录,一个FileProvider才可以为文件生成一个对应的Content URI。要指定一个路径,需要在XML文件中指定其存储的路径。使用<paths>标签。例如:
1 | <paths xmlns:android="http://schemas.android.com/apk/res/android"> |
<root-path name="name" path="path" />:/<files-path name="name" path="path" />:/data/data/<package-name>/files/path/<cache-path name="name" path="path" />:/data/data/<package-name>/cache/path/<external-files-path name="name" path="path" />:Context.getExternalFilesDir(null) + "/path/",/storage/emulated/0/Android/data/<package_name>/files/path/<external-cache-path name="name" path="path" />:Context.getExternalCacheDir() + "/path/",即/storage/emulated/0/Android/data/<package-name>/cache/path/<external-media-path name="name" path="path" />:Context.getExternalMediaDirs() + "/path/",即/storage/emulated/0/Android/media/<package-name>/path/<external-path name="name" path="path" />:Environment.getExternalStorageDirectory() + "/path/",即/storage/emulated/0/path/
在res目录下新建xml目录,然后新建文件file_paths.xml,根据上述内容编写。
获取Content Uri
1 | File file = new File(mContext.getFilesDir() + "/text", "hello.txt"); |
赋予临时权限
两种方法:(通常使用第2种)
- Context.grantUriPermission(package, Uri, mode_flags)
- Intent.setFlags():
intent.addFlags(Intent.FLAG_GRANT_READ_URI_PERMISSION | FLAG_GRANT_WRITE_URI_PERMISSION);
Flag意义如下:
- FLAG_GRANT_READ_URI_PERMISSION:表示读取权限;
- FLAG_GRANT_WRITE_URI_PERMISSION:表示写入权限。
分享文件URI
1 | private void shareFile() { |
Mime Type
概述
MIME:多用途互联网邮件扩展(Multipurpose Internet Mail Extensions)是一个互联网标准,它扩展了电子邮件标准,使其能够支持非ASCII字符、二进制格式附件等多种格式的邮件消息。
MIME TYPE一般以这种形式出现:[type]/[subtype]
type标识内容type,有下面的形式:
- Text:用于标准化地表示的文本信息,文本消息可以是多种字符集和或者多种格式的;
- Multipart:用于连接消息体的多个部分构成一个消息,这些部分可以是不同类型的数据;
- Application:用于传输应用程序数据或者二进制数据;
- Message:用于包装一个E-mail消息;
- Image:用于传输静态图片数据;
- Audio:用于传输音频或者音声数据;
- Video:用于传输动态影像数据,可以是与音频编辑在一起的视频数据格式。
subtype用于指定type的详细形式。content-type/subtype配对的集合和与此相关的参数,将随着时间而增长。为了确保这些值在一个有序而且公开的状态下开发,MIME使用Internet Assigned Numbers Authority (IANA)作为中心的注册机制来管理这些值。常用的subtype值如下所示:
- text/plain(纯文本)
- text/html(HTML文档)
- application/xhtml+xml(XHTML文档)
- image/gif(GIF图像)
- image/jpeg(JPEG图像)
- image/png(PNG图像)
- video/mpeg(MPEG动画)
- application/octet-stream(任意的二进制数据)
- application/pdf(PDF文档)
- application/msword(Microsoft Word文件)
- message/rfc822(RFC 822形式)
- multipart/alternative(HTML邮件的HTML形式和纯文本形式,相同内容使用不同形式表示)
- application/x-www-form-urlencoded(使用HTTP的POST方法提交的表单)
- multipart/form-data(同上,但主要用于表单提交时伴随文件上传的场合)
使用
当Android系统接收到一个隐式Intent要启动一个Activity(或其他组件)时,Android会根据以下三个信息比较Intent的信息与注册的组件的intent-filter的信息,从而为该Intent选择出最匹配的Activity(或其他组件):
- intent中的action
- intent中的category
- intent中的data(包含Uri以及data的MIME类型)
也就是隐式intent对象要满足要启动的目标组件中注册的intent-filter中的<action/>、<category/>、<data/>三个标签中的信息,即要分别通过action测试、category测试以及data测试。
MINI类型即在data中指定。
Intent和Intent-filter
概述
- Intent 是一个消息传递对象,可以用来从其他应用组件请求操作, Intent 包括显式和隐式。
- Intent-filter 是 Manifest 中的一个表达式,用于指定该组件要接收的 Intent 类型。
为了确保应用的安全性,启动 Service 时应该始终使用显式 Intent,且不要为服务声明 Intent-filter。
构建Intent
Component name
可选项,如果没有组件名称,则 Intent 为隐式,如需在应用中启动特定的组件,则应指定该组件的名称。可以使用 setComponent(), setClass(), setClassName() 或 Intent 构造函数设置组件名称。
Action
可以指定自己的 action。以下是一些用于启动 Activity 的常见操作:
- ACTION_VIEW: 拥有一些可向用户显示的信息(查看照片 或 观看视频等)。
- ACTION_SEND:拥有一些用户可通过其他应用(例如电子邮件应用 或 社交共享应用)共享的数据。
可以使用 setAction() 或 Intent 构造函数为 Intent 指定操作。
Data
指定数据 MIME 类型的 URI,提供的数据类型通常由 Intent 的 Action 决定,例如如果操作是 ACTION_EDIT 则数据应包含待编辑文档的 URI。
可以使用 setData() 设置数据 URI;可以使用 setType() 设置 MIME 类型;可以使用 setDataAndType() 同时显式设置二者。注意:若要同时设置 URI 和 MIME 类型,请勿调用 setData() 和 setType(),因为它们会互相抵消彼此的值。
Category
一个包含应处理 Intent 组件类型的附加信息的字符串。可以将任意数量的Category放入一个 Intent 中,但大多数 Intent 均不需要 Category。以下是一些常见category:
- CATEGORY_BROWSABLE:目标 Activity 允许本身通过网络浏览器启动,以显示链接引用的数据,如图像或电子邮件。
- CATEGORY_LAUNCHER:该 Activity 是任务的初始 Activity,在系统的应用启动器中列出。
- CATEGORY_HOME:桌面应用需要声明。
- CATEGORY_DEFAULT:通过隐式启动Activity时,Android会默认加上一个CATEGORY_DEFAULT,所以如果Activity要支持隐式启动的话,除了默认LaunchActivity,其余都需要加上CATEGORY_DEFAULT。
可以使用 addCategory() 指定 category。
Extras
携带完成请求操作所需的附加信息的键值对,可以使用各种 putExtra() 方法添加 extra 数据。
Flags
可以使用 setFlags() 方法添加Flags。
接收隐式 Intent
应用组件应当为自身可执行的每个独特作业声明单独的filter。例如,图像库应用中的一个 Activity 可能会有两个filter,分别用于查看图像和编辑图像。
在 <intent-filter> 内部可以使用以下三个元素中的一个或多个指定要接受的 Intent 类型:
<action>:在 name 属性中,声明接受的 Intent 操作。<data>:使用一个或多个指定数据 URI(scheme、host、port、path)各个方面和 MIME 类型的属性,声明接受的数据类型。<category>:在 name 属性中,声明接受的 Intent category。
请注意:要接收隐式 Intent,必须将 CATEGORY_DEFAULT category 包括在 Intent-filter中。方法 startActivity() 和 startActivityForResult() 将按照其声明 CATEGORY_DEFAULT category的方式处理所有 Intent。如果未在 Intent-filter中声明此category,则隐式 Intent 不会解析为您的 Activity。
可以创建一个包括多个 <action>、<data> 或 <category> 实例的filter,创建时,需确定组件能够处理这些filter元素的任何及所有组合。系统通过将 Intent 与所有这三个元素进行比较,根据filter测试隐式 Intent。隐式 Intent 若要传递给组件,必须通过所有这三项测试。
Intent 解析
当收到隐式 Intent 以启动 Activity 时,系统会根据以下三个方面将该 Intent 与 Intent-filter进行比较,搜索该 Intent 的最佳 Activity:
- Action
- Data(URI 和数据类型)。
- Category
Action测试
要指定接受的 Intent action,Intent-filter既可以不声明任何 <action> 元素,也可以声明多个此类元素。要通过此filter,Intent 中指定的action必须与filter中列出的某一action匹配。
Category测试
要指定接受的 Intent category,Intent-filter既可以不声明任何 <category> 元素,也可以声明多个此类元素。要使 Intent 通过category测试,则 Intent 中的每个category均必须与filter中的category匹配。Intent-filter声明的category可以超出 Intent 中指定的数量,因此不含category的 Intent 应当始终会通过此测试,无论filter中声明何种category均是如此。
请注意:Android 会自动将 CATEGORY_DEFAULT category应用于传递给 startActivity() 和 startActivityForResult() 的所有隐式 Intent。如需 Activity 接收隐式 Intent,则必须将 “android.intent.category.DEFAULT” 的category包括在其 Intent-filter中。
Data测试
要指定接受的 Intent 数据,Intent-filter既可以不声明任何 <data> 元素,也可以声明多个此类元素,如下例所示:
1 | <intent-filter> |
每个 <data> 元素均可指定 URI 结构和数据类型(MIME 媒体类型)。URI 的每个部分都是一个单独的属性:scheme、host、port 和 path:<scheme>://<host>:<port>/<path>
在 <data> 元素中,上述每个属性均为可选,但存在线性依赖关系:
- 如果未指定scheme,则会忽略host。
- 如果未指定host,则会忽略port。
- 如果未指定scheme和host,则会忽略path。
将 Intent 中的 URI 与filter中的 URI 规范进行比较时,它仅与filter中包含的部分 URI 进行比较。例如:
- 如果filter仅指定scheme,则具有该scheme的所有 URI 均与该filter匹配。
- 如果filter指定scheme和host,但未指定path,则具有相同scheme和host的所有 URI 都会通过filter,无论其path如何均是如此。
- 如果filter指定scheme、host和path,则仅具有相同scheme、host和path的 URI 才会通过filter。
请注意:path规范可以包含星号通配符 (*),因此仅需部分匹配路径名即可。
数据测试会将 Intent 中的 URI 和 MIME 类型与filter中指定的 URI 和 MIME 类型进行比较。规则如下:
- 仅当filter未指定任何 URI 或 MIME 类型时,不含 URI 和 MIME 类型的 Intent 才会通过测试。
- 对于包含 URI 但不含 MIME 类型(既未显式声明,也无法通过 URI 推断得出)的 Intent,仅当其 URI 与filter的 URI 格式匹配、且filter同样未指定 MIME 类型时,才会通过测试。
- 仅当filter列出相同的 MIME 类型且未指定 URI 格式时,包含 MIME 类型但不含 URI 的 Intent 才会通过测试。
- 仅当 MIME 类型与filter中列出的类型匹配时,同时包含 URI 类型和 MIME 类型(通过显式声明,或可以通过 URI 推断得出)的 Intent 才会通过测试的 MIME 类型部分。如果 Intent 的 URI 与filter中的 URI 匹配,或者如果 Intent 具有 content: 或 file: URI 且filter未指定 URI,则 Intent 会通过测试的 URI 部分。换言之,如果filter只是列出 MIME 类型,则假定组件支持 content: 和 file: 数据。
请注意:如果 Intent 指定 URI 或 MIME 类型,则数据测试会在 <intent-filter> 中没有 <data> 元素时失败。
最后一条规则反映出对组件能够从文件中或内容提供程序处获得本地数据的预期。因此,其filter只能列出数据类型,不需要显式命名 content: 和 file: scheme。以下是一个典型示例,说明 <data> 元素向 Android 指出,组件可从内容提供程序处获得并显示图像数据:
1 | <intent-filter> |
由于大部分可用数据均由内容提供程序分发,因此指定数据类型(而非 URI)的filter也许最为常见。
另一常见的配置是具有scheme和数据类型的filter。例如,下文中的 <data> 元素向 Android 指出,组件可从网络中检索视频数据以执行操作:
1 | <intent-filter> |