0%

Android-init-zygote

概述

注:本文基于Android 9.0源码,为了文章的简洁性,引用源码的地方可能有所删减。

本文主要分析Android系统在启动之后系统服务之间的关系以及各个关键进程的启动逻辑,Android系统简要启动流程如下(图片来源网络,总结得非常好):

android-boot

系统启动

当电源按下时引导芯片代码会从预定义的地方(固化在ROM)开始执行,加载引导程序BootLoader到RAM,然后执行。

引导程序BootLoader

它是Android操作系统开始运行前的一个小程序,主要将操作系统OS拉起来并进行。

Linux内核启动

当内核启动时,会设置缓存、加载驱动等。此外,还启动了Kernel的swapper进程(pid = 0)和kthreadd进程(pid = 2):

  • swapper进程:又称为idle进程,系统初始化过程Kernel由无到有开创的第一个进程, 用于初始化进程管理、内存管理,加载Binder Driver、Display、Camera Driver等相关工作。
  • kthreadd进程:Linux系统的内核进程,是所有内核进程的鼻祖,会创建内核工作线程kworkder,软中断线程ksoftirqd,thermal等内核守护进程。

当内核完成系统设置时,它首先在系统中寻找init.rc文件,并启动init进程。init进程是一个由内核启动的第一个用户级进程,它的进程号是1,父进程id号是0。init进程是所有用户空间的鼻祖, 它会启动servicemanager(binder服务管家,其功能为查询和注册服务), Zygote进程(Java进程的鼻祖). Zygote进程会创建 system_server进程以及各种app进程。

init进程

init.cpp

init进程的入口函数是system/core/init/init.cpp的main函数,它的代码如下所示:

1
2
3
4
5
6
7
8
9
10
11
12
13
14
15
16
17
18
19
20
21
22
23
24
25
26
27
28
29
30
31
32
33
34
35
36
37
38
39
40
41
42
43
44
45
46
47
48
49
50
51
52
53
54
55
56
57
58
59
60
61
62
63
64
65
66
67
68
69
70
71
72
73
74
75
76
77
78
79
80
81
82
83
84
85
86
87
88
89
90
91
92
93
94
95
96
97
98
99
100
101
102
103
104
105
106
107
108
109
110
111
112
113
114
115
116
int main(int argc, char** argv) {
add_environment("PATH", _PATH_DEFPATH);

// 第一阶段:内核态
// 第二阶段:用户态
bool is_first_stage = (getenv("INIT_SECOND_STAGE") == nullptr);

if (is_first_stage) {
// Clear the umask,与Linux系统权限有关
umask(0);

// Get the basic filesystem setup we need put together in the initramdisk
// on / and then we'll let the rc file figure out the rest.
mount("tmpfs", "/dev", "tmpfs", MS_NOSUID, "mode=0755");
mkdir("/dev/pts", 0755);
// ...

InitKernelLogging(argv);

LOG(INFO) << "init first stage started!";

if (!DoFirstStageMount()) {
LOG(ERROR) << "Failed to mount required partitions early ...";
panic();
}

// Set up SELinux(Security-Enhanced Linux), loading the SELinux policy.
selinux_initialize(true);

// We're in the kernel domain, so re-exec init to transition to the init domain now
// that the SELinux policy has been loaded.
// 按selinux policy要求,重新设置init文件属性
if (restorecon("/init") == -1) {
// 失败的话会reboot
PLOG(ERROR) << "restorecon failed";
security_failure();
}

setenv("INIT_SECOND_STAGE", "true", 1);
setenv("INIT_STARTED_AT", StringPrintf("%" PRIu64, start_ms).c_str(), 1);

// 再次调用init的main函数,启动用户态的init进程
char* path = argv[0];
char* args[] = { path, nullptr };
execv(path, args);

// execv() only returns if an error happened, in which case we
// panic and never fall through this conditional.
PLOG(ERROR) << "execv(\"" << path << "\") failed";
security_failure();
}

// 第二阶段:用户态
InitKernelLogging(argv);
LOG(INFO) << "init second stage started!";

property_init(); // 初始化属性服务

// 执行内核命令
process_kernel_dt();
process_kernel_cmdline();
export_kernel_boot_props();

// 设置属性
property_set("ro.boottime.init", getenv("INIT_STARTED_AT"));
property_set("ro.boottime.init.selinux", getenv("INIT_SELINUX_TOOK"));

// 重置之前使用过的一些环境变量
unsetenv("INIT_SECOND_STAGE");
unsetenv("INIT_STARTED_AT");
unsetenv("INIT_SELINUX_TOOK");
unsetenv("INIT_AVB_VERSION");

// Now set up SELinux for second stage.
selinux_initialize(false);
selinux_restore_context();

signal_handler_init();

// 开启属性服务
start_property_service();

// 解析init.rc
// ...

while (true) {
// 默认会休眠直到有事件唤醒
int epoll_timeout_ms = -1;

if (!(waiting_for_prop || ServiceManager::GetInstance().IsWaitingForExec())) {
am.ExecuteOneCommand();
}
// 重启一些挂掉的进程,例如Zygote
if (!(waiting_for_prop || ServiceManager::GetInstance().IsWaitingForExec())) {
restart_processes();
// If there's a process that needs restarting, wake up in time for that.
if (process_needs_restart_at != 0) {
epoll_timeout_ms = (process_needs_restart_at - time(nullptr)) * 1000;
if (epoll_timeout_ms < 0) epoll_timeout_ms = 0;
}

// If there's more work to do, wake up again immediately.
if (am.HasMoreCommands()) epoll_timeout_ms = 0;
}

epoll_event ev;
int nr = TEMP_FAILURE_RETRY(epoll_wait(epoll_fd, &ev, 1, epoll_timeout_ms));
if (nr == -1) {
PLOG(ERROR) << "epoll_wait failed";
} else if (nr == 1) {
((void (*)()) ev.data.ptr)();
}
}

return 0;
}

第一阶段:

  • 判断及增加环境变量
  • 创建文件系统目录并挂载相关的文件系统
  • 重定向输入输出/内核Log系统
  • 挂载一些分区设备
  • 完成SELinux相关工作
  • is_first_stage 收尾

第二阶段:

  • 初始化属性域,清空环境变量
  • 完成SELinux相关工作
  • 启动属性服务
  • 解析init.rc配置文件,执行各个阶段的动作,创建Zygote的工作就是在其中的某个阶段完成的。
  • init进入一个无限循环,并且等待一些事情的发生。

下面给出 init.rc 部分内容(Mi Max3–MIUI 10–Android 9):

1
2
3
4
5
6
7
8
9
10
11
12
13
14
15
16
17
18
19
20
21
22
23
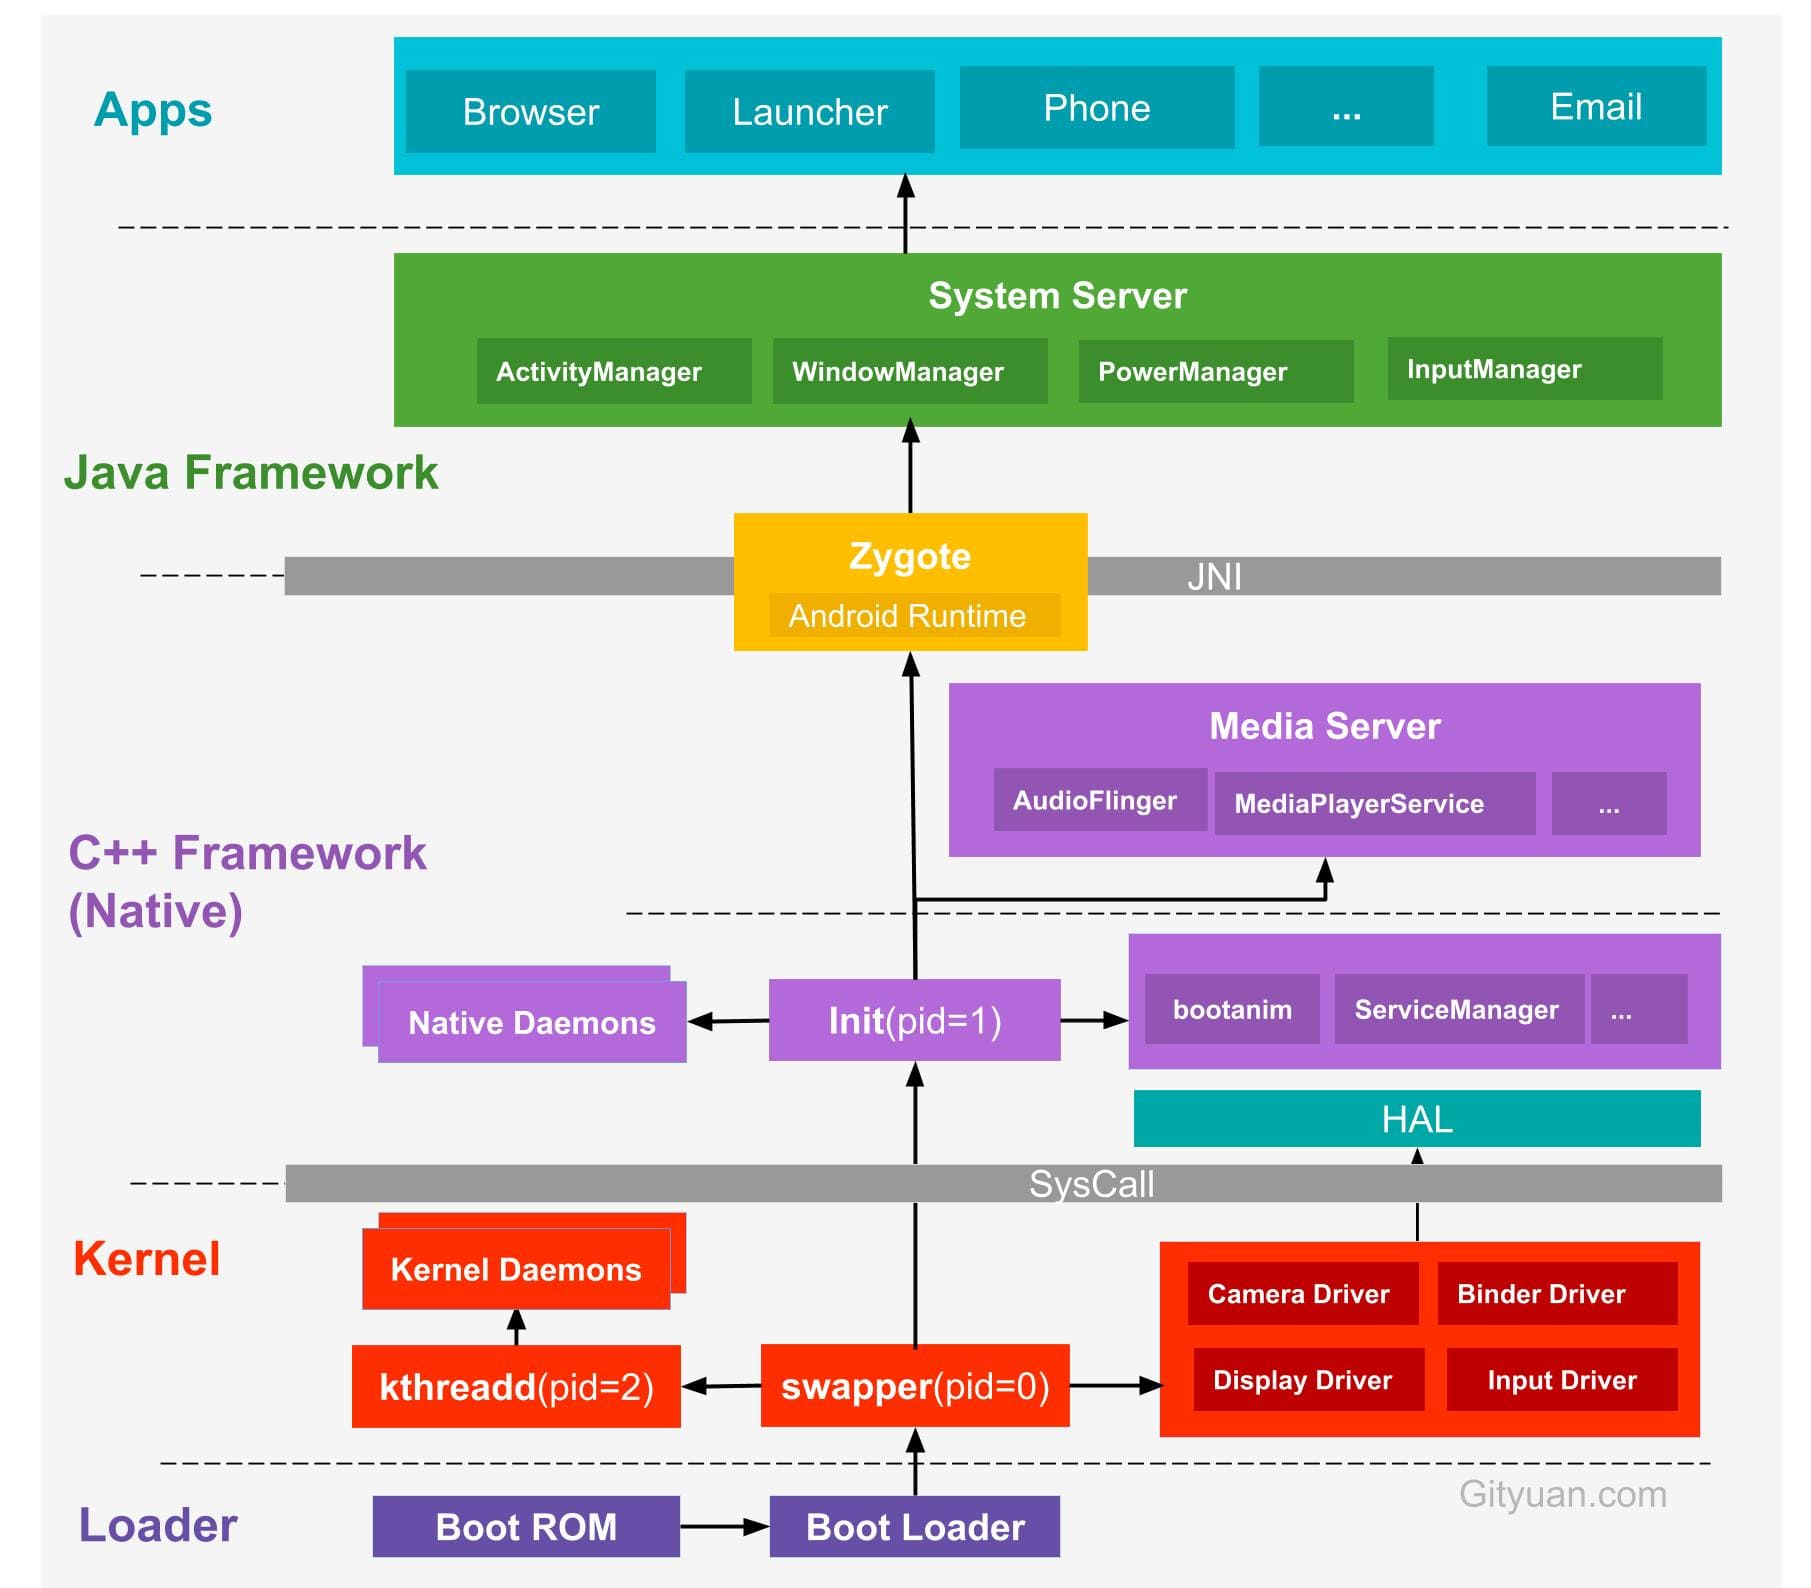
on early-init
on init
on property:sys.boot_from_charger_mode=1
on load_persist_props_action
on firmware_mounts_complete
on late-init
on post-fs // mount file system
start logd
mount rootfs rootfs / ro remount
mount rootfs rootfs / shared rec
mount none /mnt/runtime/default /storage slave bind rec
// ...
// ...
on post-fs-data // mount /data/
// 启动 logd
start logd
// 启动 vold, 用于管理Android外部存储介质的后台进程,包括SD卡的插拔等
start vold
// ...
// ...
on boot
// ...
class_start core

启动service

在 init.zygote64_32.rc 文件中:

1
2
3
4
5
6
7
8
9
10
11
12
13
14
15
16
17
18
19
20
21
22
23
service zygote /system/bin/app_process64 -Xzygote /system/bin --zygote --start-system-server --socket-name=zygote
class main
priority -20
user root
group root readproc reserved_disk
socket zygote stream 660 root system
onrestart write /sys/android_power/request_state wake
onrestart write /sys/power/state on
onrestart restart audioserver
onrestart restart cameraserver
onrestart restart media
onrestart restart netd
onrestart restart wificond
writepid /dev/cpuset/foreground/tasks

service zygote_secondary /system/bin/app_process32 -Xzygote /system/bin --zygote --socket-name=zygote_secondary --enable-lazy-preload
class main
priority -20
user root
group root readproc reserved_disk
socket zygote_secondary stream 660 root system
onrestart restart zygote
writepid /dev/cpuset/foreground/tasks

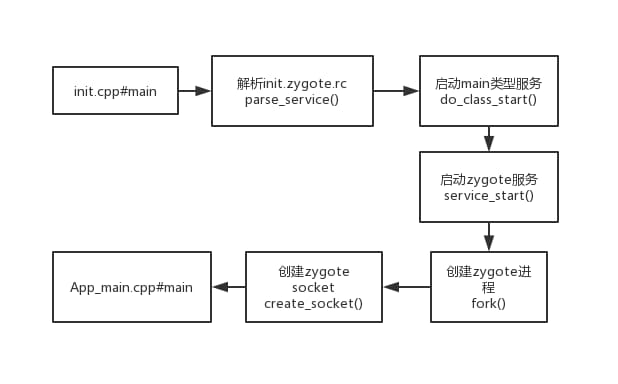
通过 init_parser.cpp 完成整个 service 解析工作,此处就不详细展开讲解析过程。

zygote所对应的可执行文件是/system/bin/app_process,通过调用pid = fork()创建子进程,通过execve(svc->args[0], (char**)svc->args, (char**) ENV),进入app_main.cpp的main()函数。故zygote是通过fork和execv共同创建的。

流程如下:

zygote启动

当init子进程退出时,会产生 SIGCHLD 信号,并发送给init进程,通过socket套接字传递数据,调用到 wait_for_one_process() 方法,根据是否是oneshot,来决定是重启子进程,还是放弃启动。surfaceflinger, servicemanager, zygote 以及 system_server 进程被杀都会触发Zygote重启。

属性服务

我们知道,Windows平台上有一个叫注册表的东西。注册表可以存储一些类似key/value的键值对。一般而言,系统或某些应用程序会把自己的一些属性存储在注册表中,即使下次系统重启或应用程序重启,它还能够根据之前在注册表中设置的属性,进行相应的初始化工作。

Android平台也提供了一个类型机制,可称之为属性服务(property service)。应用程序可通过这个属性机制,查询或设置属性。当某个进程A修改属性值后,init进程会检查访问权限,当权限满足要求后,则更改相应的属性值,属性值一旦改变则会触发相应的触发器(即rc文件中的on开头的语句),

属性服务初始化:

1
2
3
4
5
6
void property_init(void)
{
init_property_area();//初始化属性存储区域
//加载default.prop文件
load_properties_from_file(PROP_PATH_RAMDISK_DEFAULT);
}

在 properyty_init 函数中,先调用 init_property_area 函数,创建一块用于存储属性的存储区域(共享内存),然后加载 default.prop 文件中的内容。

访问方法:

  • Native: property_get/property_set
  • Java: SystemProperties
  • Shell: adb shell getprop

zygote进程

概述

Zygote是由init进程通过解析init.zygote.rc文件而创建的,zygote所对应的可执行程序app_process,所对应的源文件是app_main.cpp,进程名为zygote。

当Zygote进程启动后, 便会执行到frameworks/base/cmds/app_process/app_main.cpp文件的main()方法。整个调用流程:

1
2
3
4
5
6
7
8
9
app_main.main
AndroidRuntime.start
AndroidRuntime.startVm
AndroidRuntime.startReg
ZygoteInit.main (首次进入Java世界)
registerServerSocketFromEnv
preload
forkSystemServer
runSelectLoop

Zygote进程创建Java虚拟机,并注册JNI方法,真正成为Java进程的母体,用于孵化Java进程。在创建完system_server进程后,zygote功成身退,调用runSelectLoop()随时待命,当接收到创建新进程请求时立即唤醒并执行相应工作。Zygote进程共做了如下几件事:

  1. 创建AppRuntime并调用其start方法,启动Zygote进程。
  2. 创建DVM(ART)并为DVM注册JNI。
  3. 通过JNI调用ZygoteInit的main函数进入Zygote的Java框架层。
  4. 通过registerServerSocketFromEnv函数创建服务端Socket,并通过runSelectLoop函数等待ActivityManagerService的请求来创建新的应用程序进程。
  5. 启动SystemServer进程。

app_main.cpp

Zygote本身是一个Native的应用程序,和驱动、内核等均无关系。Zygote是由init进程根据init.rc文件中的配置项而创建的。zygote最初的名字叫“app_process”,这个名字是在Android.mk文件中被指定的,但app_process在运行过程中,通过Linux下的pctrl系统调用将自己的名字换成了“zygote”,所以我们通过ps命令看到的进程名是“zygote”。

zygote的原型app_process所对应的源文件是framework/base/cmds/app_process/app_main.cpp,代码如下所示:

1
2
3
4
5
6
7
8
9
10
11
12
13
14
15
16
17
18
19
20
21
22
23
24
25
26
27
28
29
30
31
32
33
34
35
36
37
38
39
40
41
42
43
44
45
46
47
48
49
50
51
52
53
54
55
56
57
58
59
60
61
62
63
64
65
66
67
68
69
70
71
72
73
74
75
76
77
78
79
80
int main(int argc, const char* const argv[])
{
AppRuntime runtime(argv[0], computeArgBlockSize(argc, argv));

// --zygote : Start in zygote mode
// --start-system-server : Start the system server.
// --application : Start in application (stand alone, non zygote) mode.
// --nice-name : The nice name for this process.
bool zygote = false;
bool startSystemServer = false;
bool application = false;
String8 niceName;
String8 className;

while (i < argc) {
const char* arg = argv[i++];
if (strcmp(arg, "--zygote") == 0) {
zygote = true;
niceName = ZYGOTE_NICE_NAME; // zygote64 or zygote
} else if (strcmp(arg, "--start-system-server") == 0) {
startSystemServer = true;
} else if (strcmp(arg, "--application") == 0) {
application = true;
} else if (strncmp(arg, "--nice-name=", 12) == 0) {
niceName.setTo(arg + 12);
} else if (strncmp(arg, "--", 2) != 0) {
className.setTo(arg);
break;
} else {
--i;
break;
}
}

Vector<String8> args;
if (!className.isEmpty()) {
// We're not in zygote mode
// 需要传递给RuntimeInit的唯一参数是application参数,剩余的args传递给启动类main
args.add(application ? String8("application") : String8("tool"));
runtime.setClassNameAndArgs(className, argc - i, argv + i);
} else {
// We're in zygote mode.
maybeCreateDalvikCache();

if (startSystemServer) {
args.add(String8("start-system-server"));
}

char prop[PROP_VALUE_MAX];
if (property_get(ABI_LIST_PROPERTY, prop, NULL) == 0) {
LOG_ALWAYS_FATAL("app_process: Unable to determine ABI list from property %s.",
ABI_LIST_PROPERTY);
return 11;
}

String8 abiFlag("--abi-list=");
abiFlag.append(prop);
args.add(abiFlag);

// In zygote mode, pass all remaining arguments to the zygote
// main() method.
for (; i < argc; ++i) {
args.add(String8(argv[i]));
}
}

if (!niceName.isEmpty()) {
runtime.setArgv0(niceName.string(), true /* setProcName */);
}

if (zygote) {
runtime.start("com.android.internal.os.ZygoteInit", args, zygote);
} else if (className) {
runtime.start("com.android.internal.os.RuntimeInit", args, zygote);
} else {
fprintf(stderr, "Error: no class name or --zygote supplied.\n");
app_usage();
LOG_ALWAYS_FATAL("app_process: no class name or --zygote supplied.");
}
}

AppRuntime类的声明和实现均在app_main.cpp中,它是从AndroidRuntime类派生出来的,上述start函数使用的是基类AndroidRuntime的start。

AndroidRuntime.start

1
2
3
4
5
6
7
8
9
10
11
12
13
14
15
16
17
18
19
20
21
22
23
24
25
26
27
28
29
30
31
32
33
34
35
36
37
38
39
40
41
42
43
44
45
46
47
48
49
50
51
// frameworks/base/core/jni/AndroidRuntime.cpp
void AndroidRuntime::start(const char* className, const Vector<String8>& options, bool zygote)
{
const char* rootDir = getenv("ANDROID_ROOT");
if (rootDir == NULL) {
rootDir = "/system";
if (!hasDir("/system")) {
LOG_FATAL("No root directory specified, and /android does not exist.");
return;
}
setenv("ANDROID_ROOT", rootDir, 1);
}

/* start the virtual machine */
JniInvocation jni_invocation;
jni_invocation.Init(NULL);
JNIEnv* env;
if (startVm(&mJavaVM, &env, zygote) != 0) {
return;
}
onVmCreated(env);

// 因为后续Java世界用到的一些函数是采用native方式来实现的,所以必须提前注册这些函数
if (startReg(env) < 0) {
ALOGE("Unable to register all android natives\n");
return;
}

// 将参数封装到strArray里

/*
* Start VM. This thread becomes the main thread of the VM, and will
* not return until the VM exits.
*/
char* slashClassName = toSlashClassName(className != NULL ? className : "");
jclass startClass = env->FindClass(slashClassName);
if (startClass == NULL) {
ALOGE("JavaVM unable to locate class '%s'\n", slashClassName);
} else {
// 找到ZygoteInit类的static main函数的jMethodId
jmethodID startMeth = env->GetStaticMethodID(startClass, "main",
"([Ljava/lang/String;)V");
if (startMeth == NULL) {
ALOGE("JavaVM unable to find main() in '%s'\n", className);
} else {
// 调用ZygoteInit.main函数后,Zygote便进入了Java世界
env->CallStaticVoidMethod(startClass, startMeth, strArray);
}
}
free(slashClassName);
}

ZygoteInit.main

CallStaticVoidMethod最终将调用com.android.internal.os.ZygoteInit的main函数,代码如下所示:

1
2
3
4
5
6
7
8
9
10
11
12
13
14
15
16
17
18
19
20
21
22
23
24
25
26
27
28
29
30
31
32
33
34
35
36
37
38
39
40
41
42
43
44
45
46
47
48
49
50
51
52
53
54
55
56
57
58
59
60
// frameworks/base/core/java/com/android/internal/os/ZygoteInit.java
public static void main(String argv[]) {
ZygoteServer zygoteServer = new ZygoteServer();
try {
boolean startSystemServer = false;
String socketName = "zygote";
String abiList = null;
boolean enableLazyPreload = false;
for (int i = 1; i < argv.length; i++) {
if ("start-system-server".equals(argv[i])) {
startSystemServer = true;
} else if ("--enable-lazy-preload".equals(argv[i])) {
enableLazyPreload = true;
} else if (argv[i].startsWith(ABI_LIST_ARG)) {
abiList = argv[i].substring(ABI_LIST_ARG.length());
} else if (argv[i].startsWith(SOCKET_NAME_ARG)) {
socketName = argv[i].substring(SOCKET_NAME_ARG.length());
} else {
throw new RuntimeException("Unknown command line argument: " + argv[i]);
}
}
// 创建一个Zygote的Socket接口,用来和AMS等通信
zygoteServer.registerServerSocketFromEnv(socketName);
if (!enableLazyPreload) {
// 预加载一些类和资源,这是导致Android系统启动慢的原因之一
// 应用程序都从Zygote孵化出来,应用程序都会继承Zygote的所有内容,如果在Zygote启动的时候加载这些类和资源,
// 这些孵化的应用程序就继承Zygote的类和资源,这样启动引用程序的时候就不需要加载类和资源了,启动的速度就会快很多。
preload(bootTimingsTraceLog);
}

// Do an initial gc to clean up after startup
gcAndFinalize();

if (startSystemServer) {
Runnable r = forkSystemServer(abiList, socketName, zygoteServer);
// 子进程(system_server)
if (r != null) {
// 调用com.android.server.SystemServer.main方法
r.run();
return;
}
}

Log.i(TAG, "Accepting command socket connections");

// The select loop returns early in the child process after a fork and
// loops forever in the zygote.
caller = zygoteServer.runSelectLoop(abiList);
} catch (Throwable ex) {
Log.e(TAG, "System zygote died with exception", ex);
throw ex;
} finally {
zygoteServer.closeServerSocket();
}

// We're in the child process and have exited the select loop. Proceed to execute the command.
if (caller != null) {
caller.run();
}
}

上面有三个重要的调用:

  • registerServerSocketFromEnv用来创建一个Zygote的Socket接口,用来和AMS等通信
  • forkSystemServer用来fork创建system_server进程;
  • runSelectLoop用来处理客户端连接与请求,包括AMS请求创建app进程。

system_server进程

概述

SyetemServer在启动时做了如下工作:

  1. 启动Binder线程池,这样就可以与其他进程进行通信。
  2. 创建SystemServiceManager用于对系统的服务进行创建、启动和生命周期管理。
  3. 启动各种系统服务。AMS,PMS,以及WMS等都是运行在system_server这个进程中的线程。

ZygoteInit.forkSystemServer

在上节中,ZygoteInit.main方法首次进入Java世界,然后调用了forkSystemServer方法创建system_server进程。

1
2
3
4
5
6
7
8
9
10
11
12
13
14
15
16
17
18
19
20
21
22
23
24
25
26
27
28
29
30
31
32
33
34
35
36
37
38
39
40
41
42
43
44
45
46
47
48
49
50
51
52
private static Runnable forkSystemServer(String abiList, String socketName,
ZygoteServer zygoteServer) {
/* Hardcoded command line to start the system server */
String args[] = {
"--setuid=1000",
"--setgid=1000",
"--setgroups=1001,1002,1003,1004,1005,1006,1007,1008,1009,1010,1018,1021,1023,1024,1032,1065,3001,3002,3003,3006,3007,3009,3010",
"--capabilities=" + capabilities + "," + capabilities,
"--nice-name=system_server",
"--runtime-args",
"--target-sdk-version=" + VMRuntime.SDK_VERSION_CUR_DEVELOPMENT,
"com.android.server.SystemServer",
};
ZygoteConnection.Arguments parsedArgs = null;

int pid;

try {
parsedArgs = new ZygoteConnection.Arguments(args);
ZygoteConnection.applyDebuggerSystemProperty(parsedArgs);
ZygoteConnection.applyInvokeWithSystemProperty(parsedArgs);

boolean profileSystemServer = SystemProperties.getBoolean(
"dalvik.vm.profilesystemserver", false);
if (profileSystemServer) {
parsedArgs.runtimeFlags |= Zygote.PROFILE_SYSTEM_SERVER;
}

/* Request to fork the system server process */
pid = Zygote.forkSystemServer(
parsedArgs.uid, parsedArgs.gid,
parsedArgs.gids,
parsedArgs.runtimeFlags,
null,
parsedArgs.permittedCapabilities,
parsedArgs.effectiveCapabilities);
} catch (IllegalArgumentException ex) {
throw new RuntimeException(ex);
}

/* For child process */
if (pid == 0) {
if (hasSecondZygote(abiList)) {
waitForSecondaryZygote(socketName);
}

zygoteServer.closeServerSocket();
return handleSystemServerProcess(parsedArgs);
}

return null;
}

在这里设置了system_server进程的uid,gid和groups,nice-name等,有两个重要的调用:

  • Zygote.forkSystemServer()函数用来fork一个新的进程,如果pid==0,表示已经进入SystemServer子进程,于是先关闭“Zygote”socket,因为系统服务进程system_server也继承了Socket,不用所以close它;
  • 调用了handleSystemServerProcess()方法,返回Runnable对象到ZygoteInit.main并调用,其实是调用到了com.android.server.SystemServer.main方法。

Zygote.forkSystemServer

首先看看Zygote.forkSystemServer方法,它调用的是nativeForkSystemServer方法:

1
2
3
4
5
6
7
8
9
10
11
12
13
14
15
16
17
18
19
20
21
22
23
24
25
26
27
28
29
30
31
32
33
34
35
36
37
38
39
40
41
42
43
44
45
46
47
48
49
50
51
52
53
54
55
56
57
58
// frameworks/base/core/jni/com_android_internal_os_Zygote.cpp
static jint com_android_internal_os_Zygote_nativeForkSystemServer(
JNIEnv* env, jclass, uid_t uid, gid_t gid, jintArray gids,
jint runtime_flags, jobjectArray rlimits, jlong permittedCapabilities,
jlong effectiveCapabilities) {
pid_t pid = ForkAndSpecializeCommon(env, uid, gid, gids,
runtime_flags, rlimits,
permittedCapabilities, effectiveCapabilities,
MOUNT_EXTERNAL_DEFAULT, NULL, NULL, true, NULL,
NULL, NULL, NULL);
if (pid > 0) {
}
return pid;
}

static pid_t ForkAndSpecializeCommon(/* ... */) {
SetSignalHandlers();
pid_t pid = fork(); // fork子进程
UnsetChldSignalHandler();
}

static void SetSignalHandlers() {
struct sigaction sig_chld = {};
sig_chld.sa_handler = SigChldHandler;

if (sigaction(SIGCHLD, &sig_chld, NULL) < 0) {
ALOGW("Error setting SIGCHLD handler: %s", strerror(errno));
}

struct sigaction sig_hup = {};
sig_hup.sa_handler = SIG_IGN;
if (sigaction(SIGHUP, &sig_hup, NULL) < 0) {
ALOGW("Error setting SIGHUP handler: %s", strerror(errno));
}
}

// Sets the SIGCHLD handler back to default behavior in zygote children.
static void UnsetChldSignalHandler() {
struct sigaction sa;
memset(&sa, 0, sizeof(sa));
sa.sa_handler = SIG_DFL;

if (sigaction(SIGCHLD, &sa, NULL) < 0) {
ALOGW("Error unsetting SIGCHLD handler: %s", strerror(errno));
}
}

static void SigChldHandler(int /*signal_number*/) {
pid_t pid;
int status;

while ((pid = waitpid(-1, &status, WNOHANG)) > 0) {
if (pid == gSystemServerPid) {
ALOGE("Exit zygote because system server (%d) has terminated", pid);
kill(getpid(), SIGKILL);
}
}
}

在ForkAndSpecializeCommon中有个逻辑是如果SystemServer进程停止工作,那么首先通过getpid()来获取Zygote进程的pid,然后调用kill函数杀死它,即SystemServer停止工作之后,Zygote进程自杀,然后在Init进程的main()函数中有一个死循环,如果它的子进程Zygote停止工作,就会去重启子进程。

handleSystemServerProcess

1
2
3
4
5
6
7
8
9
10
11
12
13
14
15
16
17
18
19
20
21
22
23
24
25
26
27
28
29
30
31
32
33
34
35
36
37
38
39
40
41
42
43
private static Runnable handleSystemServerProcess(ZygoteConnection.Arguments parsedArgs) {
ClassLoader cl = createPathClassLoader(systemServerClasspath, parsedArgs.targetSdkVersion);
Thread.currentThread().setContextClassLoader(cl);
return ZygoteInit.zygoteInit(parsedArgs.targetSdkVersion, parsedArgs.remainingArgs, cl);
}

public static final Runnable zygoteInit(int targetSdkVersion, String[] argv, ClassLoader classLoader) {
// 执行Binder驱动程序初始化的相关工作,它调用之后system_server进程就可以进行Binder进程通信
ZygoteInit.nativeZygoteInit();
return RuntimeInit.applicationInit(targetSdkVersion, argv, classLoader);
}

// frameworks/base/core/java/com/android/internal/os/RuntimeInit.java
protected static Runnable applicationInit(int targetSdkVersion, String[] argv,
ClassLoader classLoader) {
final Arguments args = new Arguments(argv);
return findStaticMain(args.startClass, args.startArgs, classLoader);
}

// 通过反射获得com.android.server.SystemServer的main方法
protected static Runnable findStaticMain(String className, String[] argv,
ClassLoader classLoader) {
Class<?> cl = Class.forName(className, true, classLoader);
Method m = cl.getMethod("main", new Class[] { String[].class });
return new MethodAndArgsCaller(m, argv);
}

static class MethodAndArgsCaller implements Runnable {
/** method to call */
private final Method mMethod;

/** argument array */
private final String[] mArgs;

public MethodAndArgsCaller(Method method, String[] args) {
mMethod = method;
mArgs = args;
}

public void run() {
mMethod.invoke(null, new Object[] { mArgs });
}
}

到这里可以知道ZygoteInit.main方法中的Runnable r = forkSystemServer(abiList, socketName, zygoteServer);返回的r即是MethodAndArgsCaller,在子进程中调用r.run方法便是调用了com.android.server.SystemServer.main方法。

SystemServer#main

1
2
3
4
5
6
7
8
9
10
11
12
13
14
15
16
17
18
19
20
21
22
23
24
25
26
27
28
29
30
31
32
33
34
// SystemServer.java
public final class SystemServer {
...
public static void main(String[] args) {
//先初始化SystemServer对象,再调用对象的run()方法
new SystemServer().run();
}
}

private void run() {
Looper.prepareMainLooper();// 准备主线程looper

//加载android_servers.so库,该库包含的源码在frameworks/base/services/目录下
System.loadLibrary("android_servers");

createSystemContext(); //初始化系统上下文

//创建系统服务管理
mSystemServiceManager = new SystemServiceManager(mSystemContext);
LocalServices.addService(SystemServiceManager.class, mSystemServiceManager);

//启动各种系统服务
try {
startBootstrapServices(); // 启动引导服务
startCoreServices(); // 启动核心服务
startOtherServices(); // 启动其他服务
} catch (Throwable ex) {
throw ex;
}

//一直循环执行
Looper.loop();
throw new RuntimeException("Main thread loop unexpectedly exited");
}

调用关系:

1
2
3
4
5
6
7
8
SystemServer.main
SystemServer.run
Looper.prepareMainLooper();
createSystemContext
startBootstrapServices();
startCoreServices();
startOtherServices();
Looper.loop();

LocalServices通过用静态Map变量sLocalServiceObjects,来保存以服务类名为key,以具体服务对象为value的Map结构。

首先看看启动引导服务的方法startBootstrapServices:

1
2
3
4
5
6
7
8
9
10
11
12
13
14
15
16
17
18
19
20
21
22
23
24
25
26
27
28
29
30
31
32
33
34
35
36
37
38
39
40
41
42
43
44
45
46
47
48
49
50
51
52
53
54
55
56
57
58
59
60
61
62
63
private void startBootstrapServices() {
// 阻塞等待与installd建立socket通道
Installer installer = mSystemServiceManager.startService(Installer.class);

// In some cases after launching an app we need to access device identifiers,
// therefore register the device identifier policy before the activity manager.
mSystemServiceManager.startService(DeviceIdentifiersPolicyService.class);

mActivityManagerService = mSystemServiceManager.startService(
ActivityManagerService.Lifecycle.class).getService();
mActivityManagerService.setSystemServiceManager(mSystemServiceManager);
mActivityManagerService.setInstaller(installer);

mPowerManagerService = mSystemServiceManager.startService(PowerManagerService.class);
mActivityManagerService.initPowerManagement();

mSystemServiceManager.startService(RecoverySystemService.class);

// Now that we have the bare essentials of the OS up and running, take
// note that we just booted, which might send out a rescue party if
// we're stuck in a runtime restart loop.
RescueParty.noteBoot(mSystemContext);

mSystemServiceManager.startService(LightsService.class);

// Package manager isn't started yet; need to use SysProp not hardware feature
if (SystemProperties.getBoolean("config.enable_sidekick_graphics", false)) {
mSystemServiceManager.startService(WEAR_SIDEKICK_SERVICE_CLASS);
}

mDisplayManagerService = mSystemServiceManager.startService(DisplayManagerService.class);

// We need the default display before we can initialize the package manager.
mSystemServiceManager.startBootPhase(SystemService.PHASE_WAIT_FOR_DEFAULT_DISPLAY);

// 当设备正在加密时,仅运行core apps
String cryptState = SystemProperties.get("vold.decrypt");
if (ENCRYPTING_STATE.equals(cryptState)) {
Slog.w(TAG, "Detected encryption in progress - only parsing core apps");
mOnlyCore = true;
} else if (ENCRYPTED_STATE.equals(cryptState)) {
Slog.w(TAG, "Device encrypted - only parsing core apps");
mOnlyCore = true;
}

// Start the package manager.
mPackageManagerService = PackageManagerService.main(mSystemContext, installer,
mFactoryTestMode != FactoryTest.FACTORY_TEST_OFF, mOnlyCore);
mFirstBoot = mPackageManagerService.isFirstBoot();
mPackageManager = mSystemContext.getPackageManager();

mSystemServiceManager.startService(UserManagerService.LifeCycle.class);

AttributeCache.init(mSystemContext);

// Set up the Application instance for the system process and get started.
mActivityManagerService.setSystemProcess();

mDisplayManagerService.setupSchedulerPolicies();
mSystemServiceManager.startService(new OverlayManagerService(mSystemContext, installer));

// 启动传感器服务
startSensorService();

该方法所创建的服务:ActivityManagerService, PowerManagerService, LightsService, DisplayManagerService, PackageManagerService, UserManagerService, sensor服务等。

然后是启动核心服务startCoreServices:

1
2
3
4
5
6
7
8
9
10
11
12
13
14
15
16
private void startCoreServices() {
// 启动服务BatteryService,用于统计电池电量,需要LightService.
mSystemServiceManager.startService(BatteryService.class);

// 启动服务UsageStatsService,用于统计应用使用情况
mSystemServiceManager.startService(UsageStatsService.class);
mActivityManagerService.setUsageStatsManager(
LocalServices.getService(UsageStatsManagerInternal.class));

if (mPackageManager.hasSystemFeature(PackageManager.FEATURE_WEBVIEW)) {
// 启动服务WebViewUpdateService
mWebViewUpdateService = mSystemServiceManager.startService(WebViewUpdateService.class);
}

BinderCallsStatsService.start();
}

启动服务BatteryService,UsageStatsService,WebViewUpdateService等。

启动其它服务的startOtherServices方法比较长,主要是启动一系列的服务:

1
2
3
4
5
6
7
8
9
10
11
12
13
14
15
16
17
18
19
20
21
22
23
private void startOtherServices() {
// ...
ServiceManager.addService("sec_key_att_app_id_provider", new KeyAttestationApplicationIdProviderService(context));
mSystemServiceManager.startService(KeyChainSystemService.class);
ServiceManager.addService("scheduling_policy", new SchedulingPolicyService());
mSystemServiceManager.startService(TelecomLoaderService.class);
telephonyRegistry = new TelephonyRegistry(context);
ServiceManager.addService("telephony.registry", telephonyRegistry);
mEntropyMixer = new EntropyMixer(context);

mContentResolver = context.getContentResolver();

mSystemServiceManager.startService(ACCOUNT_SERVICE_CLASS);
mSystemServiceManager.startService(CONTENT_SERVICE_CLASS);

// 准备好window, power, package, display服务
wm.systemReady();
mPowerManagerService.systemReady(...);
mPackageManagerService.systemReady();
mDisplayManagerService.systemReady(...);
mActivityManagerService.systemReady(...);
// ...
}

到此, System_server主线程的启动工作总算完成, 进入Looper.loop()状态,等待其他线程通过handler发送消息到主线再处理。

与system_server进程的Application相关的解析可见:Android-Application

app进程

AMS发送请求

ActivityManagerService也是由SystemServer创建的。假设通过startActivity来启动一个新的Activity,而这个Activity附属于一个还未启动的进程,则会启动一个新的进程,调用startActivity的进程通过Binder调用到ActivityManagerService中的方法,然后经过层层调用(具体可见Android-Activity启动原理),会调用到Process.start()方法,代码如下所示:

1
2
3
4
5
6
7
8
9
10
11
12
13
14
15
public static final ProcessStartResult start(final String processClass,
final String niceName,
int uid, int gid, int[] gids,
int runtimeFlags, int mountExternal,
int targetSdkVersion,
String seInfo,
String abi,
String instructionSet,
String appDataDir,
String invokeWith,
String[] zygoteArgs) {
return zygoteProcess.start(processClass, niceName, uid, gid, gids,
runtimeFlags, mountExternal, targetSdkVersion, seInfo,
abi, instructionSet, appDataDir, invokeWith, zygoteArgs);
}

这里的参数processClass为“android.app.ActivityThread”,它是传进去的第一个参数,也就是程序初始化进程时要加载的主文件Java类。当应用进程启动之后,会把这个类加载到进程,调用它的main()方法作为应用程序进程的入口。Process类的start()直接调用了ZygoteProcess类的start()方法,该start()方法调用了ZygoteProcess类的startViaZygote()方法,下面看看该方法实现:

1
2
3
4
5
6
7
8
9
10
11
12
13
private Process.ProcessStartResult startViaZygote(final String processClass, final String niceName,
final int uid, final int gid, final int[] gids, int runtimeFlags, int mountExternal,
int targetSdkVersion, String seInfo, String abi, String instructionSet,String appDataDir,
String invokeWith, String[] extraArgs) throws ZygoteStartFailedEx {
ArrayList<String> argsForZygote = new ArrayList<String>();
argsForZygote.add("--runtime-args");
argsForZygote.add("--setuid=" + uid);
argsForZygote.add("--setgid=" + gid);
// ......
synchronized(mLock) {
return zygoteSendArgsAndGetResult(openZygoteSocketIfNeeded(abi), argsForZygote);
}
}

首先给它设置值,包括uid、gid等。接着调用openZygoteSocketIfNeeded()方法来连接“zygote”Socket,链接Socket成功之后,就会调用zygoteSendArgsAndGetResult()方法来进一步处理。

先来看看openZygoteSocketIfNeeded()方法:

1
2
3
4
5
6
private ZygoteState openZygoteSocketIfNeeded(String abi) throws ZygoteStartFailedEx {
if (primaryZygoteState == null || primaryZygoteState.isClosed()) {
try {
primaryZygoteState = ZygoteState.connect(mSocket);
}
}

方法中的mSocket的值是“zygote”,通过connect()方法去连接“zygote”Socket。接着看看zygoteSendArgsAndGetResult()方法:

1
2
3
4
5
6
7
8
9
10
11
12
13
14
15
private static Process.ProcessStartResult zygoteSendArgsAndGetResult(
ZygoteState zygoteState, ArrayList<String> args)
throws ZygoteStartFailedEx {
try {
final BufferedWriter writer = zygoteState.writer;
final DataInputStream inputStream = zygoteState.inputStream;
writer.write(Integer.toString(args.size()));
writer.newLine();
for (int i = 0; i < sz; i++) {
String arg = args.get(i);
writer.write(arg);
writer.newLine();
}
writer.flush();
}

通过Socket写入流writer把前面传过来的那些参数写进去,Socket即ZygoteServer类的runSelectLoop()方法监听。写入这些数据之后,ZygoteServer类的runSelectLoop()方法就能被监听到。

响应请求

1
2
3
4
5
6
7
8
9
10
11
12
13
14
15
16
17
18
19
20
21
22
23
24
25
26
27
28
29
30
31
32
33
34
35
36
37
38
39
40
41
42
43
44
45
46
47
48
49
50
51
52
53
54
55
56
57
58
59
60
61
62
63
64
65
66
67
68
69
70
71
72
73
void setForkChild() {
mIsForkChild = true;
}

Runnable runSelectLoop(String abiList) {
ArrayList<FileDescriptor> fds = new ArrayList<FileDescriptor>();
ArrayList<ZygoteConnection> peers = new ArrayList<ZygoteConnection>();

fds.add(mServerSocket.getFileDescriptor());
peers.add(null);

while (true) {
StructPollfd[] pollFds = new StructPollfd[fds.size()];
for (int i = 0; i < pollFds.length; ++i) {
pollFds[i] = new StructPollfd();
pollFds[i].fd = fds.get(i);
pollFds[i].events = (short) POLLIN;
}
try {
Os.poll(pollFds, -1);
} catch (ErrnoException ex) {
throw new RuntimeException("poll failed", ex);
}
for (int i = pollFds.length - 1; i >= 0; --i) {
if ((pollFds[i].revents & POLLIN) == 0) {
continue;
}

if (i == 0) {
ZygoteConnection newPeer = acceptCommandPeer(abiList);
peers.add(newPeer);
fds.add(newPeer.getFileDesciptor());
} else {
try {
ZygoteConnection connection = peers.get(i);
final Runnable command = connection.processOneCommand(this);
// 通过mIsForkChild变量控制父进程接着死循环/子进程返回command
if (mIsForkChild) {
// We're in the child. We should always have a command to run at this
// stage if processOneCommand hasn't called "exec".
if (command == null) {
throw new IllegalStateException("command == null");
}

return command;
} else {
// We're in the server - we should never have any commands to run.
if (command != null) {
throw new IllegalStateException("command != null");
}

if (connection.isClosedByPeer()) {
connection.closeSocket();
peers.remove(i);
fds.remove(i);
}
}
} catch (Exception e) {
if (!mIsForkChild) {
ZygoteConnection conn = peers.remove(i);
conn.closeSocket();
fds.remove(i);
} else {

throw e;
}
} finally {
mIsForkChild = false;
}
}
}
}
}

进入ZygoteConnection类的processOneCommand()方法后:

1
2
3
4
5
6
7
8
9
10
11
12
13
14
15
16
Runnable processOneCommand(ZygoteServer zygoteServer) {
pid = Zygote.forkAndSpecialize(parsedArgs.uid, parsedArgs.gid, parsedArgs.gids,
parsedArgs.runtimeFlags, rlimits, parsedArgs.mountExternal, parsedArgs.seInfo,
parsedArgs.niceName, fdsToClose, fdsToIgnore, parsedArgs.instructionSet,
parsedArgs.appDataDir);
try {
if (pid == 0) {
// in child
zygoteServer.setForkChild();
zygoteServer.closeServerSocket();
IoUtils.closeQuietly(serverPipeFd);
serverPipeFd = null;
return handleChildProc(parsedArgs, descriptors, childPipeFd);
}
}
}
  • 此处通过Zygote.forkAndSpecialize()来fork新的应用进程,而启动systemserver进程是通过Zygote.forkSystemServer()来fork SystemServer进程。
  • 此处通过handleChildProc()方法处理,而之前是用handleSystemServerProcess()来处理。

通过fork新的应用程序进程之后,返回pid等于0就表示进入子进程,于是调用handleChildProc()方法进一步处理:

1
2
3
4
5
private Runnable handleChildProc(Arguments parsedArgs, FileDescriptor[] descriptors,FileDescriptor pipeFd) {
// ZygoteInit.zygoteInit中会创建Binder线程池,
// 也就是说每个进程无论是否包含任何activity等组件,一定至少会包含一个Binder线程
return ZygoteInit.zygoteInit(parsedArgs.targetSdkVersion, parsedArgs.remainingArgs,null /* classLoader */);
}

到此处,后面便和上面一样的了,唯一不同的是,SystemServer进程启动之后进入的是主类SystemServer.java的main()函数,而这里应用程序启动起来后进入的是主类是ActivityThread.java的main()函数,进入ActivityThread.main()方法后,会创建Application实例,具体可见:Android-Application

接下来就只剩下forkAndSpecialize方法的解析了:

1
2
3
4
5
6
7
8
9
10
11
12
13
14
15
16
public static int forkAndSpecialize(int uid, int gid, int[] gids, int runtimeFlags,
int[][] rlimits, int mountExternal, String seInfo, String niceName, int[] fdsToClose,
int[] fdsToIgnore, boolean startChildZygote, String instructionSet, String appDataDir) {
// 停止Zygote的4个Daemon子线程的运行,等待并确保Zygote是单线程(用于提升fork效率),
// 并等待这些线程的停止,初始化gc堆的工作
VM_HOOKS.preFork();
// Resets nice priority for zygote process.
resetNicePriority();
// 调用fork()创建新进程,设置新进程的主线程id,重置gc性能数据,设置信号处理函数
int pid = nativeForkAndSpecialize(
uid, gid, gids, runtimeFlags, rlimits, mountExternal, seInfo, niceName, fdsToClose,
fdsToIgnore, startChildZygote, instructionSet, appDataDir);
// 在fork新进程后,启动Zygote的4个Daemon线程,java堆整理等。
VM_HOOKS.postForkCommon();
return pid;
}

nativeForkAndSpecialize()方法是一个Native方法,最终调用的是frameworks/base/core/jni/com_android_internal_os_Zygote.cpp#com_android_internal_os_Zygote_nativeForkAndSpecialize()方法,该方法又调用的是ForkAndSpecializeCommon方法:

1
2
3
4
5
6
7
8
9
10
11
12
13
14
15
16
17
18
19
20
21
22
23
24
25
26
27
28
29
30
31
32
33
34
35
36
37
38
39
40
41
42
43
44
45
46
47
48
49
50
51
52
53
54
55
56
57
58
59
60
61
62
63
64
65
66
67
68
69
70
71
72
73
74
75
76
77
78
79
static const char kZygoteClassName[] = "com/android/internal/os/Zygote";

int register_com_android_internal_os_Zygote(JNIEnv* env) {
gZygoteClass = MakeGlobalRefOrDie(env, FindClassOrDie(env, kZygoteClassName));
gCallPostForkChildHooks = GetStaticMethodIDOrDie(env, gZygoteClass, "callPostForkChildHooks", "(IZZLjava/lang/String;)V");
return RegisterMethodsOrDie(env, "com/android/internal/os/Zygote", gMethods, NELEM(gMethods));
}

static void SetSignalHandlers() {
struct sigaction sig_chld = {};
sig_chld.sa_handler = SigChldHandler;
}

// Sets the SIGCHLD handler back to default behavior in zygote children.
static void UnsetChldSignalHandler() {
struct sigaction sa;
memset(&sa, 0, sizeof(sa));
sa.sa_handler = SIG_DFL;
}

static void SigChldHandler(int /*signal_number*/) {
while ((pid = waitpid(-1, &status, WNOHANG)) > 0) {
// If the just-crashed process is the system_server, bring down zygote
// so that it is restarted by init and system server will be restarted
// from there.
if (pid == gSystemServerPid) {
ALOGE("Exit zygote because system server (%d) has terminated", pid);
kill(getpid(), SIGKILL);
}
}
}

static pid_t ForkAndSpecializeCommon(JNIEnv* env, uid_t uid, gid_t gid, jintArray javaGids, jint runtime_flags,
jobjectArray javaRlimits, jlong permittedCapabilities, jlong effectiveCapabilities,
jint mount_external, jstring java_se_info, jstring java_se_name,
bool is_system_server, jintArray fdsToClose, jintArray fdsToIgnore,
bool is_child_zygote, jstring instructionSet, jstring dataDir) {
// 设置子进程的signal信号处理函数
SetSignalHandlers();

pid_t pid = fork();

if (pid == 0) {
PreApplicationInit();

// 清理所有必须立即关闭的描述符
if (!DetachDescriptors(env, fdsToClose, &error_msg)) {
fail_fn(error_msg);
}
// Re-open all remaining open file descriptors so that they aren't shared
// with the zygote across a fork.
if (!gOpenFdTable->ReopenOrDetach(&error_msg)) {
fail_fn(error_msg);
}
MountEmulatedStorage(uid, mount_external, use_native_bridge, &error_msg);

// If this zygote isn't root, it won't be able to create a process group,
// since the directory is owned by root.
if (!is_system_server && getuid() == 0) {
int rc = createProcessGroup(uid, getpid());
}
// selinux上下文
rc = selinux_android_setcontext(uid, is_system_server, se_info_c_str, se_name_c_str);

if (se_name_c_str == NULL && is_system_server) {
se_name_c_str = "system_server";
}
if (se_name_c_str != NULL) {
SetThreadName(se_name_c_str);
}

// Unset the SIGCHLD handler, but keep ignoring SIGHUP (rationale in SetSignalHandlers).
UnsetChldSignalHandler();
// 等价于调用zygote.callPostForkChildHooks()
env->CallStaticVoidMethod(gZygoteClass, gCallPostForkChildHooks, runtime_flags,
is_system_server, is_child_zygote, instructionSet);
}
return pid;
}

接着进入zygote.callPostForkChildHooks()方法:

1
2
3
4
5
6
7
8
9
10
11
12
13
private static void callPostForkChildHooks(int runtimeFlags, boolean isSystemServer,
boolean isZygote, String instructionSet) {
// 调用ZygoteHooks.postForkChild()
VM_HOOKS.postForkChild(runtimeFlags, isSystemServer, isZygote, instructionSet);
}

// ZygoteHooks.java
public void postForkChild(int runtimeFlags, boolean isSystemServer, boolean isZygote,
String instructionSet) {
nativePostForkChild(token, runtimeFlags, isSystemServer, isZygote, instructionSet);
// 设置了新进程Random随机数种子为当前系统时间,也就是在进程创建的那一刻就决定了未来随机数的情况,也就是伪随机。
Math.setRandomSeedInternal(System.currentTimeMillis());
}

nativePostForkChild通过JNI最终调用调用如下方法:art/runtime/native/dalvik_system_ZygoteHooks.cc#ZygoteHooks_nativePostForkChild():

1
2
3
4
5
6
7
8
9
10
11
12
13
14
15
16
17
18
static void ZygoteHooks_nativePostForkChild(JNIEnv* env, jclass, jlong token, jint debug_flags, jstring instruction_set) {
// 此处token记录着当前线程
Thread* thread = reinterpret_cast<Thread*>(token);
// 设置新进程的主线程id
thread->InitAfterFork();
if (instruction_set != nullptr && !is_system_server) {
ScopedUtfChars isa_string(env, instruction_set);
InstructionSet isa = GetInstructionSetFromString(isa_string.c_str());
Runtime::NativeBridgeAction action = Runtime::NativeBridgeAction::kUnload;
if (isa != InstructionSet::kNone && isa != kRuntimeISA) {
action = Runtime::NativeBridgeAction::kInitialize;
}
Runtime::Current()->InitNonZygoteOrPostFork(env, is_system_server, action, isa_string.c_str());
} else {
Runtime::Current()->InitNonZygoteOrPostFork(env, is_system_server,
Runtime::NativeBridgeAction::kUnload, nullptr, profile_system_server);
}
}

接着调用了art/runtime/runtime.cc#InitNonZygoteOrPostFork方法:

1
2
3
4
5
6
7
8
9
10
11
12
13
14
15
16
17
18
19
20
21
22
23
24
25
26
27
28
29
void Runtime::InitNonZygoteOrPostFork(JNIEnv* env, bool is_system_server,
NativeBridgeAction action, const char* isa, bool profile_system_server) {
is_zygote_ = false;

if (is_native_bridge_loaded_) {
switch (action) {
case NativeBridgeAction::kUnload:
UnloadNativeBridge(); // 卸载用于跨平台的桥连库
is_native_bridge_loaded_ = false;
break;

case NativeBridgeAction::kInitialize:
InitializeNativeBridge(env, isa); // 初始化用于跨平台的桥连库
break;
}
}

// 创建Java堆处理的线程池
heap_->CreateThreadPool();
// 重置gc性能数据,以保证进程在创建之前的GCs不会计算到当前app上。
heap_->ResetGcPerformanceInfo();

if (!safe_mode_ && (jit_options_->UseJitCompilation() || jit_options_->GetSaveProfilingInfo()) && jit_ == nullptr) {
// 创建JIT
CreateJit();
}
// 设置信号处理函数
StartSignalCatcher();
}

总结

init进程(pid=1)是Linux系统中用户空间的第一个进程,主要工作如下:

  • 初始化环境变量及挂载文件;
  • 解析并执行init.rc文件;
  • 处理子进程的退出(signal方式);
  • 创建一块共享的内存空间用于属性服务器,并启动属性服务进程;
  • 进入无限循环状态,执行如下流程:
    • 检查是否需要重启的进程,若有则将其重新启动;
    • 进入等待状态,直到系统属性变化事件(property_set改变属性值),或者收到子进程的信号SIGCHLD,或者keychord 键盘输入事件等,则会退出等待状态,执行相应的回调函数。

可见init进程在开机之后的核心工作就是响应property变化事件和回收僵尸进程以及重启进程。

  • 当某个进程改变了一个系统属性值时,系统会通过socket向init进程发送一个property变化的事件通知,那么init进程会触发相关回调。
  • 回收僵尸进程,在Linux内核中,如父进程不等待子进程的结束直接退出,会导致子进程在结束后变成僵尸进程,占用系统资源。为此,init进程专门安装了SIGCHLD信号接收器,当某些子进程退出时发现其父进程已经退出,则会向init进程发送SIGCHLD信号,init进程回收僵尸子进程。

Zygote启动过程的调用流程:

  • 解析init.zygote.rc中的参数,创建AppRuntime并调用AppRuntime.start()方法;
  • 调用AndroidRuntime的startVM()方法创建虚拟机,再调用startReg()注册JNI函数;
  • 通过JNI方式调用ZygoteInit.main(),第一次进入Java世界;
  • registerServerSocketFromEnv()方法建立socket通道,zygote作为通信的服务端,用于响应客户端请求;
  • preload()预加载通用类、相关资源,共享库等,用于提高app启动效率;
  • 接下来再通过startSystemServer(),fork出system_server进程,也是上层framework的运行载体;
  • zygote调用runSelectLoop()方法等待,当接收到创建新进程请求时唤醒并执行相应工作。

zygote预加载了一些资源,通过它来 fork system_server 进程,则 system_server 可以直接使用这些加载好的资源如 JNI 函数,常用的方法,共享库,资源等。此外,选择使用 zygote 进程来 fork 应用程序而不是使用 system_server 来 fork 是因为 system_server 有自己的工作要处理,其内有许多线程如 AMS, WMS, PKMS 等,这种多线程的父进程 fork 子进程可能会导致死锁。

在 Linux 系统中 fork 子进程会复制父进程用户空间的数据到子进程(copy-on-write),然后复制当前线程到子进程,而父进程中的其它线程在子进程中都”蒸发”了。如果在fork之前,一个线程持有了某个锁,然后另外一个线程调用了fork创建子进程,在子进程中持有那个锁的线程却”蒸发”了,从子进程的角度来看,这个锁被“永久”的上锁了,因为它的持有者“蒸发”了。如果子进程中的任何一个线程对这个已经被持有的锁进行lock操作,就会发生死锁。

将整个流程总结为下图:

init-zygote总结