启动过程 注:本文基于Android 9.0源码,为了文章的简洁性,引用源码的地方可能有所删减。
系统启动 当电源按下时引导芯片代码会从预定义的地方(固化在ROM)开始执行,加载引导程序BootLoader到RAM,然后执行。
引导程序BootLoader 它是Android操作系统开始运行前的一个小程序,主要将操作系统OS拉起来并进行。
Linux内核启动 当内核启动时,设置缓存、被保护存储器、计划列表、加载驱动。此外,还启动了Kernel的swapper进程(pid = 0)和kthreadd进程(pid = 2):
swapper进程:又称为idle进程,系统初始化过程Kernel由无到有开创的第一个进程, 用于初始化进程管理、内存管理,加载Binder Driver、Display、Camera Driver等相关工作。
kthreadd进程:Linux系统的内核进程,是所有内核进程的鼻祖,会创建内核工作线程kworkder,软中断线程ksoftirqd,thermal等内核守护进程。
当内核完成系统设置时,它首先在系统文件中寻找init.rc文件,并启动init进程。init进程是一个由内核启动的第一个用户级进程,它的进程号是1,父进程id号是0。它的生命周期贯穿整个linux内核运行的始终,linux中所有其它的进程的共同始祖均为init进程。
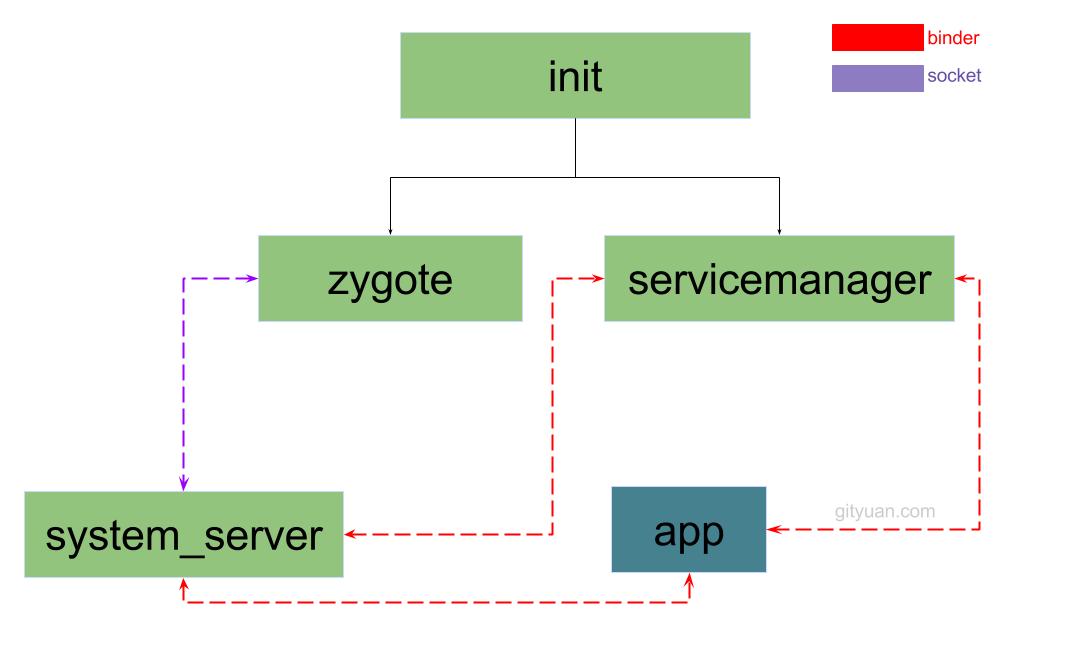
init进程是所有用户空间的鼻祖, 它会启动servicemanager(binder服务管家,其功能为查询和注册服务), Zygote进程(Java进程的鼻祖). Zygote进程会创建 system_server进程以及各种app进程。如下图所示:
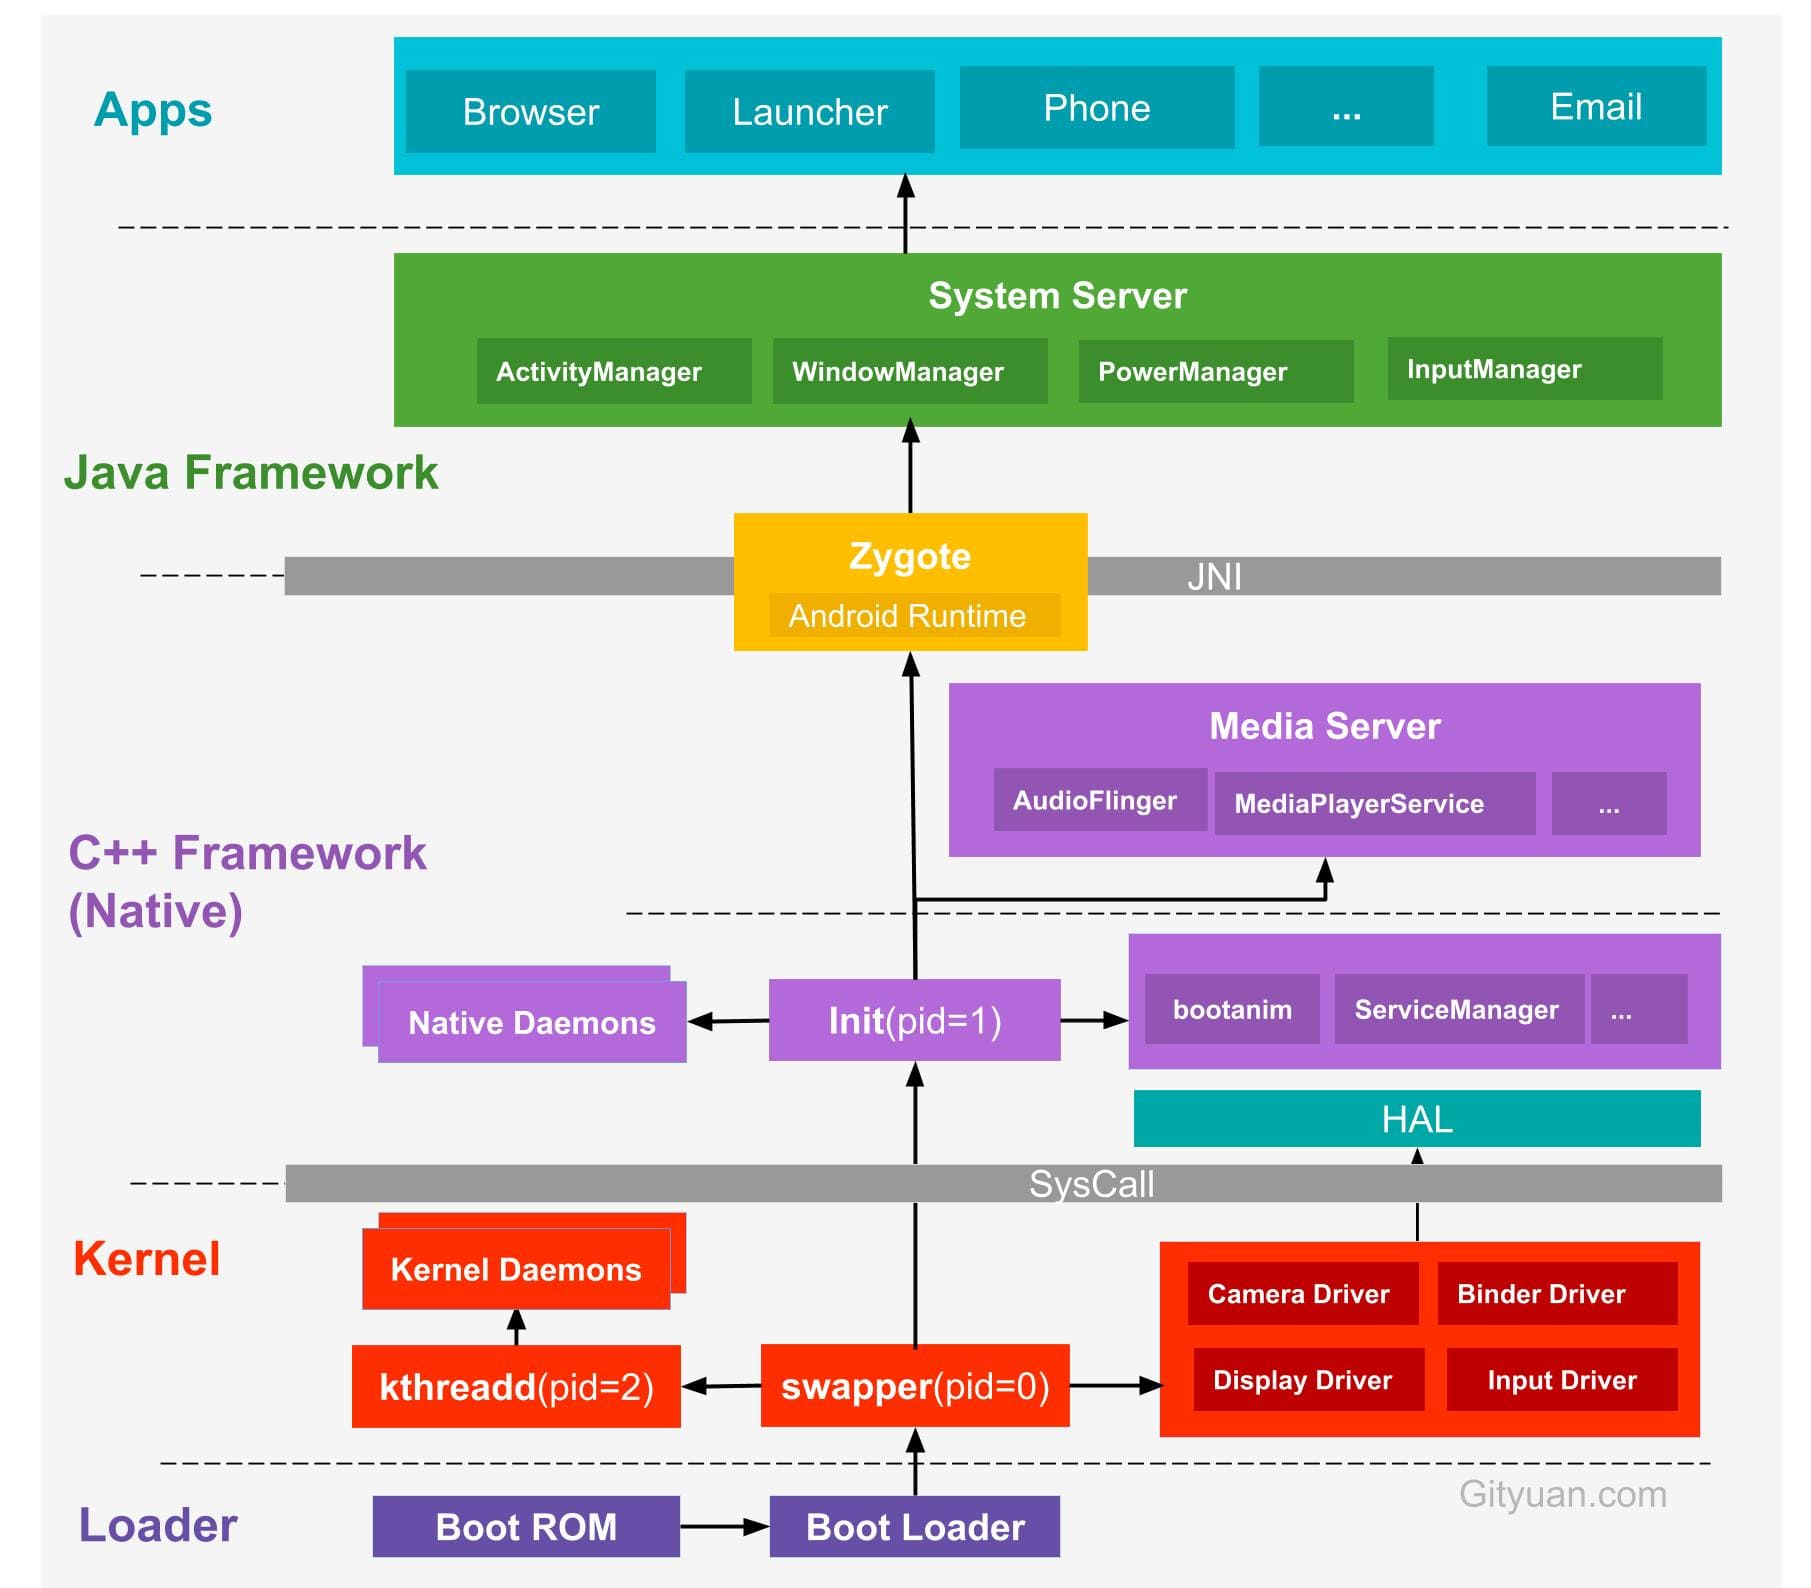
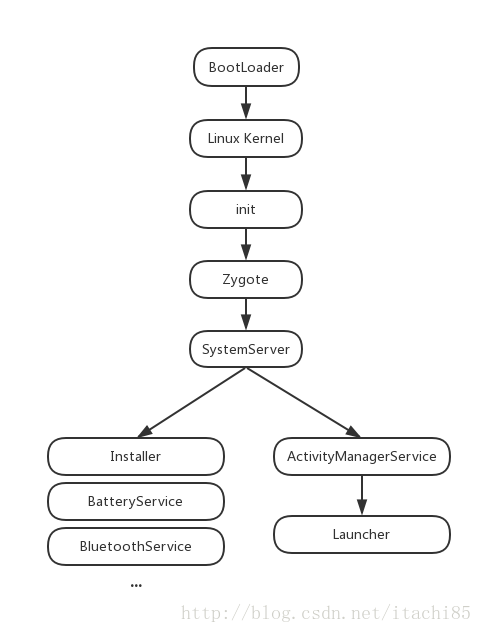
Android系统的启动流程如下图:
涉及到操作系统相关的可以看操作系统 ,本文只关注Android操作系统启动后进程之间的关系与通信。
参考:
init进程 关于init的详细解析 。
init进程的入口函数是system/core/init/init.cpp的main函数,源码 。
init进程的入口函数是system/core/init/init.cpp的main函数,它的代码如下所示:
1
2
3
4
5
6
7
8
9
10
11
12
13
14
15
16
17
18
19
20
21
22
23
24
25
26
27
28
29
30
31
32
33
34
35
36
37
38
39
40
41
42
43
44
45
46
47
48
49
50
51
52
53
54
55
56
57
58
59
60
61
62
63
64
65
66
67
68
69
70
71
72
73
74
75
76
77
78
79
80
81
82
83
84
85
86
87
88
89
90
91
92
93
94
95
96
97
98
99
100
101
102
103
104
105
106
107
108
109
110
111
112
113
114
115
116
117
int main (int argc, char ** argv) add_environment("PATH" , _PATH_DEFPATH); bool is_first_stage = (getenv("INIT_SECOND_STAGE" ) == nullptr ); if (is_first_stage) { umask(0 ); mount("tmpfs" , "/dev" , "tmpfs" , MS_NOSUID, "mode=0755" ); mkdir("/dev/pts" , 0755 ); InitKernelLogging(argv); LOG(INFO) << "init first stage started!" ; if (!DoFirstStageMount()) { LOG(ERROR) << "Failed to mount required partitions early ..." ; panic(); } selinux_initialize(true ); if (restorecon("/init" ) == -1 ) { PLOG(ERROR) << "restorecon failed" ; security_failure(); } setenv("INIT_SECOND_STAGE" , "true" , 1 ); setenv("INIT_STARTED_AT" , StringPrintf("%" PRIu64, start_ms).c_str(), 1 ); char * path = argv[0 ]; char * args[] = { path, nullptr }; execv(path, args); PLOG(ERROR) << "execv(\"" << path << "\") failed" ; security_failure(); } InitKernelLogging(argv); LOG(INFO) << "init second stage started!" ; property_init(); process_kernel_dt(); process_kernel_cmdline(); export_kernel_boot_props(); property_set("ro.boottime.init" , getenv("INIT_STARTED_AT" )); property_set("ro.boottime.init.selinux" , getenv("INIT_SELINUX_TOOK" )); unsetenv("INIT_SECOND_STAGE" ); unsetenv("INIT_STARTED_AT" ); unsetenv("INIT_SELINUX_TOOK" ); unsetenv("INIT_AVB_VERSION" ); selinux_initialize(false ); selinux_restore_context(); signal_handler_init(); start_property_service(); while (true ) { int epoll_timeout_ms = -1 ; if (!(waiting_for_prop || ServiceManager::GetInstance().IsWaitingForExec())) { am.ExecuteOneCommand(); } if (!(waiting_for_prop || ServiceManager::GetInstance().IsWaitingForExec())) { restart_processes(); if (process_needs_restart_at != 0 ) { epoll_timeout_ms = (process_needs_restart_at - time(nullptr )) * 1000 ; if (epoll_timeout_ms < 0 ) epoll_timeout_ms = 0 ; } if (am.HasMoreCommands()) epoll_timeout_ms = 0 ; } epoll_event ev; int nr = TEMP_FAILURE_RETRY(epoll_wait(epoll_fd, &ev, 1 , epoll_timeout_ms)); if (nr == -1 ) { PLOG(ERROR) << "epoll_wait failed" ; } else if (nr == 1 ) { ((void (*)()) ev.data.ptr)(); } } return 0 ; }
第一阶段:
判断及增加环境变量
创建文件系统目录并挂载相关的文件系统
重定向输入输出/内核Log系统
挂载一些分区设备
完成SELinux相关工作,可参考Android Security
is_first_stage 收尾
第二阶段:
初始化属性域,清空环境变量
完成SELinux相关工作
启动属性服务
解析配置文件,执行各个阶段的动作,创建Zygote的工作就是在其中的某个阶段完成的。
init进入一个无限循环,并且等待一些事情的发生。
小结 Android系统启动后,BootLoader程序引导Linux Kernal启动,Kernal启动内核进程鼻祖,进而启动第一个用户进程init,在其中做一些基本的初始化操作,然后解析执行init.rc系列的配置文件,其中便包括启动zygote进程。
与BootLoader引导Kernal启动以及内核剪裁相关的可以参考:Linux初步 。
zygote进程 Zygote是由init进程通过解析init.zygote.rc文件而创建的,zygote所对应的可执行程序app_process(关于app_process可执行文件的实践用法 ),所对应的源文件是app_main.cpp,进程名为zygote。
zygote最初的名字叫“app_process”,这个名字是在Android.mk文件中被指定的,但app_process在运行过程中,系统将自己的名字换成了“zygote”,所以我们通过ps命令看到的进程名是“zygote”。
当Zygote进程启动后, 便会执行到frameworks/base/cmds/app_process/app_main.cpp文件的main()方法。整个调用流程:
1
2
3
4
5
6
7
8
9
app_main.main AndroidRuntime.start AndroidRuntime.startVm AndroidRuntime.startReg ZygoteInit.main (首次进入Java世界) registerServerSocketFromEnv preload forkSystemServer runSelectLoop
Zygote进程创建Java虚拟机,并注册JNI方法,真正成为Java进程的母体,用于孵化Java进程。在创建完system_server进程后,zygote功成身退,调用runSelectLoop()随时待命,当接收到创建新进程请求时立即唤醒并执行相应工作。Zygote进程共做了如下几件事:
创建AppRuntime并调用其start方法,启动Zygote进程。
创建DVM(ART)并为DVM注册JNI。
通过JNI调用ZygoteInit的main函数进入Zygote的Java框架层。
通过registerServerSocketFromEnv函数创建服务端Socket,并通过runSelectLoop函数等待ActivityManagerService的请求来创建新的应用程序进程。
启动SystemServer进程。
1 2 3 4 5 6 7 8 9 10 11 12 13 14 15 16 17 18 19 20 21 22 23 24 25 26 27 28 29 30 31 32 33 34 35 36 37 38 39 40 41 42 43 44 45 46 47 48 49 50 51 52 53 54 55 56 57 58 59 60 public static void main (String argv[]) ZygoteServer zygoteServer = new ZygoteServer(); try { boolean startSystemServer = false ; String socketName = "zygote" ; String abiList = null; boolean enableLazyPreload = false ; for (int i = 1 ; i < argv.length; i++) { if ("start-system-server" .equals(argv[i])) { startSystemServer = true ; } else if ("--enable-lazy-preload" .equals(argv[i])) { enableLazyPreload = true ; } else if (argv[i].startsWith(ABI_LIST_ARG)) { abiList = argv[i].substring(ABI_LIST_ARG.length()); } else if (argv[i].startsWith(SOCKET_NAME_ARG)) { socketName = argv[i].substring(SOCKET_NAME_ARG.length()); } else { throw new RuntimeException("Unknown command line argument: " + argv[i]); } } zygoteServer.registerServerSocketFromEnv(socketName); if (!enableLazyPreload) { preload(bootTimingsTraceLog); } gcAndFinalize(); if (startSystemServer) { Runnable r = forkSystemServer(abiList, socketName, zygoteServer); if (r != null) { r.run(); return ; } } Log.i(TAG, "Accepting command socket connections" ); caller = zygoteServer.runSelectLoop(abiList); } catch (Throwable ex) { Log.e(TAG, "System zygote died with exception" , ex); throw ex; } finally { zygoteServer.closeServerSocket(); } if (caller != null) { caller.run(); } }
上面有三个重要的调用:
registerServerSocketFromEnv用来创建一个Zygote的Socket接口,用来和AMS等通信
forkSystemServer用来fork创建system_server进程;
runSelectLoop用来处理客户端连接与请求,包括AMS请求创建app进程。
小结 zygote进程被init进程启动后,它启动了虚拟机,然后注册一些JNI函数,通过JNI调用ZygoteInit的main函数进入Zygote的Java框架层,然后创建用于通信的Socket,用来处理客户端请求,包括AMS请求创建app进程等,另外通过fork创建system_server进程。
system_server进程 概述 SyetemServer在启动时做了如下工作:
启动Binder线程池,这样就可以与其他进程进行通信。
创建SystemServiceManager用于对系统的服务进行创建、启动和生命周期管理。
启动各种系统服务。AMS,PMS,以及WMS等都是运行在system_server这个进程中的线程。
ZygoteInit.forkSystemServer 在上节中,ZygoteInit.main方法首次进入Java世界,然后调用了forkSystemServer方法创建system_server进程。
1
2
3
4
5
6
7
8
9
10
11
12
13
14
15
16
17
18
19
20
21
22
23
24
25
26
27
28
29
30
31
32
33
34
35
36
37
38
39
40
41
42
43
44
45
46
47
48
49
50
51
52
private static Runnable forkSystemServer (String abiList, String socketName, ZygoteServer zygoteServer) String args[] = { "--setuid=1000" , "--setgid=1000" , "--setgroups=1001,1002,1003,1004,1005,1006,1007,1008,1009,1010,1018,1021,1023,1024,1032,1065,3001,3002,3003,3006,3007,3009,3010" , "--capabilities=" + capabilities + "," + capabilities, "--nice-name=system_server" , "--runtime-args" , "--target-sdk-version=" + VMRuntime.SDK_VERSION_CUR_DEVELOPMENT, "com.android.server.SystemServer" , }; ZygoteConnection.Arguments parsedArgs = null ; int pid; try { parsedArgs = new ZygoteConnection.Arguments(args); ZygoteConnection.applyDebuggerSystemProperty(parsedArgs); ZygoteConnection.applyInvokeWithSystemProperty(parsedArgs); boolean profileSystemServer = SystemProperties.getBoolean( "dalvik.vm.profilesystemserver" , false ); if (profileSystemServer) { parsedArgs.runtimeFlags |= Zygote.PROFILE_SYSTEM_SERVER; } pid = Zygote.forkSystemServer( parsedArgs.uid, parsedArgs.gid, parsedArgs.gids, parsedArgs.runtimeFlags, null , parsedArgs.permittedCapabilities, parsedArgs.effectiveCapabilities); } catch (IllegalArgumentException ex) { throw new RuntimeException(ex); } if (pid == 0 ) { if (hasSecondZygote(abiList)) { waitForSecondaryZygote(socketName); } zygoteServer.closeServerSocket(); return handleSystemServerProcess(parsedArgs); } return null ; }
在这里设置了system_server进程的uid,gid和groups,nice-name等,有两个重要的调用:
Zygote.forkSystemServer()函数用来fork一个新的进程,如果pid==0,表示已经进入SystemServer子进程,于是先关闭“Zygote”socket,因为系统服务进程system_server也继承了Socket,不用所以close它;
调用了handleSystemServerProcess()方法,返回Runnable对象到ZygoteInit.main并调用,其实是调用到了com.android.server.SystemServer.main方法。
Zygote.forkSystemServer 首先看看Zygote.forkSystemServer方法,它调用的是nativeForkSystemServer方法:
1 2 3 4 5 6 7 8 9 10 11 12 13 14 15 16 17 18 19 20 21 22 23 24 25 26 27 28 29 30 31 32 33 34 35 36 37 38 39 40 41 42 43 44 45 46 47 48 49 50 51 52 53 54 55 56 57 58 static jint com_android_internal_os_Zygote_nativeForkSystemServer ( JNIEnv* env, jclass, uid_t uid, gid_t gid, jintArray gids, jint runtime_flags, jobjectArray rlimits, jlong permittedCapabilities, jlong effectiveCapabilities) pid_t pid = ForkAndSpecializeCommon(env, uid, gid, gids, runtime_flags, rlimits, permittedCapabilities, effectiveCapabilities, MOUNT_EXTERNAL_DEFAULT, NULL , NULL , true , NULL , NULL , NULL , NULL ); if (pid > 0 ) { } return pid; } static pid_t ForkAndSpecializeCommon () SetSignalHandlers(); pid_t pid = fork(); UnsetChldSignalHandler(); } static void SetSignalHandlers () struct sigaction sig_chld = { sig_chld.sa_handler = SigChldHandler; if (sigaction(SIGCHLD, &sig_chld, NULL ) < 0 ) { ALOGW("Error setting SIGCHLD handler: %s" , strerror(errno)); } struct sigaction sig_hup = { sig_hup.sa_handler = SIG_IGN; if (sigaction(SIGHUP, &sig_hup, NULL ) < 0 ) { ALOGW("Error setting SIGHUP handler: %s" , strerror(errno)); } } static void UnsetChldSignalHandler () struct sigaction sa ; memset (&sa, 0 , sizeof (sa)); sa.sa_handler = SIG_DFL; if (sigaction(SIGCHLD, &sa, NULL ) < 0 ) { ALOGW("Error unsetting SIGCHLD handler: %s" , strerror(errno)); } } static void SigChldHandler (int ) pid_t pid; int status; while ((pid = waitpid(-1 , &status, WNOHANG)) > 0 ) { if (pid == gSystemServerPid) { ALOGE("Exit zygote because system server (%d) has terminated" , pid); kill(getpid(), SIGKILL); } } }
在ForkAndSpecializeCommon中有个逻辑是如果SystemServer进程停止工作,那么首先通过getpid()来获取Zygote进程的pid,然后调用kill函数杀死它,即SystemServer停止工作之后,Zygote进程自杀,然后在Init进程的main()函数中有一个死循环,如果它的子进程Zygote停止工作,就会去重启子进程。
handleSystemServerProcess 1 2 3 4 5 6 7 8 9 10 11 12 13 14 15 16 17 18 19 20 21 22 23 24 25 26 27 28 29 30 31 32 33 34 35 36 37 38 39 40 41 42 43 private static Runnable handleSystemServerProcess (ZygoteConnection.Arguments parsedArgs) ClassLoader cl = createPathClassLoader(systemServerClasspath, parsedArgs.targetSdkVersion); Thread.currentThread().setContextClassLoader(cl); return ZygoteInit.zygoteInit(parsedArgs.targetSdkVersion, parsedArgs.remainingArgs, cl); } public static final Runnable zygoteInit (int targetSdkVersion, String[] argv, ClassLoader classLoader) ZygoteInit.nativeZygoteInit(); return RuntimeInit.applicationInit(targetSdkVersion, argv, classLoader); } protected static Runnable applicationInit (int targetSdkVersion, String[] argv, ClassLoader classLoader) final Arguments args = new Arguments(argv); return findStaticMain(args.startClass, args.startArgs, classLoader); } protected static Runnable findStaticMain (String className, String[] argv, ClassLoader classLoader) Class<?> cl = Class.forName(className, true , classLoader); Method m = cl.getMethod("main" , new Class[] { String[].class }); return new MethodAndArgsCaller(m, argv); } static class MethodAndArgsCaller implements Runnable private final Method mMethod; private final String[] mArgs; public MethodAndArgsCaller (Method method, String[] args) mMethod = method; mArgs = args; } public void run () mMethod.invoke(null , new Object[] { mArgs }); } }
到这里可以知道ZygoteInit.main方法中的Runnable r = forkSystemServer(abiList, socketName, zygoteServer);返回的r即是MethodAndArgsCaller,在子进程中调用r.run方法便是调用了com.android.server.SystemServer.main方法。
SystemServer#main 1 2 3 4 5 6 7 8 9 10 11 12 13 14 15 16 17 18 19 20 21 22 23 24 25 26 27 28 29 30 31 32 33 34 public final class SystemServer ... public static void main (String[] args) new SystemServer().run(); } } private void run () Looper.prepareMainLooper(); System.loadLibrary("android_servers" ); createSystemContext(); mSystemServiceManager = new SystemServiceManager(mSystemContext); LocalServices.addService(SystemServiceManager.class, mSystemServiceManager); try { startBootstrapServices(); startCoreServices(); startOtherServices(); } catch (Throwable ex) { throw ex; } Looper.loop(); throw new RuntimeException("Main thread loop unexpectedly exited" ); }
调用关系:
1
2
3
4
5
6
7
8
SystemServer.main SystemServer.run Looper.prepareMainLooper(); createSystemContext startBootstrapServices(); startCoreServices(); startOtherServices(); Looper.loop();
与system_server进程的Application相关的解析可见:Android-Application 。
小结 system_server进程由zygote进程fork而创建,它是Android系统中一个核心的进程,里面启动了许多系统级别的Service线程,如AMS,PMS等。它创建了用于IPC的Binder线程池(service_manager在init进程执行init.rc的时候创建),它的死亡会导致zygote自杀,zygote自杀后init进程会重启它,然后接下来再重复进行上述相关的操作。
app进程 AMS发送请求 ActivityManagerService也是由SystemServer创建的。假设通过startActivity来启动一个新的Activity,而这个Activity附属于一个还未启动的进程,则会启动一个新的进程,调用startActivity的进程通过Binder调用到ActivityManagerService中的方法,然后经过层层调用(具体可见Android-Activity启动原理 ),会调用到Process.start()方法,代码如下所示:
1
2
3
4
5
6
7
8
9
10
11
12
13
14
15
public static final ProcessStartResult start (final String processClass, final String niceName, int uid, int gid, int [] gids, int runtimeFlags, int mountExternal, int targetSdkVersion, String seInfo, String abi, String instructionSet, String appDataDir, String invokeWith, String[] zygoteArgs) return zygoteProcess.start(processClass, niceName, uid, gid, gids, runtimeFlags, mountExternal, targetSdkVersion, seInfo, abi, instructionSet, appDataDir, invokeWith, zygoteArgs); }
这里的参数processClass为“android.app.ActivityThread”,它是传进去的第一个参数,也就是程序初始化进程时要加载的主文件Java类。当应用进程启动之后,会把这个类加载到进程,调用它的main()方法作为应用程序进程的入口。Process类的start()直接调用了ZygoteProcess类的start()方法,该start()方法调用了ZygoteProcess类的startViaZygote()方法,下面看看该方法实现:
1
2
3
4
5
6
7
8
9
10
11
12
13
private Process.ProcessStartResult startViaZygote (final String processClass, final String niceName, final int uid, final int gid, final int [] gids, int runtimeFlags, int mountExternal, int targetSdkVersion, String seInfo, String abi, String instructionSet,String appDataDir, String invokeWith, String[] extraArgs) throws ZygoteStartFailedEx ArrayList<String> argsForZygote = new ArrayList<String>(); argsForZygote.add("--runtime-args" ); argsForZygote.add("--setuid=" + uid); argsForZygote.add("--setgid=" + gid); synchronized(mLock) { return zygoteSendArgsAndGetResult(openZygoteSocketIfNeeded(abi), argsForZygote); } }
首先给它设置值,包括uid、gid等。接着调用openZygoteSocketIfNeeded()方法来连接“zygote”Socket,链接Socket成功之后,就会调用zygoteSendArgsAndGetResult()方法来进一步处理。
先来看看openZygoteSocketIfNeeded()方法:
1
2
3
4
5
6
private ZygoteState openZygoteSocketIfNeeded (String abi) throws ZygoteStartFailedEx if (primaryZygoteState == null || primaryZygoteState.isClosed()) { try { primaryZygoteState = ZygoteState.connect(mSocket); } }
方法中的mSocket的值是“zygote”,通过connect()方法去连接“zygote”Socket。接着看看zygoteSendArgsAndGetResult()方法:
1
2
3
4
5
6
7
8
9
10
11
12
13
14
15
private static Process.ProcessStartResult zygoteSendArgsAndGetResult ( ZygoteState zygoteState, ArrayList<String> args) throws ZygoteStartFailedEx { try { final BufferedWriter writer = zygoteState.writer; final DataInputStream inputStream = zygoteState.inputStream; writer.write(Integer.toString(args.size())); writer.newLine(); for (int i = 0 ; i < sz; i++) { String arg = args.get(i); writer.write(arg); writer.newLine(); } writer.flush(); }
通过Socket写入流writer把前面传过来的那些参数写进去,Socket即ZygoteServer类的runSelectLoop()方法监听。写入这些数据之后,ZygoteServer类的runSelectLoop()方法就能被监听到。
响应请求 1 2 3 4 5 6 7 8 9 10 11 12 13 14 15 16 17 18 19 20 21 22 23 24 25 26 27 28 29 30 31 32 33 34 35 36 37 38 39 40 41 42 43 44 45 46 47 48 49 50 51 52 53 54 55 56 57 58 59 60 61 62 63 64 65 66 67 68 69 Runnable runSelectLoop (String abiList) { ArrayList<FileDescriptor> fds = new ArrayList<FileDescriptor>(); ArrayList<ZygoteConnection> peers = new ArrayList<ZygoteConnection>(); fds.add(mServerSocket.getFileDescriptor()); peers.add(null ); while (true ) { StructPollfd[] pollFds = new StructPollfd[fds.size()]; for (int i = 0 ; i < pollFds.length; ++i) { pollFds[i] = new StructPollfd(); pollFds[i].fd = fds.get(i); pollFds[i].events = (short ) POLLIN; } try { Os.poll(pollFds, -1 ); } catch (ErrnoException ex) { throw new RuntimeException("poll failed" , ex); } for (int i = pollFds.length - 1 ; i >= 0 ; --i) { if ((pollFds[i].revents & POLLIN) == 0 ) { continue ; } if (i == 0 ) { ZygoteConnection newPeer = acceptCommandPeer(abiList); peers.add(newPeer); fds.add(newPeer.getFileDesciptor()); } else { try { ZygoteConnection connection = peers.get(i); final Runnable command = connection.processOneCommand(this ); if (mIsForkChild) { if (command == null ) { throw new IllegalStateException("command == null" ); } return command; } else { if (command != null ) { throw new IllegalStateException("command != null" ); } if (connection.isClosedByPeer()) { connection.closeSocket(); peers.remove(i); fds.remove(i); } } } catch (Exception e) { if (!mIsForkChild) { ZygoteConnection conn = peers.remove(i); conn.closeSocket(); fds.remove(i); } else { throw e; } } finally { mIsForkChild = false ; } } } } }
进入ZygoteConnection类的processOneCommand()方法后:
1
2
3
4
5
6
7
8
9
10
11
12
13
14
15
16
Runnable processOneCommand (ZygoteServer zygoteServer) { pid = Zygote.forkAndSpecialize(parsedArgs.uid, parsedArgs.gid, parsedArgs.gids, parsedArgs.runtimeFlags, rlimits, parsedArgs.mountExternal, parsedArgs.seInfo, parsedArgs.niceName, fdsToClose, fdsToIgnore, parsedArgs.instructionSet, parsedArgs.appDataDir); try { if (pid == 0 ) { zygoteServer.setForkChild(); zygoteServer.closeServerSocket(); IoUtils.closeQuietly(serverPipeFd); serverPipeFd = null ; return handleChildProc(parsedArgs, descriptors, childPipeFd); } } }
此处通过Zygote.forkAndSpecialize()来fork新的应用进程,而启动systemserver进程是通过Zygote.forkSystemServer()来fork SystemServer进程。
此处通过handleChildProc()方法处理,而之前是用handleSystemServerProcess()来处理。
通过fork新的应用程序进程之后,返回pid等于0就表示进入子进程,于是调用handleChildProc()方法进一步处理:
1
2
3
4
5
private Runnable handleChildProc (Arguments parsedArgs, FileDescriptor[] descriptors,FileDescriptor pipeFd) return ZygoteInit.zygoteInit(parsedArgs.targetSdkVersion, parsedArgs.remainingArgs,null ); }
到此处,后面便和上面一样的了,唯一不同的是,SystemServer进程启动之后进入的是主类SystemServer.java的main()函数,而这里应用程序启动起来后进入的是主类是ActivityThread.java的main()函数,进入ActivityThread.main()方法后,会创建Application实例,具体可见:Android-Application 。
总结 init进程(pid=1)是Linux系统中用户空间的第一个进程,主要工作如下:
分析和运行所有的init.rc文件;
生成设备驱动节点;(通过rc文件创建)
处理子进程的终止(signal方式);
创建一块共享的内存空间用于属性服务器,并启动相应属性服务进程;
进入无限循环状态,执行如下流程:
检查是否需要重启的进程,若有则将其重新启动;
进入等待状态,直到系统属性变化事件(property_set改变属性值),或者收到子进程的信号SIGCHLD,再或者keychord键盘输入事件,则会退出等待状态,执行相应的回调函数。
Zygote启动过程的调用流程:
解析init.zygote.rc中的参数,创建AppRuntime并调用AppRuntime.start()方法;
调用AndroidRuntime的startVM()方法创建虚拟机,再调用startReg()注册JNI函数;
通过JNI方式调用ZygoteInit.main(),第一次进入Java世界;
registerServerSocketFromEnv()建立socket通道,zygote作为通信的服务端,用于响应客户端请求;
preload()预加载通用类、drawable和color资源、openGL以及共享库以及WebView,用于提高app启动效率;
zygote完毕大部分工作,接下来再通过startSystemServer(),fork得力帮手system_server进程,也是上层framework的运行载体。
zygote功成身退,调用runSelectLoop(),随时待命,当接收到请求创建新进程请求时立即唤醒并执行相应工作。
Zygote进程为了启动SystemServer和启动应用程序进程主要做了两件事,一是初始化Binder驱动用来进行进程间通信,二是通过反射进入main()方法。与Binder相关的原理可以看系列:Android-Binder原理 。
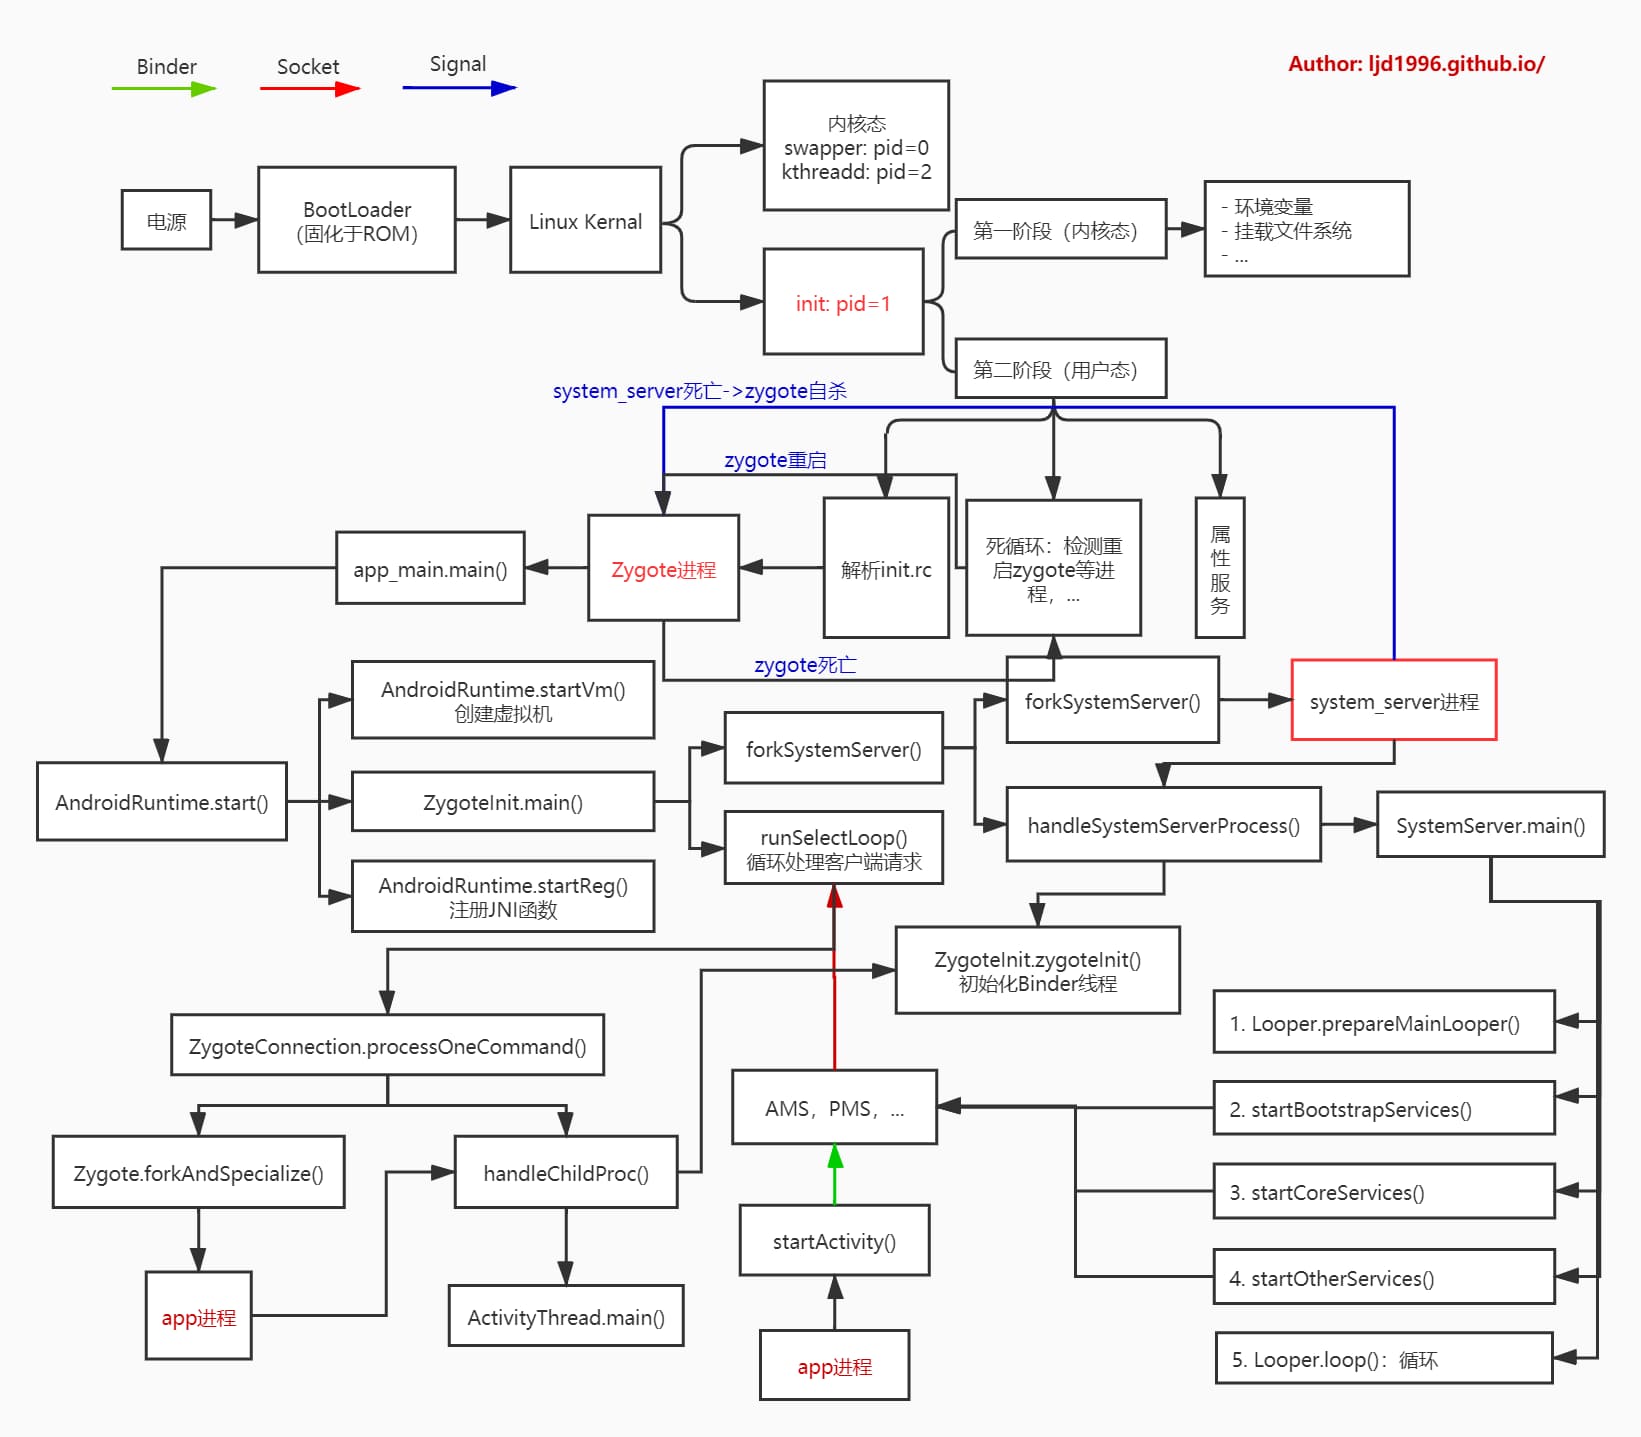
将整个流程总结为下图: