概述 WMS继承于IWindowManager.Stub,是Binder的服务端。
注:本文基于Android 10源码,为了文章的简洁性,引用源码的地方可能有所删减。
相关类/方法 在解析WMS源码前,先看一下几个相关的类和方法。
DisplayThread 1 2 3 4 5 6 7 8 9 10 11 12 13 14 15 16 17 18 19 20 21 22 23 24 25 26 27 28 29 30 31 32 33 public class ServiceThread extends HandlerThread } public final class DisplayThread extends ServiceThread private static DisplayThread sInstance; private static Handler sHandler; private DisplayThread () super ("android.display" , Process.THREAD_PRIORITY_DISPLAY + 1 , false ); } private static void ensureThreadLocked () if (sInstance == null ) { sInstance = new DisplayThread(); sInstance.start(); sHandler = new Handler(sInstance.getLooper()); } } public static DisplayThread get () synchronized (DisplayThread.class) { ensureThreadLocked(); return sInstance; } } public static Handler getHandler () synchronized (DisplayThread.class) { ensureThreadLocked(); return sHandler; } } }
UiThread 1 2 3 4 5 6 7 8 9 10 11 12 13 14 15 16 17 18 19 20 21 22 23 24 25 26 27 28 29 30 31 32 33 34 35 36 37 38 39 40 41 42 43 public final class UiThread extends ServiceThread private static final long SLOW_DISPATCH_THRESHOLD_MS = 100 ; private static final long SLOW_DELIVERY_THRESHOLD_MS = 200 ; private static UiThread sInstance; private static Handler sHandler; private UiThread () super ("android.ui" , Process.THREAD_PRIORITY_FOREGROUND, false ); } @Override public void run () Process.setThreadGroup(Process.myTid(), Process.THREAD_GROUP_TOP_APP); super .run(); } private static void ensureThreadLocked () if (sInstance == null ) { sInstance = new UiThread(); sInstance.start(); final Looper looper = sInstance.getLooper(); looper.setTraceTag(Trace.TRACE_TAG_SYSTEM_SERVER); looper.setSlowLogThresholdMs( SLOW_DISPATCH_THRESHOLD_MS, SLOW_DELIVERY_THRESHOLD_MS); sHandler = new Handler(sInstance.getLooper()); } } public static UiThread get () synchronized (UiThread.class) { ensureThreadLocked(); return sInstance; } } public static Handler getHandler () synchronized (UiThread.class) { ensureThreadLocked(); return sHandler; } } }
AnimationThread 1 2 3 4 5 6 7 8 9 10 11 12 13 14 15 16 17 18 19 20 21 22 23 24 25 26 27 28 29 30 31 public final class AnimationThread extends ServiceThread private static AnimationThread sInstance; private static Handler sHandler; private AnimationThread () super ("android.anim" , THREAD_PRIORITY_DISPLAY, false ); } private static void ensureThreadLocked () if (sInstance == null ) { sInstance = new AnimationThread(); sInstance.start(); sInstance.getLooper().setTraceTag(Trace.TRACE_TAG_WINDOW_MANAGER); sHandler = new Handler(sInstance.getLooper()); } } public static AnimationThread get () synchronized (AnimationThread.class) { ensureThreadLocked(); return sInstance; } } public static Handler getHandler () synchronized (AnimationThread.class) { ensureThreadLocked(); return sHandler; } } }
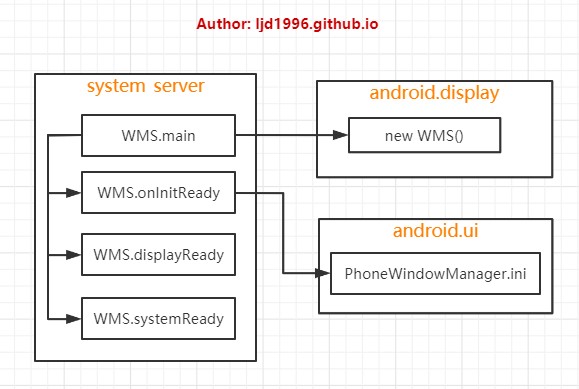
WMS启动过程 startOtherServices 由Android-init-zygote 可知,分析WMS的启动应该从SystemServer#main方法开始,在这个方法中,调用了startOtherServices方法去启动了一些系统服务,其中就包括WMS:
1 2 3 4 5 6 7 8 9 private void startOtherServices () WindowManagerService wm = WindowManagerService.main(context, inputManager, mFactoryTestMode != FactoryTest.FACTORY_TEST_LOW_LEVEL, !mFirstBoot, mOnlyCore, new PhoneWindowManager()); ServiceManager.addService(Context.WINDOW_SERVICE, wm, false , DUMP_FLAG_PRIORITY_CRITICAL | DUMP_FLAG_PROTO); wm.onInitReady(); wm.displayReady(); wm.systemReady(); }
WMS.main 1 2 3 4 5 6 7 8 9 10 11 12 13 14 15 16 17 18 19 20 21 22 23 24 25 26 27 28 29 30 31 32 33 34 35 36 37 38 39 40 41 42 43 44 45 46 final H mH = new H();final class H extends android .os .Handler } public static WindowManagerService main (final Context context, final InputManagerService im, final boolean haveInputMethods, final boolean showBootMsgs, final boolean onlyCore, WindowManagerPolicy policy) DisplayThread.getHandler().runWithScissors(() -> sInstance = new WindowManagerService(context, im, haveInputMethods, showBootMsgs, onlyCore, policy), 0 ); return sInstance; } private WindowManagerService (Context context, InputManagerService inputManager, boolean haveInputMethods, boolean showBootMsgs, boolean onlyCore, WindowManagerPolicy policy) mContext = context; mHaveInputMethods = haveInputMethods; mAllowBootMessages = showBootMsgs; mOnlyCore = onlyCore; mInputManager = inputManager; mDisplayManagerInternal = LocalServices.getService(DisplayManagerInternal.class); mDisplaySettings = new DisplaySettings(); mDisplaySettings.readSettingsLocked(); mPolicy = policy; mAnimator = new WindowAnimator(this ); mRoot = new RootWindowContainer(this ); LocalServices.addService(WindowManagerPolicy.class, mPolicy); if (mInputManager != null ) { final InputChannel inputChannel = mInputManager.monitorInput(TAG_WM); mPointerEventDispatcher = inputChannel != null ? new PointerEventDispatcher(inputChannel) : null ; } else { mPointerEventDispatcher = null ; } mDisplayManager = (DisplayManager)context.getSystemService(Context.DISPLAY_SERVICE); mPowerManager = (PowerManager)context.getSystemService(Context.POWER_SERVICE); mPowerManagerInternal = LocalServices.getService(PowerManagerInternal.class); mActivityManager = ActivityManager.getService(); LocalServices.addService(WindowManagerInternal.class, new LocalService()); }
WMS的构造方法运行在android.display线程中,由H mH = new H()知,mH也运行在当前线程,即H mH = new H()线程。
WMS.onInitReady 1 2 3 4 5 6 7 8 9 10 11 12 13 14 15 16 17 18 19 20 21 22 23 24 25 public void onInitReady () initPolicy(); Watchdog.getInstance().addMonitor(this ); openSurfaceTransaction(); try { createWatermarkInTransaction(); } finally { closeSurfaceTransaction("createWatermarkInTransaction" ); } showEmulatorDisplayOverlayIfNeeded(); } private void initPolicy () UiThread.getHandler().runWithScissors(new Runnable() { @Override public void run () WindowManagerPolicyThread.set(Thread.currentThread(), Looper.myLooper()); mPolicy.init(mContext, WindowManagerService.this , WindowManagerService.this ); } }, 0 ); }
WMS.displayReady 1 2 3 4 5 6 7 8 9 10 11 12 13 14 15 16 17 18 19 20 21 22 23 24 25 26 27 28 29 30 31 32 33 34 public void displayReady () final int displayCount = mRoot.mChildren.size(); for (int i = 0 ; i < displayCount; ++i) { final DisplayContent display = mRoot.mChildren.get(i); displayReady(display.getDisplayId()); } synchronized (mWindowMap) { final DisplayContent displayContent = getDefaultDisplayContentLocked(); if (mMaxUiWidth > 0 ) { displayContent.setMaxUiWidth(mMaxUiWidth); } readForcedDisplayPropertiesLocked(displayContent); mDisplayReady = true ; } try { mActivityManager.updateConfiguration(null ); } catch (RemoteException e) { } synchronized (mWindowMap) { mIsTouchDevice = mContext.getPackageManager().hasSystemFeature( PackageManager.FEATURE_TOUCHSCREEN); getDefaultDisplayContentLocked().configureDisplayPolicy(); } try { mActivityManager.updateConfiguration(null ); } catch (RemoteException e) { } updateCircularDisplayMaskIfNeeded(); }
WMS.systemReady 1 2 3 4 5 public void systemReady () mPolicy.systemReady(); mTaskSnapshotController.systemReady(); mHasWideColorGamutSupport = queryWideColorGamutSupport(); }
小结 WMS的启动过程涉及到3个线程: system_server主线程,android.display线程,android.ui线程。
StartingWindow流程 概述 打开一个Activity是需要时间的,如果没有任何反应的话,用户可能会以为没有点击到相应的位置。StartingWindow是一个用于在Activity创建并初始化成功前显示的临时窗口,当Activity显示后会移除这个临时Window,其Window Type是TYPE_APPLICATION_STARTING。设置windowDisablePreview属性可以控制Starting Window是否显示:<item name="android:windowDisablePreview">true</item>,默认开启。可以通过 windowBackground 属性控制 StartingWindow 的颜色,将被启动的 Activity 主题的 windowBackground 设置成 StartingWindow 需要的背景(图片等),然后在 Activity.onCreate 之前再通过 setTheme 方法设置回来。
由于在Application和Activity中都可能设置了Theme,冷启动时系统会根据这个Theme初始化Starting Window,而通过Recent启动或热启动时,starting window会显示snapshot的内容。
在Android-Activity启动流程 中介绍了Activity的启动流程,其中有多处地方都调用了显示StartingWindow的方法。
创建流程 调用入口 1 2 3 4 5 6 7 8 9 10 11 12 13 14 15 16 17 18 ActivityStarter.startActivityUnchecked ActivityStarter.setTargetStackAndMoveToFrontIfNeeded ActivityRecord.showStartingWindow(null , false , true ) ActivityStarter.resumeTargetStackIfNeeded ActivityStackSupervisor.resumeFocusedStackTopActivityLocked ActivityStack.resumeTopActivityUncheckedLocked ActivityStack.resumeTopActivityInnerLocked ActivityRecord.showStartingWindow(null , false , false ) ActivityStack.startActivityLocked ActivityRecord.showStartingWindow(prev, newTask, isTaskSwitch(r, focusedTopActivity)) AMS.moveTaskToFrontLocked ActivityRecord.showStartingWindow(null , false , true , fromRecents)
ActivityRecord.showStartingWindow 1 2 3 4 5 6 7 8 9 10 11 12 13 14 15 16 17 18 19 20 21 22 23 24 25 26 27 28 29 AppWindowContainerController mWindowContainerController; final ActivityManagerService service; final ActivityInfo info; void showStartingWindow (ActivityRecord prev, boolean newTask, boolean taskSwitch) showStartingWindow(prev, newTask, taskSwitch, false ); } void showStartingWindow (ActivityRecord prev, boolean newTask, boolean taskSwitch, boolean fromRecents) if (mWindowContainerController == null ) { return ; } if (mTaskOverlay) { return ; } final CompatibilityInfo compatInfo = service.compatibilityInfoForPackageLocked(info.applicationInfo); final boolean shown = mWindowContainerController.addStartingWindow(packageName, theme, compatInfo, nonLocalizedLabel, labelRes, icon, logo, windowFlags, prev != null ? prev.appToken : null , newTask, taskSwitch, isProcessRunning(), allowTaskSnapshot(), mState.ordinal() >= RESUMED.ordinal() && mState.ordinal() <= STOPPED.ordinal(), fromRecents); if (shown) { mStartingWindowState = STARTING_WINDOW_SHOWN; } }
AWCC.addStartingWindow addStartingWindow方法获取了主题样式,判断是否要显示starting window,如果是透明或者是悬浮窗或者windowDisablePreview等就不会显示。
1 2 3 4 5 6 7 8 9 10 11 12 13 14 15 16 17 18 19 20 21 22 23 24 25 26 27 28 29 30 31 32 33 34 35 36 37 38 39 40 41 42 43 44 45 46 47 48 49 50 51 52 53 54 55 56 57 58 59 60 61 62 63 64 65 66 67 68 69 70 71 72 73 74 75 76 77 78 79 80 81 82 83 84 85 86 87 88 89 90 public boolean addStartingWindow (String pkg, int theme, CompatibilityInfo compatInfo, CharSequence nonLocalizedLabel, int labelRes, int icon, int logo, int windowFlags, IBinder transferFrom, boolean newTask, boolean taskSwitch, boolean processRunning, boolean allowTaskSnapshot, boolean activityCreated, boolean fromRecents) synchronized (mWindowMap) { if (mContainer == null ) { return false ; } if (!mContainer.okToDisplay()) { return false ; } if (mContainer.startingData != null ) { return false ; } final WindowState mainWin = mContainer.findMainWindow(); if (mainWin != null && mainWin.mWinAnimator.getShown()) { return false ; } final TaskSnapshot snapshot = mService.mTaskSnapshotController.getSnapshot( mContainer.getTask().mTaskId, mContainer.getTask().mUserId, false , false ); final int type = getStartingWindowType(newTask, taskSwitch, processRunning, allowTaskSnapshot, activityCreated, fromRecents, snapshot); if (type == STARTING_WINDOW_TYPE_SNAPSHOT) { return createSnapshot(snapshot); } if (theme != 0 ) { AttributeCache.Entry ent = AttributeCache.instance().get(pkg, theme, com.android.internal.R.styleable.Window, mService.mCurrentUserId); if (ent == null ) { return false ; } final boolean windowIsTranslucent = ent.array.getBoolean(com.android.internal.R.styleable.Window_windowIsTranslucent, false ); final boolean windowIsFloating = ent.array.getBoolean(com.android.internal.R.styleable.Window_windowIsFloating, false ); final boolean windowShowWallpaper = ent.array.getBoolean(com.android.internal.R.styleable.Window_windowShowWallpaper, false ); final boolean windowDisableStarting = ent.array.getBoolean(com.android.internal.R.styleable.Window_windowDisablePreview, false ); if (windowIsTranslucent) { return false ; } if (windowIsFloating || windowDisableStarting) { return false ; } if (windowShowWallpaper) { if (mContainer.getDisplayContent().mWallpaperController.getWallpaperTarget() == null ) { windowFlags |= FLAG_SHOW_WALLPAPER; } else { return false ; } } } if (mContainer.transferStartingWindow(transferFrom)) { return true ; } if (type != STARTING_WINDOW_TYPE_SPLASH_SCREEN) { return false ; } mContainer.startingData = new SplashScreenStartingData(mService, pkg, theme, compatInfo, nonLocalizedLabel, labelRes, icon, logo, windowFlags, mContainer.getMergedOverrideConfiguration()); scheduleAddStartingWindow(); } return true ; } private boolean createSnapshot (TaskSnapshot snapshot) if (snapshot == null ) { return false ; } mContainer.startingData = new SnapshotStartingData(mService, snapshot); scheduleAddStartingWindow(); return true ; }
这里分为三种情况:
STARTING_WINDOW_TYPE_NONE:不添加starting window;
STARTING_WINDOW_TYPE_SNAPSHOT:任务快照,当应用程序退到后台的时候,Android为我们的应用截取的一张快照,通过Recents看到的便是TaskSnapshot截取的内容。一般从Recents界面进入应用时,或者应用进入后台再次点击桌面图标进入应用时走该流程;
STARTING_WINDOW_TYPE_SPLASH_SCREEN:默认行为,该界面显示的内容受应用主题相关属性的影响。
一般情况下可以通过设置theme的windowDisablePreview的属性为true禁止显示starting window,或者当设置了应用窗口背景色透明或者使用了float属性为true类型的窗口时,启动应用时不会添加starting window。
应用冷启动的时候starting window的显示内容受theme影响,应用通过Recent启动或者热启动时,starting window会显示snapshot的内容。
AWCC.scheduleAddStartingWindow 1 2 3 4 5 6 7 8 9 10 11 12 13 14 15 16 17 18 19 20 21 22 23 24 25 26 27 28 29 30 31 32 33 34 35 36 37 38 39 40 41 42 43 44 45 46 47 48 49 50 51 52 53 54 55 56 final WindowManagerService mService;final Handler mAnimationHandler = new Handler(AnimationThread.getHandler().getLooper());void scheduleAddStartingWindow () if (!mService.mAnimationHandler.hasCallbacks(mAddStartingWindow)) { mService.mAnimationHandler.postAtFrontOfQueue(mAddStartingWindow); } } private final Runnable mAddStartingWindow = new Runnable() { @Override public void run () final StartingData startingData; final AppWindowToken container; synchronized (mWindowMap) { if (mContainer == null ) { return ; } mService.mAnimationHandler.removeCallbacks(this ); startingData = mContainer.startingData; container = mContainer; } if (startingData == null ) { return ; } StartingSurface surface = startingData.createStartingSurface(container); if (surface != null ) { boolean abort = false ; synchronized (mWindowMap) { if (container.removed || container.startingData == null ) { container.startingWindow = null ; container.startingData = null ; abort = true ; } else { container.startingSurface = surface; } } if (abort) { surface.remove(); } } } }; public abstract class StartingData abstract StartingSurface createStartingSurface (AppWindowToken atoken) }
createStartingSurface是一个抽象方法,具体逻辑根据类型不同交由其两个子类完成。
StartingData.createStartingSurface SnapshotStartingData 1 2 3 4 5 6 7 8 9 10 11 12 13 14 15 16 17 18 19 20 21 22 23 24 25 26 27 28 29 30 31 32 33 34 35 36 37 38 39 40 41 42 class SnapshotStartingData extends StartingData private final WindowManagerService mService; private final TaskSnapshot mSnapshot; @Override StartingSurface createStartingSurface (AppWindowToken atoken) { return mService.mTaskSnapshotController.createStartingSurface(atoken, mSnapshot); } } StartingSurface createStartingSurface (AppWindowToken token, TaskSnapshot snapshot) return TaskSnapshotSurface.create(mService, token, snapshot); } static TaskSnapshotSurface create (WindowManagerService service, AppWindowToken token, TaskSnapshot snapshot) final WindowManager.LayoutParams layoutParams = new WindowManager.LayoutParams(); final Window window = new Window(); final IWindowSession session = WindowManagerGlobal.getWindowSession(); window.setSession(session); layoutParams.type = TYPE_APPLICATION_STARTING; final int res = session.addToDisplay(window, window.mSeq, layoutParams, View.GONE, token.getDisplayContent().getDisplayId(), tmpFrame, tmpRect, tmpRect, tmpRect, tmpCutout, null ); final TaskSnapshotSurface snapshotSurface = new TaskSnapshotSurface(service, window, surface, snapshot, layoutParams.getTitle(), backgroundColor, statusBarColor, navigationBarColor, sysUiVis, windowFlags, windowPrivateFlags, taskBounds, currentOrientation); window.setOuter(snapshotSurface); session.relayout(window, window.mSeq, layoutParams, -1 , -1 , View.VISIBLE, 0 , -1 , tmpFrame, tmpRect, tmpContentInsets, tmpRect, tmpStableInsets, tmpRect, tmpRect, tmpCutout, tmpMergedConfiguration, surface); snapshotSurface.setFrames(tmpFrame, tmpContentInsets, tmpStableInsets); snapshotSurface.drawSnapshot(); return snapshotSurface; }
这里的session是system_server进程中的Binder对象,继承自IWindowSession.Stub。
1 2 3 4 5 6 7 8 9 10 11 12 class Session extends IWindowSession .Stub implements IBinder .DeathRecipient final WindowManagerService mService; @Override public int addToDisplay (IWindow window, int seq, WindowManager.LayoutParams attrs, int viewVisibility, int displayId, Rect outFrame, Rect outContentInsets, Rect outStableInsets, Rect outOutsets, DisplayCutout.ParcelableWrapper outDisplayCutout, InputChannel outInputChannel) return mService.addWindow(this , window, seq, attrs, viewVisibility, displayId, outFrame, outContentInsets, outStableInsets, outOutsets, outDisplayCutout, outInputChannel); } }
最终调用了WMS.addWindow方法来添加Window。
SplashScreenStartingData 1 2 3 4 5 6 7 8 9 10 11 12 13 14 15 16 17 18 19 20 class SplashScreenStartingData extends StartingData private final String mPkg; private final int mTheme; private final CompatibilityInfo mCompatInfo; private final CharSequence mNonLocalizedLabel; private final int mLabelRes; private final int mIcon; private final int mLogo; private final int mWindowFlags; private final Configuration mMergedOverrideConfiguration; @Override StartingSurface createStartingSurface (AppWindowToken atoken) { return mService.mPolicy.addSplashScreen(atoken.token, mPkg, mTheme, mCompatInfo, mNonLocalizedLabel, mLabelRes, mIcon, mLogo, mWindowFlags, mMergedOverrideConfiguration, atoken.getDisplayContent().getDisplayId()); } }
mPolicy是PhoneWindowManager实例:
1 2 3 4 5 6 7 8 9 10 11 12 13 14 15 16 17 18 19 20 21 22 23 24 25 26 27 28 29 30 31 32 33 34 35 36 37 38 39 40 @Override public StartingSurface addSplashScreen (IBinder appToken, String packageName, int theme, CompatibilityInfo compatInfo, CharSequence nonLocalizedLabel, int labelRes, int icon, int logo, int windowFlags, Configuration overrideConfig, int displayId) WindowManager wm = null ; View view = null ; Context context = mContext; final Context displayContext = getDisplayContext(context, displayId); if (displayContext == null ) { return null ; } context = displayContext; if (theme != context.getThemeResId() || labelRes != 0 ) { context = context.createPackageContext(packageName, CONTEXT_RESTRICTED); context.setTheme(theme); } if (overrideConfig != null && !overrideConfig.equals(EMPTY)) { final Context overrideContext = context.createConfigurationContext(overrideConfig); overrideContext.setTheme(theme); final TypedArray typedArray = overrideContext.obtainStyledAttributes(com.android.internal.R.styleable.Window); final int resId = typedArray.getResourceId(R.styleable.Window_windowBackground, 0 ); if (resId != 0 && overrideContext.getDrawable(resId) != null ) { context = overrideContext; } typedArray.recycle(); } final PhoneWindow win = new PhoneWindow(context); win.setIsStartingWindow(true ); win.setType(WindowManager.LayoutParams.TYPE_APPLICATION_STARTING); wm = (WindowManager) context.getSystemService(WINDOW_SERVICE); view = win.getDecorView(); wm.addView(view, params); return view.getParent() != null ? new SplashScreenSurface(view, appToken) : null ; }
销毁流程 AWCC.removeStartingWindow StartingWindow的销毁是通过AppWindowContainerController.removeStartingWindow方法完成的。
1 2 3 4 5 6 7 8 9 10 11 12 13 14 15 16 17 18 19 20 21 22 23 24 25 26 27 28 public void removeStartingWindow () synchronized (mWindowMap) { if (mContainer.startingWindow == null ) { if (mContainer.startingData != null ) { mContainer.startingData = null ; } return ; } final StartingSurface surface; if (mContainer.startingData != null ) { surface = mContainer.startingSurface; mContainer.startingData = null ; mContainer.startingSurface = null ; mContainer.startingWindow = null ; mContainer.startingDisplayed = false ; if (surface == null ) { return ; } } else { return ; } mService.mAnimationHandler.post(() -> { surface.remove(); }); } }
跟创建过程一样,也是在android.anim线程中进行移除的处理,StartingSurface.remove方法是一个接口方法,也是根据不同类型执行不同实现类的remove方法。
StartingSurface.remove TaskSnapshotSurface 1 2 3 4 5 6 7 8 9 10 11 12 13 14 15 16 17 18 19 20 private static final long SIZE_MISMATCH_MINIMUM_TIME_MS = 450 ;@Override public void remove () synchronized (mService.mWindowMap) { final long now = SystemClock.uptimeMillis(); if (mSizeMismatch && now - mShownTime < SIZE_MISMATCH_MINIMUM_TIME_MS) { mHandler.postAtTime(this ::remove, mShownTime + SIZE_MISMATCH_MINIMUM_TIME_MS); return ; } } mSession.remove(mWindow); } @Override public void remove (IWindow window) mService.removeWindow(this , window); }
SplashScreenSurface 1 2 3 4 5 @Override public void remove () final WindowManager wm = mView.getContext().getSystemService(WindowManager.class); wm.removeView(mView); }
小结 可知Starting Window的显示和移除都在android.anim线程中。
Starting Window显示时机是AMS找到Activity信息后,创建activity前,在AMS线程中调用。流程:
AppWindowContainerController.addStartingWindow: 控制是否添加
AppWindowContainerController.scheduleAddStartingWindow: 把添加流程放到android.anim线程中执行
StartingData.createStartingSurface: 根据不同类型使用不同的子类创建窗口
WMS: 完成addView的功能
Starting Window移除时机是activity显示第一帧或者activity异常退出等。流程:
AppWindowContainerController:removeStartingWindow: 把移除流程放到android.anim线程中执行
StartingSurface.remove: 根据不同类型使用不同的子类移除窗口
WMS: 完成removeView的功能
startActivity与Window 在Android-Activity启动流程 中介绍了Activity的启动流程,接下来从Window的角度看看startActivity的流程。
AT.handleLaunchActivity 当Activity所在的进程未创建时,则在创建进程后,会调用到AT.handleLaunchActivity方法:
1 2 3 4 5 6 7 8 9 10 11 12 13 14 15 16 17 18 19 20 21 22 23 24 25 26 27 28 29 30 31 32 public Activity handleLaunchActivity (ActivityClientRecord r, PendingTransactionActions pendingActions, Intent customIntent) WindowManagerGlobal.initialize(); final Activity a = performLaunchActivity(r, customIntent); } public final class WindowManagerGlobal private static IWindowManager sWindowManagerService; public static void initialize () getWindowManagerService(); } public static IWindowManager getWindowManagerService () synchronized (WindowManagerGlobal.class) { if (sWindowManagerService == null ) { sWindowManagerService = IWindowManager.Stub.asInterface( ServiceManager.getService("window" )); try { if (sWindowManagerService != null ) { ValueAnimator.setDurationScale( sWindowManagerService.getCurrentAnimatorScale()); } } catch (RemoteException e) { throw e.rethrowFromSystemServer(); } } return sWindowManagerService; } } }
在AT.performLaunchActivity方法中,会调用到目标Activity的attach和onCreate等方法。
Activity.attach 1 2 3 4 5 6 7 8 9 10 11 12 13 14 15 16 17 18 19 20 21 22 23 24 25 26 27 28 29 30 31 32 33 34 35 final void attach (Context context, ActivityThread aThread, Instrumentation instr, IBinder token, int ident, Application application, Intent intent, ActivityInfo info, CharSequence title, Activity parent, String id, NonConfigurationInstances lastNonConfigurationInstances, Configuration config, String referrer, IVoiceInteractor voiceInteractor, Window window, ActivityConfigCallback activityConfigCallback) attachBaseContext(context); mFragments.attachHost(null ); mWindow = new PhoneWindow(this , window, activityConfigCallback); mWindow.setWindowControllerCallback(this ); mWindow.setCallback(this ); mWindow.setOnWindowDismissedCallback(this ); mWindow.getLayoutInflater().setPrivateFactory(this ); mUiThread = Thread.currentThread(); mMainThread = aThread; mInstrumentation = instr; mToken = token; mApplication = application; mIntent = intent; mReferrer = referrer; mComponent = intent.getComponent(); mActivityInfo = info; mTitle = title; mParent = parent; mWindow.setWindowManager((WindowManager)context.getSystemService(Context.WINDOW_SERVICE), mToken, mComponent.flattenToString(), (info.flags & ActivityInfo.FLAG_HARDWARE_ACCELERATED) != 0 ); if (mParent != null ) { mWindow.setContainer(mParent.getWindow()); } mWindowManager = mWindow.getWindowManager(); }
该方法主要功能是完成以下成员变量的赋值:
mApplication: 当前Activity所属的Application;
mMainThread: ActivityThread对象;
mUiThread: 当前Activity所在的主线程;
mWindow: PhoneWindow实例,继承于Window对象;
mWindowManager: WindowManagerImpl实例,实现WindowManager接口;
mToken: 远程ActivityRecord的appToken的代理端;
Activity.onCreate 1 2 3 4 5 6 7 8 9 10 11 12 13 14 15 16 17 18 19 20 21 22 23 24 25 26 27 28 29 30 31 32 33 34 35 36 37 38 39 40 41 42 43 44 45 46 47 48 49 50 51 52 protected void onCreate (@Nullable Bundle savedInstanceState) super .onCreate(savedInstanceState); setContentView(); } public void setContentView (@LayoutRes int layoutResID) getWindow().setContentView(layoutResID); initWindowDecorActionBar(); } mWindow = new PhoneWindow(this , window, activityConfigCallback); public Window getWindow () return mWindow; } public void setContentView (int layoutResID) if (mContentParent == null ) { installDecor(); } else if (!hasFeature(FEATURE_CONTENT_TRANSITIONS)) { mContentParent.removeAllViews(); } if (hasFeature(FEATURE_CONTENT_TRANSITIONS)) { final Scene newScene = Scene.getSceneForLayout(mContentParent, layoutResID, getContext()); transitionTo(newScene); } else { mLayoutInflater.inflate(layoutResID, mContentParent); } mContentParent.requestApplyInsets(); final Callback cb = getCallback(); if (cb != null && !isDestroyed()) { cb.onContentChanged(); } mContentParentExplicitlySet = true ; } private void installDecor () if (mDecor == null ) { mDecor = generateDecor(-1 ); } else { mDecor.setWindow(this ); } if (mContentParent == null ) { mContentParent = generateLayout(mDecor); } }
generateDecor方法就是创建了一个DecorView对象:
1 2 3 4 5 6 7 8 9 10 11 12 13 14 15 16 17 18 19 protected DecorView generateDecor (int featureId) Context context; if (mUseDecorContext) { Context applicationContext = getContext().getApplicationContext(); if (applicationContext == null ) { context = getContext(); } else { context = new DecorContext(applicationContext, getContext()); if (mTheme != -1 ) { context.setTheme(mTheme); } } } else { context = getContext(); } return new DecorView(context, featureId, this , getAttributes()); }
再看看generateLayout方法:
1 2 3 4 5 6 7 8 9 10 11 12 13 14 15 16 17 18 19 20 21 22 23 24 25 protected ViewGroup generateLayout (DecorView decor) TypedArray a = getWindowStyle(); if (a.getBoolean(R.styleable.Window_windowNoTitle, false )) { requestFeature(FEATURE_NO_TITLE); } else if (a.getBoolean(R.styleable.Window_windowActionBar, false )) { requestFeature(FEATURE_ACTION_BAR); } int layoutResource; int features = getLocalFeatures(); layoutResource = R.layout.screen_custom_title; layoutResource = R.layout.screen_simple; mDecor.startChanging(); mDecor.onResourcesLoaded(mLayoutInflater, layoutResource); ViewGroup contentParent = (ViewGroup)findViewById(ID_ANDROID_CONTENT); mDecor.setWindowBackground(background); mDecor.finishChanging(); return contentParent; }
通过以上流程可以知道Activity中通过setContentView设置的布局实际是加载到DecorView中id为com.android.internal.R.id.content的View中。随便找一个DecorView主题的布局,发现都有这个id的容器,且是FrameLayout:
1 2 3 4 5 6 7 8 9 10 11 12 13 14 15 16 17 18 19 20 21 22 23 24 25 <LinearLayout xmlns:android ="http://schemas.android.com/apk/res/android" android:orientation ="vertical" android:fitsSystemWindows ="true" > <ViewStub android:id ="@+id/action_mode_bar_stub" android:inflatedId ="@+id/action_mode_bar" android:layout ="@layout/action_mode_bar" android:layout_width ="match_parent" android:layout_height ="wrap_content" android:theme ="?attr/actionBarTheme" /> <FrameLayout android:id ="@android:id/title_container" android:layout_width ="match_parent" android:layout_height ="?android:attr/windowTitleSize" android:transitionName ="android:title" style ="?android:attr/windowTitleBackgroundStyle" > </FrameLayout > <FrameLayout android:id ="@android:id/content" android:layout_width ="match_parent" android:layout_height ="0dip" android:layout_weight ="1" android:foregroundGravity ="fill_horizontal|top" android:foreground ="?android:attr/windowContentOverlay" /> </LinearLayout >
AT.handleResumeActivity 1 2 3 4 5 6 7 8 9 10 public void handleResumeActivity (IBinder token, boolean finalStateRequest, boolean isForward, String reason) final ActivityClientRecord r = performResumeActivity(token, finalStateRequest, reason); final Activity a = r.activity; if (!r.activity.mFinished && willBeVisible && r.activity.mDecor != null && !r.hideForNow) { mNumVisibleActivities++; if (r.activity.mVisibleFromClient) { r.activity.makeVisible(); } } }
performResumeActivity方法会调用到目标Activity的onResume方法,接下来看看Activity.makeVisible方法:
1 2 3 4 5 6 7 8 9 void makeVisible () if (!mWindowAdded) { ViewManager wm = getWindowManager(); wm.addView(mDecor, getWindow().getAttributes()); mWindowAdded = true ; } mDecor.setVisibility(View.VISIBLE); }
其中mDecor是Activity.setContentView创建的View对象,wm是WindowManagerImpl实例对象,具体实现逻辑在下章讲解。
小结 当从Window的角度看待Activity的启动过程时,可以看到以下流程:
在system_server进程中发送消息到android.anim线程来处理Starting Window逻辑;
在目标进程中,执行AT.handleLaunchActivity方法,会回调目标Activity的onCreate方法,同时初始化一些与Window相关的对象或服务端的Binder引用,然后通过setContentView方法创建一个DecorView对象;
在目标进程中,执行AT.handleResumeActivity方法,会回调目标Activity的onResume方法,然后调用目标Activity的makeVisible方法;
在makeVisible方法中,会调用WindowManagerImpl.addView方法绘制View,并通过Binder远程调用WMS添加Window。
Window内部机制 概述 Window是所有视图的载体,如Activity,Dialog和Toast的视图,我们想要对Window进行添加和删除就要通过WindowManager来操作,而WindowManager就是通过Binder与WindowManagerService进行跨进程通信,把具体的实现工作交给WindowManagerService。
Window Window在Android开发中是一个窗口的概念,它是一个抽象类,如下:
1 2 3 4 5 6 7 8 9 10 11 12 13 14 15 16 17 18 19 20 public abstract class Window public static final int FEATURE_OPTIONS_PANEL = 0 ; public static final int FEATURE_NO_TITLE = 1 ; public final boolean isActive () return mIsActive; } public <T extends View> T findViewById (@IdRes int id) { return getDecorView().findViewById(id); } public abstract void setContentView (@LayoutRes int layoutResID) public abstract void setContentView (View view) public abstract void setContentView (View view, ViewGroup.LayoutParams params) public abstract void addContentView (View view, ViewGroup.LayoutParams params) public abstract void clearContentView () public abstract View getDecorView () }
每一个Activity都包含一个Window对象,而Window是一个抽象类,具体实现是PhoneWindow。
当我们调用Activity的setContentView时,其实最终会调用Window的setContentView,当我们调用Activity的findViewById时,其实最终调用的是Window的findViewById。
Window是View的直接管理者,但是Window并不是真实存在的,它更多的表示一种抽象的功能集合,View才是Android中的视图呈现形式,绘制到屏幕上的是View不是Window,但是View不能单独存在,它必须依附在Window这个抽象的概念上面。
Android中需要依赖Window提供视图的有Activity,Dialog,Toast,PopupWindow,StatusBarWindow(系统状态栏),输入法窗口等,因此Activity,Dialog等视图都对应着一个Window。
PhoneWindow 在PhoneWindow中有一个顶级View—DecorView,继承自FrameLayout,可以通过getDecorView()获得它。
DecorView 1 2 3 public class DecorView extends FrameLayout implements RootViewSurfaceTaker , WindowCallbacks }
作为顶级View,DecorView一般情况下内部包含一个竖直方向的LinearLayout,上面的标题栏(titleBar),下面是内容栏。通常我们在Activity中通过setContentView所设置的布局文件就是被加载到id为android.R.id.content的内容栏里(FrameLayout)。
Window的类型与层级 1 2 3 4 5 6 7 8 9 10 11 12 13 14 15 16 17 18 19 20 21 22 23 24 25 26 27 28 29 30 public interface WindowManager extends ViewManager public static class LayoutParams extends ViewGroup .LayoutParams implements Parcelable public static final int FIRST_APPLICATION_WINDOW = 1 ; public static final int TYPE_BASE_APPLICATION = 1 ; public static final int TYPE_APPLICATION = 2 ; public static final int TYPE_APPLICATION_STARTING = 3 ; public static final int TYPE_DRAWN_APPLICATION = 4 ; public static final int LAST_APPLICATION_WINDOW = 99 ; public static final int FIRST_SUB_WINDOW = 1000 ; public static final int TYPE_APPLICATION_PANEL = FIRST_SUB_WINDOW; public static final int TYPE_APPLICATION_MEDIA = FIRST_SUB_WINDOW + 1 ; public static final int TYPE_APPLICATION_SUB_PANEL = FIRST_SUB_WINDOW + 2 ; public static final int TYPE_APPLICATION_ATTACHED_DIALOG = FIRST_SUB_WINDOW + 3 ; public static final int TYPE_APPLICATION_MEDIA_OVERLAY = FIRST_SUB_WINDOW + 4 ; public static final int TYPE_APPLICATION_ABOVE_SUB_PANEL = FIRST_SUB_WINDOW + 5 ; public static final int LAST_SUB_WINDOW = 1999 ; public static final int FIRST_SYSTEM_WINDOW = 2000 ; public static final int TYPE_STATUS_BAR = FIRST_SYSTEM_WINDOW; public static final int TYPE_SEARCH_BAR = FIRST_SYSTEM_WINDOW+1 ; public static final int TYPE_PHONE = FIRST_SYSTEM_WINDOW+2 ; public static final int LAST_SYSTEM_WINDOW = 2999 ; } }
LayoutParams中以TYPE开头的值有很多,但总体可以分为3类:
应用程序窗口:type值范围是1~99,Activity就是一个典型的应用程序窗口,type值是TYPE_BASE_APPLICATION,WindowManager的LayoutParams默认type值是TYPE_APPLICATION。
子窗口:type值范围是1000~1999,PupupWindow就是一个典型的子窗口,type值是TYPE_APPLICATION_PANEL,子窗口不能独立存在,必须依附于父窗口。
系统窗口:type值范围是2000~2999,系统窗口的类型很多,上面并没有全部列举出来,系统状态栏就是一个典型的系统窗口,type值是TYPE_STATUS_BAR,与应用程序窗口不同的是,系统窗口的创建是需要声明权限的。
type值决定了决定了Window显示的层级(z-ordered),即在屏幕Z轴方向的显示次序,一般情况下type值越大,则窗口显示的越靠前,在Window的3种类型中,应用程序窗口的层级范围是199,子窗口的层级范围是10001999,系统窗口的层级范围是2000~2999,层级范围对应着type值,如果想要Window位于所有的Window上,采用较大的层级即可(权限!)。
Window的属性 Window的类型flag同样被定义在WindowManager中的静态内部类LayoutParams中,如下:
1 2 3 4 5 6 7 8 9 10 11 12 13 public interface WindowManager extends ViewManager public static class LayoutParams extends ViewGroup .LayoutParams implements Parcelable public static final int FLAG_ALLOW_LOCK_WHILE_SCREEN_ON = 0x00000001 ; public static final int FLAG_DIM_BEHIND = 0x00000002 ; public static final int FLAG_BLUR_BEHIND = 0x00000004 ; public static final int FLAG_NOT_FOCUSABLE = 0x00000008 ; public static final int FLAG_NOT_TOUCHABLE = 0x00000010 ; public static final int FLAG_NOT_TOUCH_MODAL = 0x00000020 ; public static final int FLAG_KEEP_SCREEN_ON = 0x00000080 ; } }
LayoutParams中定义的flag属性同样很多,这里挑几个常见的讲解:
FLAG_ALLOW_LOCK_WHILE_SCREEN_ON:只要窗口对用户可见,就允许在屏幕开启状态下锁屏。
FLAG_KEEP_SCREEN_ON: 只要窗口对用户可见,屏幕就一直亮着。
FLAG_SHOW_WHEN_LOCKED:窗口可以在锁屏的界面上显示。
FLAG_NOT_FOCUSABLE:窗口不能获取焦点,也不能接受任何输入事件,此标志同时会启用FLAG_NOT_TOUCH_MODAL,最终事件会直接传递给下层的具有焦点的窗口。
FLAG_NOT_TOUCH_MODAL:当前窗口区域以外的触摸事件会传递给底层的窗口,当前窗口区域内的触摸事件则自己处理,一般来说都要开启此标记,否则其他Window将无法收到点击事件。
FLAG_NOT_TOUCHABLE:窗口不接收任何触摸事件。
LayoutParams中的type和flag非常重要,可以控制Window的显示特性。
WindowManager WindowManager是一个接口,里面常用的方法有:添加View,更新View和删除View,WindowManager继承自ViewManager,这三个方法定义在ViewManager中,如下:
1 2 3 4 5 public interface ViewManager public void addView (View view, ViewGroup.LayoutParams params) public void updateViewLayout (View view, ViewGroup.LayoutParams params) public void removeView (View view) }
可以看到这些方法传入的参数是View,不是Window,说明WindowManager管理的是Window中的View,我们通过WindowManager操作Window就是在操作Window中的View。WindowManager的具体实现类是WindowManagerImp,我们看一下相应方法的实现,如下:
1 2 3 4 5 6 7 8 9 10 11 12 13 14 15 16 17 18 19 20 21 22 23 24 25 26 27 28 29 30 31 32 33 34 35 36 WindowManager wm = (WindowManager) context.getSystemService(WINDOW_SERVICE); public final class WindowManagerImpl implements WindowManager private final WindowManagerGlobal mGlobal = WindowManagerGlobal.getInstance(); private final Context mContext; private final Window mParentWindow; private IBinder mDefaultToken; public WindowManagerImpl (Context context) this (context, null ); } private WindowManagerImpl (Context context, Window parentWindow) mContext = context; mParentWindow = parentWindow; } @Override public void addView (@NonNull View view, @NonNull ViewGroup.LayoutParams params) applyDefaultToken(params); mGlobal.addView(view, params, mContext.getDisplay(), mParentWindow); } @Override public void updateViewLayout (@NonNull View view, @NonNull ViewGroup.LayoutParams params) applyDefaultToken(params); mGlobal.updateViewLayout(view, params); } @Override public void removeView (View view) mGlobal.removeView(view, false ); } }
可以看到WindowManagerImp也没有做什么,它把3个方法的操作都委托给了WindowManagerGlobal单例类,mParentWindow是Window类型,是从构造中被传入,所以WindowManager会持有Window的引用,这样WindowManager就可以对Window做操作了。
然后通过WMS在客户端的Binder代理获得Session代理,建立起与WMS的通信的桥梁,然后WindowManager就间接的通过Session向WMS发起显示窗口视图的请求,WMS会向应用返回和窗口交互的信息。
WindowManagerService WindowManagerService是一个系统级服务,由SystemService启动,实现了IWindowManager.AIDL接口,运行在system_server进程。
WindowManager.addView WMI.addView 1 2 3 4 5 6 7 8 9 10 11 12 13 14 15 16 17 18 19 20 21 22 private final WindowManagerGlobal mGlobal = WindowManagerGlobal.getInstance();@Override public void addView (@NonNull View view, @NonNull ViewGroup.LayoutParams params) applyDefaultToken(params); mGlobal.addView(view, params, mContext.getDisplay(), mParentWindow); } public void addView (View view, ViewGroup.LayoutParams params, Display display, Window parentWindow) final WindowManager.LayoutParams wparams = (WindowManager.LayoutParams) params; ViewRootImpl root = new ViewRootImpl(view.getContext(), display); view.setLayoutParams(wparams); mViews.add(view); mRoots.add(root); mParams.add(wparams); root.setView(view, wparams, panelParentView); }
ViewRootImpl.setView 1 2 3 4 5 6 7 8 9 10 11 12 13 14 15 16 17 18 19 20 21 22 23 24 25 26 27 28 29 30 31 32 33 34 35 36 37 38 39 40 41 42 43 44 45 46 47 48 49 50 51 52 53 54 55 56 57 58 59 60 61 62 63 64 65 66 67 68 69 70 71 72 final ViewRootHandler mHandler = new ViewRootHandler();public ViewRootImpl (Context context, Display display) mContext = context; mWindowSession = WindowManagerGlobal.getWindowSession(); mDisplay = display; mThread = Thread.currentThread(); mWindow = new W(this ); mAttachInfo = new View.AttachInfo(mWindowSession, mWindow, display, this , mHandler, this , context); mChoreographer = Choreographer.getInstance(); } public void setView (View view, WindowManager.LayoutParams attrs, View panelParentView) synchronized (this ) { if (mView == null ) { mView = view; mAttachInfo.mRootView = view; } requestLayout(); es = mWindowSession.addToDisplay(mWindow, mSeq, mWindowAttributes, getHostVisibility(), mDisplay.getDisplayId(), mWinFrame, mAttachInfo.mContentInsets, mAttachInfo.mStableInsets, mAttachInfo.mOutsets, mAttachInfo.mDisplayCutout, mInputChannel); } } public static IWindowSession getWindowSession () synchronized (WindowManagerGlobal.class) { if (sWindowSession == null ) { InputMethodManager imm = InputMethodManager.getInstance(); IWindowManager windowManager = getWindowManagerService(); sWindowSession = windowManager.openSession(new IWindowSessionCallback.Stub() { @Override public void onAnimatorScaleChanged (float scale) ValueAnimator.setDurationScale(scale); } }, imm.getClient(), imm.getInputContext()); } return sWindowSession; } } public IWindowSession openSession (IWindowSessionCallback callback, IInputMethodClient client, IInputContext inputContext) if (client == null ) throw new IllegalArgumentException("null client" ); if (inputContext == null ) throw new IllegalArgumentException("null inputContext" ); Session session = new Session(this , callback, client, inputContext); return session; } @Override public int addToDisplay (IWindow window, int seq, WindowManager.LayoutParams attrs, int viewVisibility, int displayId, Rect outFrame, Rect outContentInsets, Rect outStableInsets, Rect outOutsets, DisplayCutout.ParcelableWrapper outDisplayCutout, InputChannel outInputChannel) return mService.addWindow(this , window, seq, attrs, viewVisibility, displayId, outFrame, outContentInsets, outStableInsets, outOutsets, outDisplayCutout, outInputChannel); }
ViewRootImpl.requestLayout 1 2 3 4 5 6 7 8 9 10 11 12 13 14 15 16 17 18 19 20 21 22 23 24 25 26 27 28 29 30 31 32 33 34 35 36 37 38 39 40 41 42 43 44 45 46 47 48 49 50 51 52 53 54 55 public void requestLayout () if (!mHandlingLayoutInLayoutRequest) { checkThread(); mLayoutRequested = true ; scheduleTraversals(); } } void checkThread () if (mThread != Thread.currentThread()) { throw new CalledFromWrongThreadException("Only the original thread that created a view hierarchy can touch its views." ); } } final ViewRootHandler mHandler = new ViewRootHandler();void scheduleTraversals () if (!mTraversalScheduled) { mTraversalScheduled = true ; mTraversalBarrier = mHandler.getLooper().getQueue().postSyncBarrier(); mChoreographer.postCallback(Choreographer.CALLBACK_TRAVERSAL, mTraversalRunnable, null ); if (!mUnbufferedInputDispatch) { scheduleConsumeBatchedInput(); } notifyRendererOfFramePending(); pokeDrawLockIfNeeded(); } } final class TraversalRunnable implements Runnable @Override public void run () doTraversal(); } } final TraversalRunnable mTraversalRunnable = new TraversalRunnable();void doTraversal () if (mTraversalScheduled) { mTraversalScheduled = false ; mHandler.getLooper().getQueue().removeSyncBarrier(mTraversalBarrier); performTraversals(); } } private void performTraversals () performMeasure(); performLayout(); performDraw(); }
WMS.addWindow 1 2 3 4 5 6 7 8 9 10 11 12 13 14 15 16 17 18 19 20 21 22 23 24 25 26 27 28 29 30 31 32 33 34 35 36 37 38 39 40 41 42 43 44 45 46 47 public int addWindow (Session session, IWindow client, int seq, LayoutParams attrs, int viewVisibility, int displayId, Rect outFrame, Rect outContentInsets, Rect outStableInsets, Rect outOutsets, DisplayCutout.ParcelableWrapper outDisplayCutout, InputChannel outInputChannel) int res = mPolicy.checkAddPermission(attrs, appOp); if (res != WindowManagerGlobal.ADD_OKAY) { return res; } synchronized (mWindowMap) { if (mWindowMap.containsKey(client.asBinder())) { Slog.w(TAG_WM, "Window " + client + " is already added" ); return WindowManagerGlobal.ADD_DUPLICATE_ADD; } if (type >= FIRST_SUB_WINDOW && type <= LAST_SUB_WINDOW) { parentWindow = windowForClientLocked(null , attrs.token, false ); if (parentWindow == null ) { Slog.w(TAG_WM, "Attempted to add window with token that is not a window: " + attrs.token + ". Aborting." ); return WindowManagerGlobal.ADD_BAD_SUBWINDOW_TOKEN; } if (parentWindow.mAttrs.type >= FIRST_SUB_WINDOW && parentWindow.mAttrs.type <= LAST_SUB_WINDOW) { Slog.w(TAG_WM, "Attempted to add window with token that is a sub-window: " + attrs.token + ". Aborting." ); return WindowManagerGlobal.ADD_BAD_SUBWINDOW_TOKEN; } } AppWindowToken atoken = null ; final boolean hasParent = parentWindow != null ; WindowToken token = displayContent.getWindowToken(hasParent ? parentWindow.mAttrs.token : attrs.token); if (token == null ) { } final WindowState win = new WindowState(this , session, client, token, parentWindow, appOp[0 ], seq, attrs, viewVisibility, session.mUid, session.mCanAddInternalSystemWindow); win.attach(); mWindowMap.put(client.asBinder(), win); boolean focusChanged = false ; if (win.canReceiveKeys()) { focusChanged = updateFocusedWindowLocked(UPDATE_FOCUS_WILL_ASSIGN_LAYERS, false ); if (focusChanged) { imMayMove = false ; } } } return res; }
下面看看WindowState的构造方法:
1 2 3 4 5 6 7 8 9 10 11 12 13 14 15 16 17 18 WindowState(WindowManagerService service, Session s, IWindow c, WindowToken token, WindowState parentWindow, int appOp, int seq, WindowManager.LayoutParams a, int viewVisibility, int ownerId, boolean ownerCanAddInternalSystemWindow, PowerManagerWrapper powerManagerWrapper) { super (service); mSession = s; mClient = c; mToken = token; mAppToken = mToken.asAppWindowToken(); mOwnerUid = ownerId; DeathRecipient deathRecipient = new DeathRecipient(); c.asBinder().linkToDeath(deathRecipient, 0 ); mDeathRecipient = deathRecipient; }
WindowState对象创建后,会调用其attach方法:
1 2 3 4 5 6 7 8 9 10 11 12 13 14 15 16 17 18 19 20 21 22 23 24 25 26 27 28 29 30 void attach () mSession.windowAddedLocked(mAttrs.packageName); } void windowAddedLocked (String packageName) mPackageName = packageName; if (mSurfaceSession == null ) { mSurfaceSession = new SurfaceSession(); mService.mSessions.add(this ); if (mLastReportedAnimatorScale != mService.getCurrentAnimatorScale()) { mService.dispatchNewAnimatorScaleLocked(this ); } } mNumWindow++; } public SurfaceSession () mNativeClient = nativeCreate(); } static jlong nativeCreate (JNIEnv* env, jclass clazz) SurfaceComposerClient* client = new SurfaceComposerClient(); client->incStrong((void *)nativeCreate); return reinterpret_cast<jlong>(client); }
小结
首先通过context.getSystemService(WINDOW_SERVICE)方法获取WindowManagerImpl实例,然后调用WindowManagerImpl.addView方法;
WindowManagerImpl.addView方法创建了ViewRootImpl对象,然后调用其setView方法;
在ViewRootImpl.setView方法中,先通过requestLayout方法绘制View,然后通过Binder调用到system_server进程中WMS的Session.addToDisplay方法,进一步调用WMS.addWindow方法;
在WMS.addWindow方法中创建了WindowState对象,然后使用updateFocusedWindowLocked来更新聚焦窗口情况。
WindowManager.updateViewLayout WMI.updateViewLayout 1 2 3 4 5 6 7 8 9 10 11 12 13 14 15 16 17 18 19 20 21 22 @Override public void updateViewLayout (@NonNull View view, @NonNull ViewGroup.LayoutParams params) applyDefaultToken(params); mGlobal.updateViewLayout(view, params); } public void updateViewLayout (View view, ViewGroup.LayoutParams params) final WindowManager.LayoutParams wparams = (WindowManager.LayoutParams)params; view.setLayoutParams(wparams); synchronized (mLock) { int index = findViewLocked(view, true ); ViewRootImpl root = mRoots.get(index); mParams.remove(index); mParams.add(index, wparams); root.setLayoutParams(wparams, false ); } }
ViewRootImpl.setLayoutParams 1 2 3 4 5 6 7 8 9 10 void setLayoutParams (WindowManager.LayoutParams attrs, boolean newView) synchronized (this ) { if (newView) { mSoftInputMode = attrs.softInputMode; requestLayout(); } scheduleTraversals(); } }
WindowManager.removeView WMI.removeView 1 2 3 4 5 6 7 8 9 10 11 12 13 14 15 16 17 18 19 20 21 22 23 24 25 26 27 28 29 30 31 32 33 34 35 36 37 38 39 40 41 42 43 44 @Override public void removeView (View view) mGlobal.removeView(view, false ); } public void removeView (View view, boolean immediate) if (view == null ) { throw new IllegalArgumentException("view must not be null" ); } synchronized (mLock) { int index = findViewLocked(view, true ); View curView = mRoots.get(index).getView(); removeViewLocked(index, immediate); if (curView == view) { return ; } throw new IllegalStateException("Calling with view " + view + " but the ViewAncestor is attached to " + curView); } } private void removeViewLocked (int index, boolean immediate) ViewRootImpl root = mRoots.get(index); View view = root.getView(); if (view != null ) { InputMethodManager imm = InputMethodManager.getInstance(); if (imm != null ) { imm.windowDismissed(mViews.get(index).getWindowToken()); } } boolean deferred = root.die(immediate); if (view != null ) { view.assignParent(null ); if (deferred) { mDyingViews.add(view); } } }
ViewRootImpl.die 1 2 3 4 5 6 7 8 9 10 11 12 13 14 15 16 17 18 19 20 21 22 23 24 25 26 27 28 29 30 31 32 33 34 35 36 37 38 39 40 41 42 43 44 45 46 47 48 49 50 51 52 53 54 55 56 57 58 59 60 61 62 63 64 65 66 67 68 69 70 71 72 73 74 boolean die (boolean immediate) if (immediate && !mIsInTraversal) { doDie(); return false ; } if (!mIsDrawing) { destroyHardwareRenderer(); } mHandler.sendEmptyMessage(MSG_DIE); return true ; } @Override public void handleMessage (Message msg) switch (msg.what) { case MSG_DIE: doDie(); break ; } } void doDie () checkThread(); synchronized (this ) { if (mRemoved) { return ; } mRemoved = true ; if (mAdded) { dispatchDetachedFromWindow(); } if (mAdded && !mFirst) { destroyHardwareRenderer(); if (mView != null ) { int viewVisibility = mView.getVisibility(); boolean viewVisibilityChanged = mViewVisibility != viewVisibility; if (mWindowAttributesChanged || viewVisibilityChanged) { if ((relayoutWindow(mWindowAttributes, viewVisibility, false ) & WindowManagerGlobal.RELAYOUT_RES_FIRST_TIME) != 0 ) { mWindowSession.finishDrawing(mWindow); } } mSurface.release(); } } mAdded = false ; } WindowManagerGlobal.getInstance().doRemoveView(this ); } void doRemoveView (ViewRootImpl root) synchronized (mLock) { final int index = mRoots.indexOf(root); if (index >= 0 ) { mRoots.remove(index); mParams.remove(index); final View view = mViews.remove(index); mDyingViews.remove(view); } } if (ThreadedRenderer.sTrimForeground && ThreadedRenderer.isAvailable()) { doTrimForeground(); } }
接着到了dispatchDetachedFromWindow方法:
1 2 3 4 5 6 7 8 9 10 11 12 13 14 15 16 17 18 19 20 21 22 23 24 25 26 27 28 29 30 31 32 33 34 35 36 37 38 39 40 41 42 43 44 void dispatchDetachedFromWindow () mFirstInputStage.onDetachedFromWindow(); if (mView != null && mView.mAttachInfo != null ) { mAttachInfo.mTreeObserver.dispatchOnWindowAttachedChange(false ); mView.dispatchDetachedFromWindow(); } mAccessibilityInteractionConnectionManager.ensureNoConnection(); mAccessibilityManager.removeAccessibilityStateChangeListener( mAccessibilityInteractionConnectionManager); mAccessibilityManager.removeHighTextContrastStateChangeListener( mHighContrastTextManager); removeSendWindowContentChangedCallback(); destroyHardwareRenderer(); setAccessibilityFocus(null , null ); mView.assignParent(null ); mView = null ; mAttachInfo.mRootView = null ; mSurface.release(); if (mInputQueueCallback != null && mInputQueue != null ) { mInputQueueCallback.onInputQueueDestroyed(mInputQueue); mInputQueue.dispose(); mInputQueueCallback = null ; mInputQueue = null ; } if (mInputEventReceiver != null ) { mInputEventReceiver.dispose(); mInputEventReceiver = null ; } mWindowSession.remove(mWindow); if (mInputChannel != null ) { mInputChannel.dispose(); mInputChannel = null ; } mDisplayManager.unregisterDisplayListener(mDisplayListener); unscheduleTraversals(); }
WMS.removeWindow 1 2 3 4 5 6 7 8 9 10 11 12 13 14 15 16 17 @Override public void remove (IWindow window) mService.removeWindow(this , window); } void removeWindow (Session session, IWindow client) synchronized (mWindowMap) { WindowState win = windowForClientLocked(session, client, false ); if (win == null ) { return ; } win.removeIfPossible(); } }
ViewRootImpl.checkThread 众所周知只能在主线程中操作UI,否则会出现崩溃:Only the original thread that created a view hierarchy can touch its views.。原因就在于 ViewRootImpl.checkThread 方法中有限制只能在当前线程操作UI:
1 2 3 4 5 6 7 8 9 10 11 12 13 public ViewRootImpl (Context context, Display display) mContext = context; mWindowSession = WindowManagerGlobal.getWindowSession(); mThread = Thread.currentThread(); } void checkThread () if (mThread != Thread.currentThread()) { throw new CalledFromWrongThreadException( "Only the original thread that created a view hierarchy can touch its views." ); } }
这里的 mThread 便是在创建 ViewRootImpl 实例时所在的主线程。而在操作UI时,都会先调用 checkThread 方法去检测线程的合法性,否则抛出异常。我们知道 ViewRootImpl 的实例化在 Activity.onResume 后面,因此如果我们这样调用则可以在子线程中操作UI而不会崩溃:
1 2 3 4 5 6 7 8 9 10 11 12 13 14 15 public class MainActivity extends AppCompatActivity @Override protected void onCreate (Bundle savedInstanceState) super .onCreate(savedInstanceState); setContentView(R.layout.activity_main); final TextView view = findViewById(R.id.text_view); new Thread(new Runnable() { @Override public void run () view.setText("test" ); } }).start(); } }
因为这个时候 ViewRootImpl 还没有被实例化,因此不会崩溃。如果延时一会儿再去调用setText,则会崩溃。